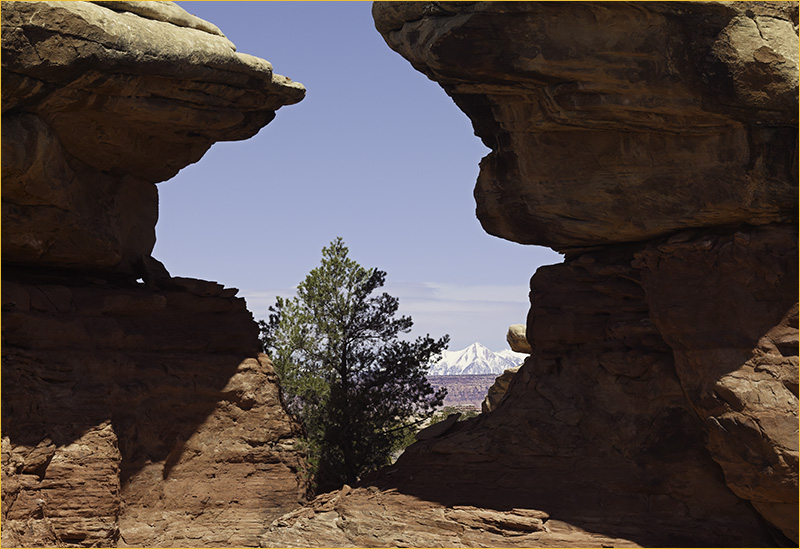
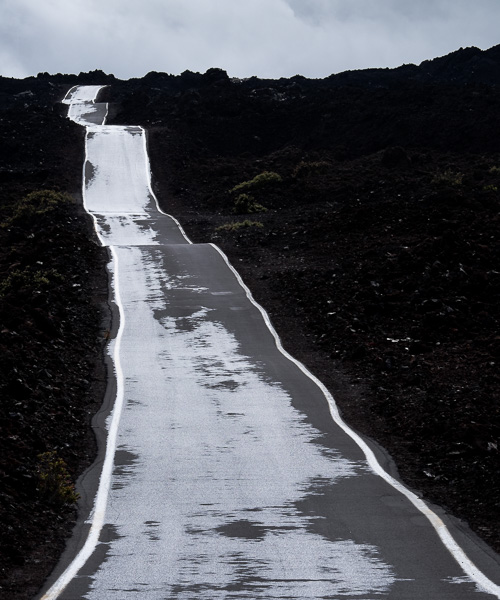
Through the Rocks
ALPA SWA, IQ 180 Back at ISO 100, Rodenstock APO Digaron 180 mm lens
(Notice that in spite of the long focal length, perfect focus was achieved from the near point all the way to infinity using the focus confirmation tool in the IQ 180)
Introduction
I had the great pleasure of spending last week photographing in the Canyons of Utah with a group of close friends. There are few things in life I enjoy more than spending time with good friends, in a beautiful place and taking pictures to boot.
Michael Reichmann and Chris Sanderson were part of the group, and we were lucky that Kevin Raber, VP; and Claus Mølgaard, President of R&D and Chief Technical Officer of PhaseOne also joined us. Claus made a special effort to procure three full production IQ 180 backs that he personally brought with him on his flight from Denmark. Therefore, I am glad to report that Michael and I were lucky enough to be able to test three of the first full production IQ 180 backs in the field, while standing next to the person that actually designed the device.
This allowed for an extremely valuable exchange of ideas that I know greatly benefited both, the company as well as photographers that will use this back, because we discussed extensively future features and firmware improvements based on our field use. We also discovered some small glitches that by the time you read this will have been fixed.
A further bonus is that Chris Sanderson was able to document the entire experience shooting video.
I would like to emphasize that this trip was neither organized nor sponsored by PhaseOne. It just so happens that like the six planets that are currently aligned (a rare astronomical occurrence), the production release of the new IQ 180 backs coincided with a personal trip we had scheduled long ago. We had a variety of cameras in the group; three people were shooting with Leicas (S2 and M9), one person was shooting with a Pentax Medium Format DSLR, one person had a Nikon D3X system, etc.
I also need to emphasize that while I make no secret that I have great admiration for Claus, and that both Kevin and Claus have become friends over the years, this in no way clouds or biases my judgement about PhaseOne.
As a photographer, educator and journalist, I meet many people in the industry and invariably over the years a number of them become friends. However, when it comes to writing, publishing or rendering opinions, I always remain dispassionate, objective and neutral. No one can buy me, and if anyone ever tried, they would immediately stop being my friend.
OK, now that I have made that disclosure, let’s proceed with the review.
Since Michael and I were shooting with ALPA cameras (Kevin and Claus brought PhaseOne DF cameras, but Michael and I did not use them) the first thing we did was shim the ALPA back adapters to the respective IQ 180 backs. The process revealed as usual, that differences as small as 1/100th of a millimeter are quite visible in the images, and properly shimming the back adapter in an ALPA produces sharper images than cameras that cannot be shimmed.
I must mention that it appears that PhaseOne has tightened their manufacturing tolerances. We shimmed three IQ 180 backs to cameras that were previously shimmed for older P65+ backs, and we found that one back needed a change of 1/100th of a millimeter, the second back needed a change of 2/100th of a millimeter, while the third back needed no adjustment at all. This is quite impressive.
For those of you interested in how shimming is done, you canwatch the process in this video.
It Is Not All About Megapixels!
No matter how much I keep repeating this message, it seems to be quite hard to transmit, so at the risk of being repetitive, here I go again:
It is not all about Megapixels!
There is a lot more to image quality and a lot more to photography than one number. The Megapixel count hardly begins to tell the story.
With the introduction of the first production PhaseOne IQ 180 backs, no doubt lots of reports will be written. Many of them will concentrate on the number of Megapixels, resolution figures, etc. This is all fine, and I am not trying to diminish its importance. Does the IQ 180 have more resolution than prior backs? Of course it does. Does it have better technical specifications? Of course it does.
No doubt the techies and the pixel peepers will rejoice picking at these figures ad nauseum (No offense intended to either group. I used to be a proud member of both).
On the other hand, the world of photography is not all about Megapixels, and my first week shooting with a production IQ 180 back mounted on an ALPA SWA in Moab Utah is poignantly not an experience about Megapixels and specifications.
I would describe the experience as my introduction to “Thoughtful Photography”.

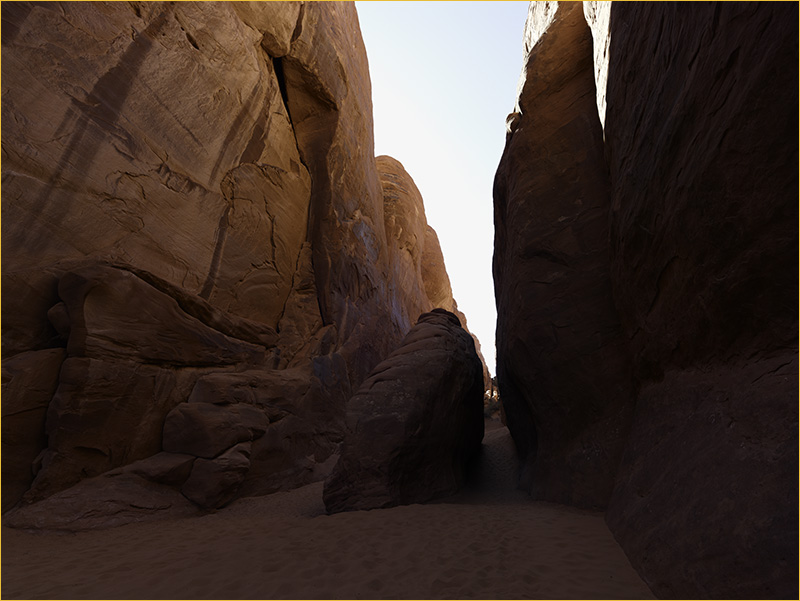
Rocks Inside Canyon
ALPA SWA, IQ 180 Back at ISO 35, Schneider 35 mm APO Digitar XL lens
Thoughtful Photography
Before traveling to Utah, I decided that I wanted to test the IQ 180 on a technical camera. I chose the ALPA SWA which is still my favorite camera for this type of field use. As soon as I started using the two devices together, a transformation occurred.
If you read my prior articles on this site about ALPA equipment, about my experience with the pre-production PhaseOne IQ 180 back, and about how equipment affects creativity, you will find that I am very favorably inclined to the ALPA gear and the IQ 180 backs. The main reason is that they are pieces of equipment that have been carefully thought out by people who are themselves passionate about photography. They are not designed by a group of optical or mechanical engineers embedded in a large company in the consumer business, but rather by individuals that have an understanding of image making, how photographers work, and they really care about the tools they are building. They are also built with extreme care and maximum possible quality every step of the way.
The result of all this is that it makes the photographer more thoughtful and more precise, or at least that was the effect it had on me. The equipment seemed to “sing together” and to “sing with me”. It felt like total synergy between camera, digital back and photographer. A certain rhythm was established, the workflow was completely natural and things just gelled together in a way I had not experienced before.
I was experiencing something new, and for lack of a better term, I call it “Thoughtful Photography“.
A New Era For Technical Cameras
Let’s face it, technical cameras can be a real pain in the butt. Up until now, one has had to contend with focusing cloths, loupes, groundglasses, taking the back on and off or suffering through one of those awful sliding backs, and a bunch of other pieces of gear. Frankly, as the groundglass got smaller and smaller, from 8×10 to 4×5 and now to Medium Format, the task of focusing on the groundglass and making ever smaller adjustments to the camera standards became much more difficult and much less fun. Yet, the main reason to use these cameras remained intact, and it is that in spite of the pain and hassles, the complete control over the image and the increase in image quality is worth the extra effort.
With the combination of the IQ 180 and an ALPA, all of that extra effort is a thing of the past. The technical camera has finally come of age and become a practical instrument that does not feel like a pain in the butt to use half the time. Quite the contrary, it is light, easy to use and fast!
In fact, I am pleased to report that for me, the groundglass is obsolete. No more taking the back on and off the camera, no more sliding backs with all their problems, no more focusing on the groundglass.
But, before getting into the details, I need to mention a few things about the IQ 180 back in terms of how the production unit differs from the pre-production unit I tested before.
The Good, the Bad and The Ugly
Let’s get the bad out of the way first: Initial production IQ 180 backs are being delivered without Live View implemented. Live View will be added in an upcoming firmware update scheduled for June. So, as much as I anticipated being able to test this feature, it was not to be.
Now for the good: I was surprised that even without Live View, I never needed a groundglass. This is because the focus confirmation feature (analogous to focus confirmation in CaptureOne) is enabled, and works so well that I had complete confidence in what I was doing. The image files clearly show that focus is tack sharp precisely where I expected it.
Another piece of good news is that the user interface that I raved about in my preliminary review of the IQ 180 has been improved even more.
I believe that the user interface of this back is hands down the best that has ever existed in photography, and light years (pun intended) ahead of any other photographic capture device.
It is important to mention that the CTO of PhaseOne was shooting with us, so he observed and experienced what we learned in this field test. We had a number of sessions where he carefully listened to our suggestions in terms of functionality and future improvements. Many of these ideas will likely be implemented in upcoming firmware upgrades.
Finally, let’s talk about the ugly: Because all Medium Format backs use CCD sensors, when keeping the shutter open with light falling on the sensor for a long period of time during Live View it is quite easy to saturate the sensor.
As a consequence, the use of a strong neutral density filter will be required when using Live View in bright light conditions. I call thisuglybecause none of us wants to have to take any additional steps or carry any additional equipment, but unfortunately, there is no way out of this. Claus recommends the use of a variable neutral density filter in the range of about 3-9 F/stops. I intend to carry just one filter of a diameter large enough to cover all my lenses (either hand held in front of the lens, or screwed on with an adapter ring).
I could write a very long article if I concentrated only on the new features and how they work, but my guess is that anyone who has this level of interest in the device will download an instruction manual or go visit a dealer.
Therefore, I think it is more productive to concentrate on the things that for me were immediate stand out features:
1. The display is greatly improved. It is about as good as an iPhone 4 display, and can be used even in bright sunlight.
2. There is a new ISO setting: ISO 35. PhaseOne tells us that this is the native sensitivity of the back, and that images shot at this setting go through minimum processing (read high quality). Consider it the ultra-high quality setting. I tried to shoot everything at ISO 35, except in cases where the wind and depth of field requirements forced me to use higher ISO settings. There is an equivalent super-high quality setting at ISO 140 in sensor plus mode. I think of this ISO setting as the new Kodachrome.
3. STUNNING dynamic range. Note that I have capitalized the word “STUNNING”. It is so good, that we basically could not find a subject that would make this back clip in outdoor daylight. From the brightest sunlit highlights to the deepest shadows inside canyons, the IQ 180 had full detail (and no visible noise) everywhere. I do not believe I have ever experienced a capture device that comes close to the dynamic range of this back. I would suggest to the reader to not just look at the Dynamic Range specification. There is much more to Dynamic Range than just a number. Seeing actual images capturing essentially noise-free deep shadows all the way to the brightest highlights in extremely contrasty scenes is truly remarkable. The ISO 35 setting is the best in this regard.
4.Outstanding color accuracy. Although I have not had the time to make a large number of tests, based on dozens of shots taken outdoors, as well as some shots of the famous Gretag MacBeth Color Checker, my PRELIMINARY conclusion is that the color accuracy of the IQ 180 might be the best I have ever tested.
5. Fully customizable tools. You can customize the values for the highlight and shadow warnings, the sensitivity of the focus confirmation tool, the arrangement of the tools in the default screen, flashing or no flashing indicators and on and on. It is beautifully done.
6. Leveling tool (artificial horizon). At first I thought this was going to be a big yawn, but i found myself using it all the time . It is excellent and quite addictive. My understanding is that CaptureOne will be able to make auto-horizon and auto-keystone corrections based on the readings from this tool, but I have not tested that yet. As far as I am concerned, the good old bubble level is now also a thing of the past.
7. Much faster boot up time.
There are many other improvements, almost too numerous to mention. Three that I will mention before concluding this section are longer exposure times (up to 2 minutes), no degradation of image quality in zero latency mode even if the sensor stays on for 5-10 minutes (depending on the ambient temperature) and multiple on-screen grid patterns, such as golden ratio, square format, etc.

Sunset, Arches National Park
ALPA SWA, IQ 180 Back at ISO 35, Rodenstock APO Digaron 100 mm lens
(Notice the extreme dynamic range capabilities of the IQ 180)
How “Thoughtful Photography” Works
First, a few words about the equipment.
During my time in Utah, I used an ALPA SWA with Schneider and Rodenstock lenses. The ALPA has a viewfinder mounted on top with a custom mask (a standard item from ALPA) that shows the field of view of my five lenses.
An IQ 180 back was mounted on the back of the ALPA. It was never removed, except when rotated ninety degrees to change from landscape to portrait shooting. For precise focusing, all my lenses are equipped with the ALPA High Precision Focusing (HPF) rings, and I used a Leica Disto D5 laser rangefinder to measure distances.
Here is a step by step description of how “Thoughtful Photography” worked for me in the field:
1. Mount the camera on the tripod and look through the viewfinder. Because of the custom mask, it is quite easy to decide which lens to use and adjust the camera to properly frame the image.
2. After the camera is locked in position, mount the chosen lens on the camera and connect the PC sync cable.
3. Measure the distance to the key object in the image using the Disto D5. Enter the distance in the HPF ring.
4. Choose a lens aperture, ISO and shutter speed appropriate to the image (guess the exposure).
5. Make a test exposure.
5. Evaluate and confirm framing, focus, leveling and exposure using the tools in the IQ 180 touch screen. Perform any necessary changes or tweaks.
6. Shoot the final image. If not satisfactory, repeat step 5 and shoot again.
After a bit of practice, shooting like this becomes totally instinctive and very fast. The results are deadly accurate in terms of sharpness, depth of field, exposure and framing. This is because the tools in the IQ 180 touch screen allow you to see an enlarged 3 color histogram, they allow you to zoom into the image up to 400% and easily navigate through it, the leveling tool is accurate to a small fraction of a degree, the focus confirmation tool is extremely accurate, etc.
It almost takes longer to read it than it takes to actually do it.
Because the process is so simple and intuitive, it resulted in my being more observant and more thoughtful about what I was shooting. It resulted in my becoming more discerning about the image, and technically executing the image to an extremely high degree of precision.
While this style may not be your cup of tea, it worked wonders for me.
The great news is that if you want to use the IQ 180 with a Medium Format SLR, or with a full blown view camera, or if you love your groundglass, knock yourself out. Any and all of these devices work just fine with this back. It is your choice as to how you want to work with the IQ 180.
I was excited to find out that there is a very nice feature in the upcoming firmware release in June: There will be a “Composition Mode” that allows you to shoot as many test images as you want, utilize the tools, and make changes as needed, all without actually writing into the card (or the computer when tethered). Once you are ready to shoot the final image, you can revert to shooting mode, shoot the image and write the file. This will make the process even faster because you do not have to wait for the file to be written each time you shoot a test, and it will also remove the need to delete the bad test images.
Are there any Negatives?
Yes, there always are.
Trust me, I looked long and hard to see if I could find any negatives or any problems with the back. The only one I found, and this is a minor one, is that when using camera movements the IQ 180 seems to be more sensitive to color casts than the P65+. It also seems to be more sensitive to vignetting with extreme wide angles.
This is not a big issue, but the photographer should make it a habit to produce and apply the proper Lens Cast Correction (LCC) in Capture One.
Other than this small issue, I found the hardware to be absolutely rock solid, incredibly precise and built like the proverbial tank.
We did have a few minor firmware glitches, but as explained above, these have already been fixed.
While on this section discussing negatives, it might also be worth mentioning that working with the IQ 180 there is an immediate tendency to use the screen all the time. This is great, but as all of us know, the screen takes energy to run, and as a result I found that I was using more batteries than before. Therefore, I would advise anyone contemplating a purchase of an IQ back to buy a good supply of batteries for field work. You are likely to use the screen a lot and thus consume more batteries than with previous backs.
Inside the Blade
ALPA SWA, IQ 180 Back at ISO 35, Rodenstock Digaron 23 mm lens
(Again, notice the STUNNING Dynamic Range. Full detail from the deepest shadows inside a blade,
all the way to the bright sky and sunlit rocks on top. Also notice the amazing color purity and color accuracy)
The Real Test
The real test of how valuable and desirable all this technology is comes down to whether photographers will be willing to put their hard earned money on the table and buy the device.
In this sense, the IQ 180 passed “the real test” with flying colors. I can tell you that after working with the IQ 180 for one week, there is no way that anyone could have pried these backs away from me or Michael. We purchased the upgrade from the P65+ to the IQ 180 on the spot, and are now the proud owners of the backs we tested.
There is no question in my mind that in terms of image quality, the IQ 180 is currently the “King of the Hill” of single shot digital capture devices.
Besides image quality, the IQ 180 is, in my opinion, a game changer. It establishes a new paradigm for the user interface and thus the way the photographer interacts with the camera.
I firmly believe that any camera company that ignores a touch screen with a user interface derived from what PhaseOne has already done, will be making a huge mistake. I would anticipate that we will see touch screens with some derivation of this kind of UI in other cameras in the future.
In the meantime, PhaseOne is at the front of the pack as not only the key innovator, but also as the company that has done a superb job of design and implementation.

The Crevice
ALPA SWA, IQ 180 back at ISO 35, Rodenstock Digaron 23 mm lens
Final Thoughts
When I used to shoot 8×10 inch film, I constantly heard that unless you enlarged well beyond 16×20 you would never see a difference between 8×10 and smaller formats. Fortunately or unfortunately (depending on your point of view) this was never the case for me. An 8×10 contact print always looked better than enlarged images from smaller formats, and 16×20 prints from 8×10 always looked to me to be more “liquid”, more refined, with a special punch and sparkle that I could never achieve with smaller negatives.
I presume that many people will make similar statements regarding the IQ 180: That unless you print really big, you cannot see the difference. Well, I beg to disagree again. Although I have been back from Utah only a few days, I have made several prints in sizes ranging from 8 1/2×11 to 32×40 inches. To my eyes, the prints look better than prints from other cameras regardless of size. They “pop” in a way that prints captured with other devices do not. Somehow the combination of stunning dynamic range, lack of noise, extreme detail and color accuracy is detected by the eye/brain system even in the smaller sizes. In some images it is a very subtle difference, in others it is not so subtle. I have not made enough prints to come to a definitive conclusion, but I suspect that some visible difference will always be present.
Whether this, plus the UI and the features of the back is worth the price of admission is something that each photographer will have to decide for himself/herself. For some professional photographers that can amortize the cost in a reasonably short period of time, it will be a “no brainer”. For those who must have the best and can afford the best, it is also a “no brainer”. On the other hand, whether to purchase an IQ series back (even the smaller Megapixel count IQ backs) will be a wrenching decision for many.
The only thing I can say is that the image quality and the joy of using the device will be present long after the price is forgotten.
The IQ 180 currently ranks as the best and the most exciting capture device I have ever tested or owned. This is the highest praise I can bestow on any product, but it is praise that is well deserved.
May, 2011


Elevate Your Vision


Read this story and all the best stories on The Luminous Landscape
The author has made this story available to Luminous Landscape members only. Upgrade to get instant access to this story and other benefits available only to members.
Why choose us?
Luminous-Landscape is a membership site. Our website contains over 5300 articles on almost every topic, camera, lens and printer you can imagine. Our membership model is simple, just $2 a month ($24.00 USD a year). This $24 gains you access to a wealth of information including all our past and future video tutorials on such topics as Lightroom, Capture One, Printing, file management and dozens of interviews and travel videos.
- New Articles every few days
- All original content found nowhere else on the web
- No Pop Up Google Sense ads – Our advertisers are photo related
- Download/stream video to any device
- NEW videos monthly
- Top well-known photographer contributors
- Posts from industry leaders
- Speciality Photography Workshops
- Mobile device scalable
- Exclusive video interviews
- Special vendor offers for members
- Hands On Product reviews
- FREE – User Forum. One of the most read user forums on the internet
- Access to our community Buy and Sell pages; for members only.
You may also like