


Editing Ice and Snow with and NIK Detail Extractor, Auto Curves and Apply Image
There is a technique that I frequently use when I am editing images that have a lot of ice and snow.
This consists of applying a combination of what I called Auto Curves (Photoshop), the Detail Extractor tool of Nik Software together with the Apply Image tool of Photoshop. This technique works really well and can make your image pop out of the screen – In this article I will show you this technique with a three step process. Just be aware that it is a bit aggressive and creates a bit of noise but if your image is to be used to be displayed or not printed big, it will not be that noticeable. Since I work with a medium format camera (the Pentax 645z), this is not such an issue for me but it might be the case if you are shooting with cameras equipped with sensors.
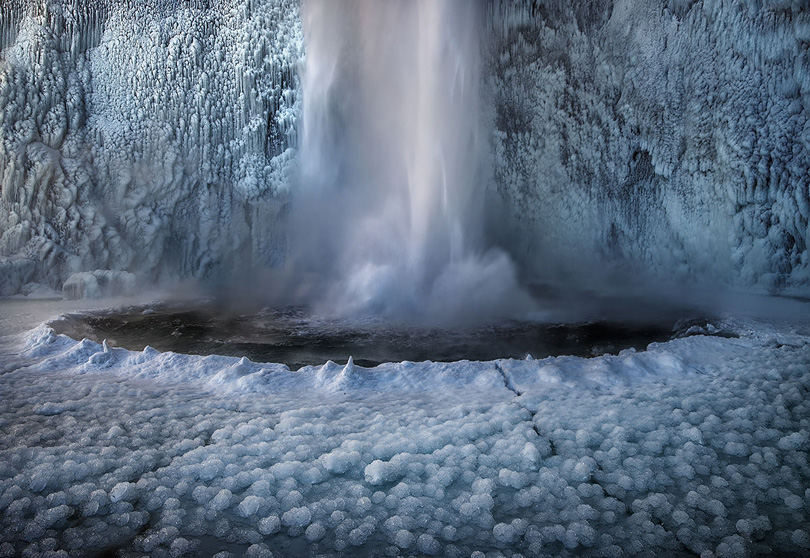
For this article I will be using an image that I took in Iceland whilst running a photography workshop with my friends Luke Austin and Adam Williams of The Light Collective (www.thelightcollective.com.au). The image was processed “live” during a post-processing session with all participants. Iceland in winter is a photographer’s paradise and Skógafoss waterfall is a beautiful location. When we arrived, it was completely frozen and we managed to get some nice captures but with some additional work in Photoshop, I think I managed to create a much more powerful image.
Step 1: RAW processing
Process your image with your RAW editing software (Lightroom, Capture One, ACR) and when you finish click on Open Image to start work on your image with Photoshop. The images below show the original capture and the image after some adjustments with Photoshop Camera Raw (RAW editing software).


Step 2: NIK Software – Color Efex Pro – Detail Extractor
I normally use NIK Software first. Go to Nik Software and click on the Color Efex Pro. Then, click on a filter called Detail Extractor and apply the standard settings:
- Detail Extractor 25%
- Contrast 6%
- Saturation 6%.
This filter, will extract a lot of detail from the Ice and/or Snow in your image but it is quite an aggressive tool that will create some noise in your image so when you click OK, you can zoom in the image in Photoshop and check it at 100%. If it is too noisy, you can always reduce the opacity of the image or reduce the Detail extractor effect below 25%. If this is an image that won’t be printed very big, you should not worry too much about this. Otherwise, you can reduce the opacity of the layer and apply some further noise reduction with Photoshop or other Noise reduction programs such as Noise Ninja. You can find an old review of this software here: https://luminous-landscape.com/noise-ninja-review/

Step 3: Apply Image
This is a variation of a technique I learnt from Christian Fletcher some years ago that I find works a treat in this process. The Apply Image command, is also useful for blending images into each other to create collage effects, for working with layer masks, and for photo editing tasks.
- Firstly, you need to stamp all layers on top with Crtl+Alt+Shift+E (or Command+Alt+Shift+E if you are using Mac)
- Then, go to Image>Apply Image and Select the following settings
- Layer: Merged
- Channel: RGB or Red
- Blending: Multiply, Overlay, Soft Light or Hard Light (try them to see which one works best on your image)
- Click on Mask and then, select Layer: Merged, Channel: Red and click on Invert.
Click OK and when the new layer is created in Photoshop, reduce the opacity to 20-70% depending on how strong you want to apply this effect. You will see that the Apply Image technique has created a more contrasty image and the combination of this one with the Detail Extractor tool of Nik Software seems to make it pop.

Step 4: Auto Curves (Auto Color Correction Options)
Finally, I create an Auto Curves layer with Photoshop. To do this, create a Curves Adjustment layer and then click on Auto + the Alt Key at the same time. When you do that, another palette called “Auto Color Correction Options” will appear with the following options:
- Enhance Monochromatic Contras
- Enhance Per Channel Contras
- Find Dark & Light Colours
- Enhance Brightness and Contrast
Go through all of them to check which of those options you like best and then click OK and reduce the opacity of the layer as this is another quite aggressive technique that might create some additional noise. For this particular example I find that Find Dark & Light Colours works best for me.


I hope you enjoyed this and if you have any questions, you can always find contact me through my website or emailing me at [email protected]
Ignacio Palacios
(Original) June 2016

Elevate Your Vision


Read this story and all the best stories on The Luminous Landscape
The author has made this story available to Luminous Landscape members only. Upgrade to get instant access to this story and other benefits available only to members.
Why choose us?
Luminous-Landscape is a membership site. Our website contains over 5300 articles on almost every topic, camera, lens and printer you can imagine. Our membership model is simple, just $2 a month ($24.00 USD a year). This $24 gains you access to a wealth of information including all our past and future video tutorials on such topics as Lightroom, Capture One, Printing, file management and dozens of interviews and travel videos.
- New Articles every few days
- All original content found nowhere else on the web
- No Pop Up Google Sense ads – Our advertisers are photo related
- Download/stream video to any device
- NEW videos monthly
- Top well-known photographer contributors
- Posts from industry leaders
- Speciality Photography Workshops
- Mobile device scalable
- Exclusive video interviews
- Special vendor offers for members
- Hands On Product reviews
- FREE – User Forum. One of the most read user forums on the internet
- Access to our community Buy and Sell pages; for members only.
You may also like