


© 2004, Glenn E. Mitchell II, Ph.D.
The Light’s Right Studio
My photography extends back to the years before digital cameras. The advice for nature and landscape photographers was to underexpose by 1/3 to 1/2 stop, especially if they shot slide film. A slight underexposure would add “pop” by increasing saturation and contrast.
Michael Reichmann, the force behind theThe Luminous Landscape, recommends a different strategy for digital photography. He urges photographers to “expose to the right” and his advice has recently become pervasive in Web tutorials and printed articles. For the uninitiated, expose to the right involves overexposure. The idea is to use the histogram on the digital camera and overexpose just to the point that highlights are not burned out. The benefit is reduced noise, especially in the shadows. Lots of photographers get excellent results with this technique.
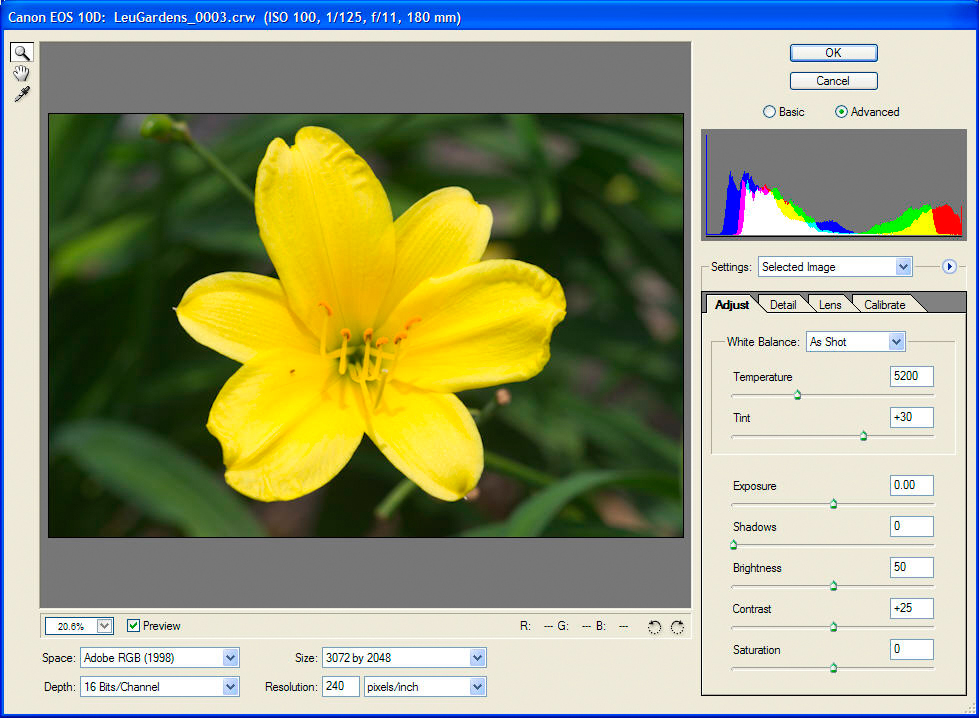
Figure 1. When you “Expose to the Right,” you risk burning out a channel.
Overexposure risks clipped channels, however. Expensive DSLRs do provide a highlight warning. On the Canon DSLRs, for example, highlights that result in an average luminosity of 100 will flash.
It is possible to clip a single channel. InFigure 1, the red channel was clipped as a result of exposing to the right. The Canon D60, like most of the DSLRs currently on the market, offered no sign of a clipped channel. The histogram looked like it was close to the edge but the highlights were intact.
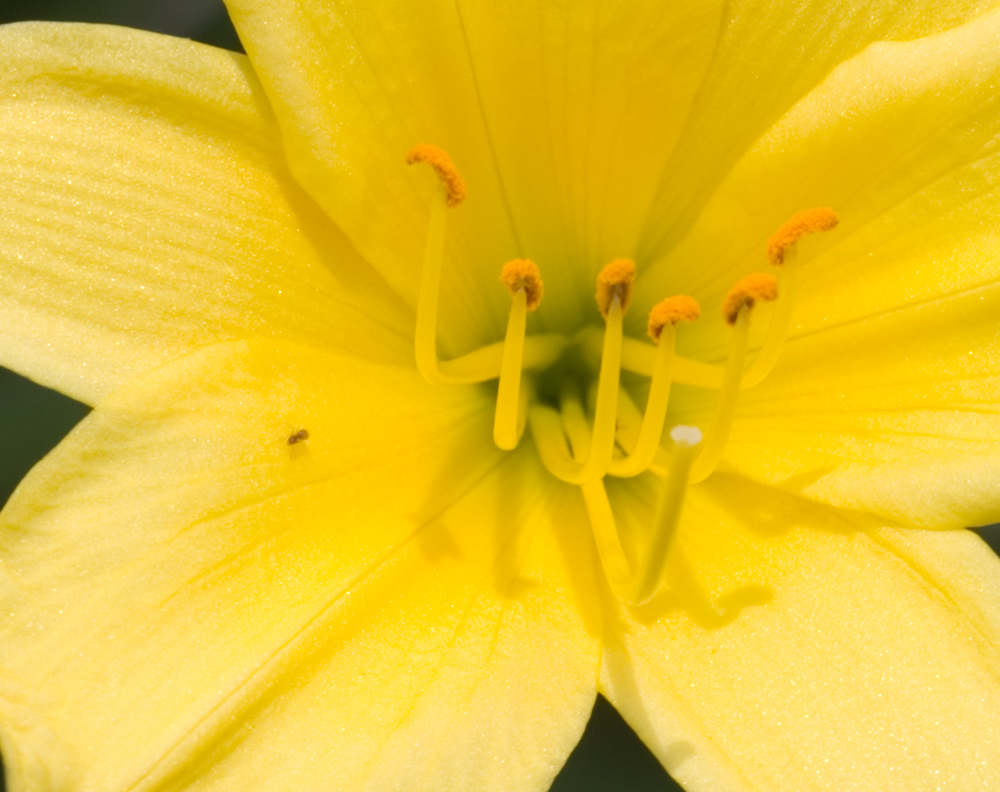
Figure 2. The clipped red channel gives a reddish cast and causes some posterization.
Clipped channels are serious. The enlarged view of the daylily inFigure 2has a reddish cast from clipped red channel. The yellow tones are also not continuous. Posterization is evident as the eye moves from the edge toward the center of the flower.
Once a channel is clipped, the customary advice is that information is lost and little or nothing can be done about it.
This article presents a technique that can rescue many images: the use of a saturation mask. Saturation masks are grayscale images that transition from black for the least saturated colors to white for the most saturated colors. Saturation masks are perfect for restoring images with severe saturation problems, such as clipped channels.
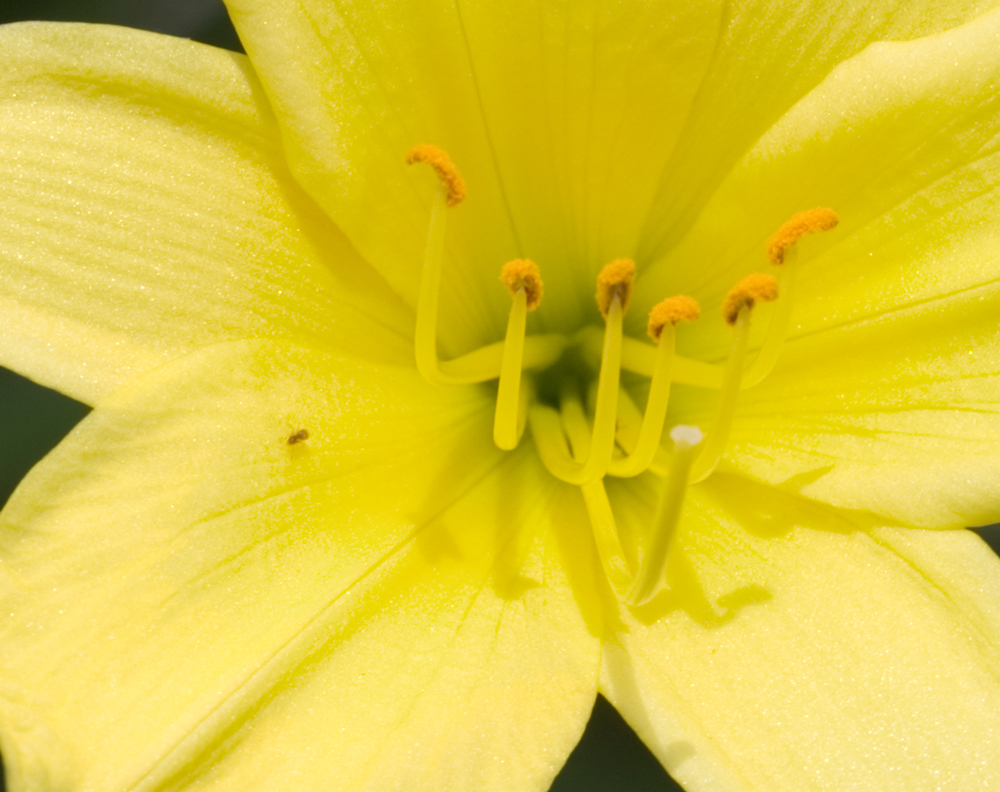
Figure 3. The results of correcting the image with a saturation mask.
The differences betweenFigure 2andFigure 3are the result of two Hue/Saturation adjustment layers. The first used a saturation mask to focus most of the correction on the areas with highest saturation. The second was a global adjustment that removed the reddish cast from the day lily.
Creating a Saturation Mask
Creating a saturation mask involves several steps. I recommend you work with a flattened version of your image. You can also create a new topmost layer and merge all of the visible layers by pressing the alt-ctrl-shift-e combination on a PC or option-command-shift-e on a Mac. The result is like a snapshot, except you have the permanence of a layer
• With your previous image corrections flattened or merged into a single layer, copy the layer and rename the layer to "Color" and set the Blend mode to Color.
• Go back and select your original layer and make a new layer, naming it “Saturation Mask.” The “Saturation Mask” layer will appear between your original layer and your “Color” layer.
• Set the foreground color to 50% gray (RGB = 128, 128, 128). The easiest way is to use the Swatches palette and click on 50% gray.
• Fill the “Saturation Mask” layer with the foreground color. (Alt/Option-Backspace).
• Duplicate the “Saturation Mask” layer and rename it “Saturation Source.” This will leave you with a stack of three layers above your original layer. From the top down, they are “Color,” “Saturation Source,” and “Saturation Mask.”
• Select the “Color” Layer and merge the “Color” and “Saturation Source” layers. (Ctrl/Cmd-e)
• Change the Layer mode to Difference blend.
• Merge the “Saturation Source” and “Saturation Mask” layers. (Ctrl/Cmd-e)
• Desaturate the layer by setting the Saturation setting to -100 for the Image|Adjustments|Hue/Saturation… dialog.
• Use Image|Adjustments|Levels and move the white input slider to 128.
You will be left with a layer named “Saturation Mask.” You can use the layer itself for some image editing. For example, you can set the layer to Screen mode to lighten portions of the image or Multiply mode to darken.
To convert the layer to a channel so you can use it with multiple layers, there are just a few quick steps.
Click on the layer named “Saturation Mask” and then open the Channels palette.
Make a selection by pressing the leftmost icon at the bottom of the palette.
Save the selection by clicking the second icon from the left at the bottom of the palette. Rename the alpha channel, if you prefer.
After you make a channel, you can delete the “Saturation Mask” layer. Anytime you need the saturation mask, just return to the Channels palette and ctrl-click (cmd-click on the Mac) on the channel for the saturation mask. Then create a new adjustment layer and a layer mask will be generated automatically. For other layers, load the channel into a selection and then use the Reveal Selection menu option to add a layer mask.
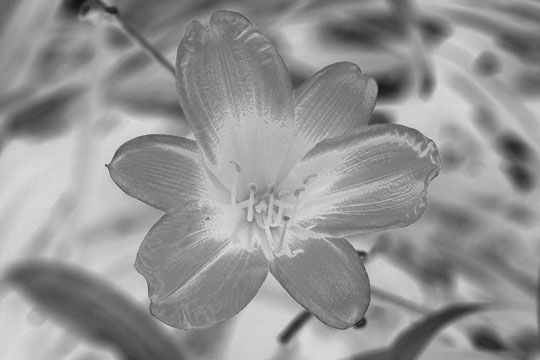
Figure 4. The resulting saturation mask.
Using the Saturation Mask
The saturation mask was used to adjust the oversaturated portions of the flower. The idea was to reduce the saturation and increase the lightness of the more saturated portions of the flower more than other portions of the flower. Only the yellow channel was adjusted.
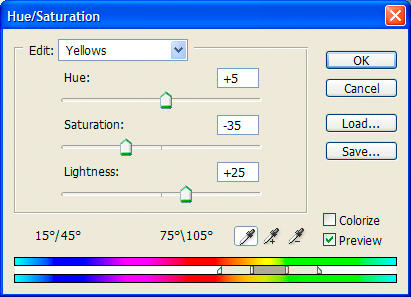
Figure 5. Hue/Saturation adjustment applied by saturation mask.
The Hue/Saturation adjustment layer combined with a saturation mask made it quick and easy to blend the tones in the flower together. The Hue adjustment removed the orange cast. The reduced Saturation and increased Lightness lessened the differences between the curled edges of the petals and the throat of the flower. Important detail still remains in the throat of the flower. Not all of the difference was owing to over-saturation. The throat of the flower was shaded by the sides of the lily itself in the direct sunlight. I did want to leave some difference intact.
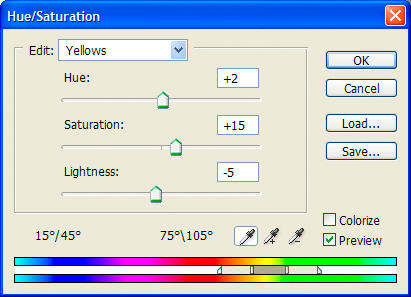
Figure 6. Hue/Saturation adjustment applied to the entire image.
Once the yellows in the throat of the flower was corrected, a global Hue/Saturation adjustment layer restored some saturation removed in the previous step and tweaked the hue of the flower. The result of the adjustments appears inFigure 7below.

Figure 7. The corrected daylily from Leu Botanical Garden in Orlando, FL.
The histogram inFigure 8below also shows an improvement. If you compare it with the histogram inFigure 1, you will see that the red channel has moved away from the right edge of the histogram. Information was pulled back from the precipice.
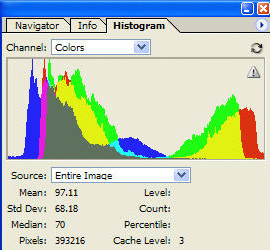
Figure 8. The histogram after correction with a saturation mask.
You can also invert the saturation mask in order to add more “pop” to muted colors without the risk of over-saturating other image elements The image along Scotland’s Bay of Firth inFigure 9is a case in point.

Figure 9. Image than can benefit from a controlled saturation boost.
There are some very saturated colors in this seaside image. It is important not to over-saturate them. Some of the blues, for example, could easily be over-saturated by a general saturation boost.
The first step is to invert the saturation mask. This will progressively reveal areas in the image that are lower in saturation. The mask is then used with a Hue/Saturation adjustment layer as a layer mask.

Figure 10. Inverse of the saturation mask for boosting low saturation features.
As with all layer masks set to reveal selections, white will reveal and black will conceal. We are set to boost the saturation of the clouds, the pier, some features of the boats, and the shore.
Figure 11. The after-effect of a controlled saturation boost.
The result inFigure 11is added visual impact. The image has more pop. The details along the edge of the pier, for example, now stand out more that they did previously inFigure 9.
Conclusion
Expose to the Rightcaused me considerable consternation when the red channel clipped on the saturated yellows of a daylily. No highlight warning. The histogram looked good. When I got back to the hotel, the clipped channel was evident. My shots of red roses that day were even more severely affected.
The point is not a criticism of the “Expose to the Right” technique. I knew full well fromMichael’s Reichmann’sarticle that I could clip a channel without warning if the scene contained highly saturated colors. I was not as careful as the circumstances required.
Bright, direct sunlight gave me highly saturated yellows. The clipped red channel gave the most saturated of those yellows a reddish cast. It also compressed some of the highlights, leaving some visible posterization. A global change in hue, saturation, and lightness would not adequately correct those problems; it would affect all of the yellows. The eyedroppers on the Hue/Saturation dialog would have been little help, too. There were no wholesale differences among the yellows in the flower.
Adding a saturation mask allowed the corrections from a hue/Saturation adjustment layer to be progressively applied to the flower, affecting the most highly saturated areas more than less saturated areas. The transitions blended together, restoring an image that was disappointing when it emerged from Adobe Camera RAW II.
Clipped channels are just one circumstance where a saturation mask is useful. Another use for the saturation mask is to increase the saturation of muted colors in an image while avoiding the risk of over-saturating colors that are already highly saturated. To progressively boost the saturation of more muted colors, just apply the inverse of the saturation mask as a layer mask or use the Hide Selection option when attaching the layer mask.
Glenn E. Mitchell, II(who prefers to be called "Mitch") is an avid photographer and digital printmaker.
His information and gallery website can be seen atwww.thelightsright.com.
You’ll find other tutorials and helpful Photoshop resources there,
including a Photoshop CS action set for generating saturation masks.


Elevate Your Vision


Read this story and all the best stories on The Luminous Landscape
The author has made this story available to Luminous Landscape members only. Upgrade to get instant access to this story and other benefits available only to members.
Why choose us?
Luminous-Landscape is a membership site. Our website contains over 5300 articles on almost every topic, camera, lens and printer you can imagine. Our membership model is simple, just $2 a month ($24.00 USD a year). This $24 gains you access to a wealth of information including all our past and future video tutorials on such topics as Lightroom, Capture One, Printing, file management and dozens of interviews and travel videos.
- New Articles every few days
- All original content found nowhere else on the web
- No Pop Up Google Sense ads – Our advertisers are photo related
- Download/stream video to any device
- NEW videos monthly
- Top well-known photographer contributors
- Posts from industry leaders
- Speciality Photography Workshops
- Mobile device scalable
- Exclusive video interviews
- Special vendor offers for members
- Hands On Product reviews
- FREE – User Forum. One of the most read user forums on the internet
- Access to our community Buy and Sell pages; for members only.
You may also like


