


By Mark Segal
This discussion is the digest of much reading and trial, error and head-scratching. Users new to Silverfast will find it hugely lessens an otherwise steep learning curve.
Unlike Vuescan, the same “version” of Silverfast is issued in an edition customized to each scanner model – and interestingly enough – at difference prices depending on the scanner. Hence there could be some differences between how Silverfast operates with my scanner versus others. As I only know it from the operational experience of my scanner, that information will have to suffice here, but your mileage may vary. For sake of brevity (but unfortunately it remains not too brief!) and practicality, this is a “do this, do that” discussion with little surrounding commentary, confined only to the subject matter of this article – colour negatives. Recall, there are no IT8 targets or ICC calibration possible for the scanner when using this medium; instead there is “Negafix”, which converts the scanned negative data to positive with about right colour and luminosity, as discussed below. The list below simply tells you what I do to get this program working as I like it.
(a) Turn on the scanner before opening Silverfast, otherwise the program won’t recognize the scanner.
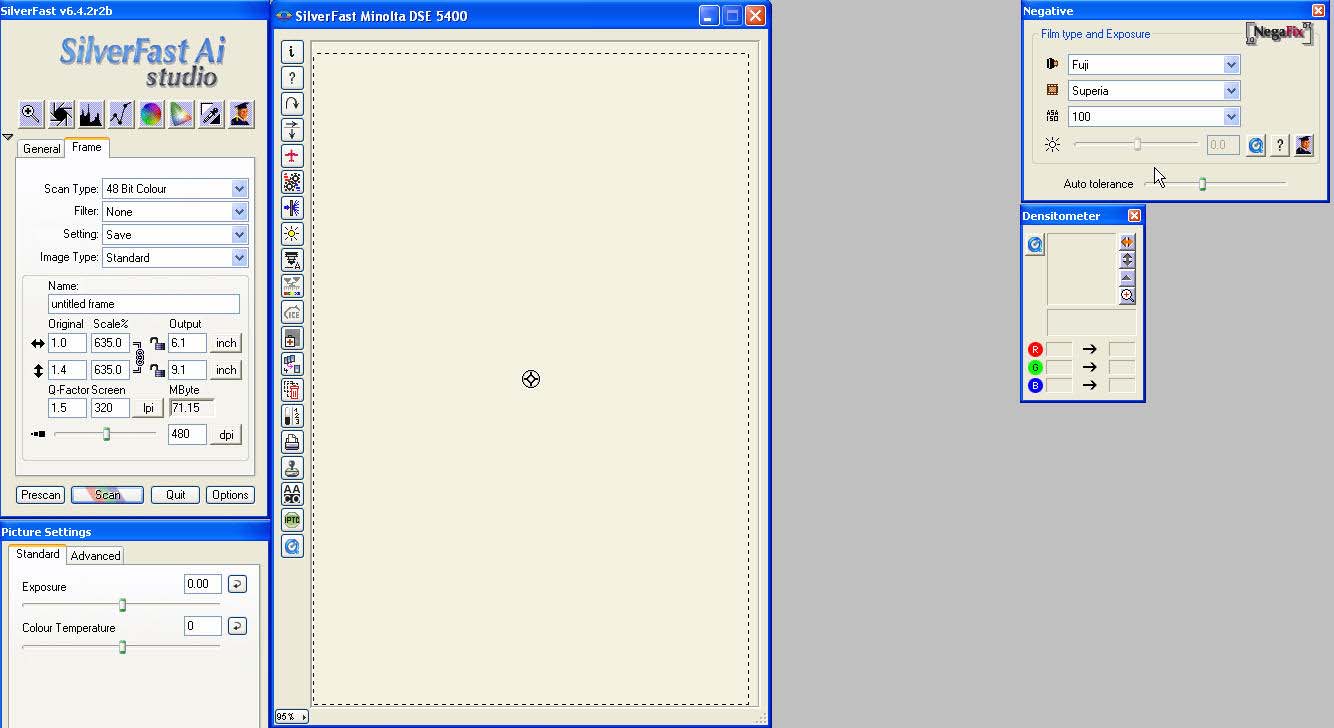
(b) I arrange the program layout as shown in Inset A1, with Negafix and the Densitometer on my second monitor, to maximize screen space for Landscape-oriented images on my primary monitor.
Inset A1. Silverfast Layout
(c) In the “General” tab: there are four drop-down menus. Do as follows: Scan Mode: Normal; Original: transparency; Pos/Neg: negative; Frame Set: save.
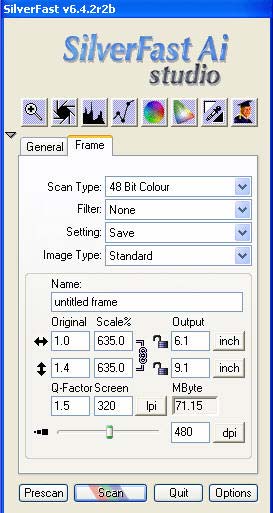
(d) In the “Frame Tab”: my settings are as in Inset A2, based on the dimensions and resolution preferences in the foregoingNDQ article
Inset A2: Silverfast Frame Tab
Comment on Scan Type:48 bit colour provides 16 bit editing (16 bits in each of the R, G, B channels).
Comment on Q-Factor Screen:For output destined to an inkjet printer make sure these values are set with Q-Factor at 1.5 and Screen at whatever number preserves both the desired dimensions and scale for the original and for the values in the output boxes just above.
Comment on “dpi”: This obscure misnomer really means desired OUTPUT pixels per inch for the Output dimensions entered in the boxes above “MByte”. MByte is the resulting file size.
(e) In the Frame tab, click on “Options”, bottom right, which opens an Options box that has four tabs, of which three deserve discussion for the manual workflow from scanner to inkjet printer. My settings are as shown in Inset A3.
Inset A3. Silverfast General Options
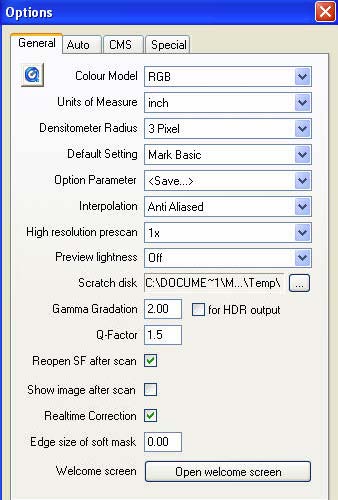
Most of these are self explanatory.
The densitometer radius is for measuring colour values – averaging several pixels is recommended to avoid non-representative measurements.
The high resolution prescan is set to 1 because no more is practically necessary.
The gamma gradation and Q-factor are set per Silverfast default recommendations and work well.
“Reopen SF after scan” is needed to get back to the program easily for scanning the next negative.
“Show image after scan” is unchecked because it opens Photoshop – not needed unless one wants to go there at this stage.
“Realtime correction” shows the results of adjustments in real time.
In the Auto tab I leave everything OFF except the colour cast removal. I keep highlights at 2 and shadows at 98 for the same reasons one sets the Levels end-points in Photoshop slightly below their extreme values.
Inset A4 is the heart of Silverfast colour management, and rather badly explained in the documentation. Furthermore there is considerable controversy about the best settings to use here. Inset 6 shows mine.
Inset A4. Silverfast Options CMS Tab
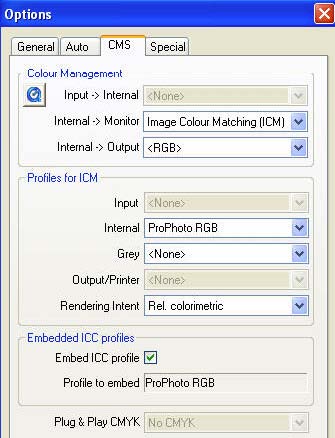
“Internal >Monitor” is set to ICM so that the image data will look the same on the scan preview as it does once opened in Photoshop.
“Internal>Output” is kept in RGB because that is the colour system being used.
In “Profiles for ICM” I use ProPhoto Colour space, which automatically gets picked-up under “Embedded ICC profiles” (a misnomer).
The choice of rendering intent is guided by the same principles as in Photoshop colour management.
“Embed ICC profile” insures that when the image is opened in Photoshop it will open in ProPhoto colour space.
The colour editing workspace of choice is hotly debated, as members of Luminous-Landscape Discussion Forum and Dan Margulis’ Applied Colour Theory List are well aware. This controversy is more complex and extensive than that over editing mode (8 versus 16 bit), and the two are related, insofar as 16 bit is recommended for wider colour spaces in order to avoid banding. Interested readers are invited to review the debates in those threads – they are beyond the purpose of this article. I often use ProPhoto because Epson printers can reproduce some hues that exceed the ARGB98 colour space. Important here, however, is theempirical factthat ProPhoto is a huge colour space that can cause difficulty with taming out-of-gamut colour, largely because of limitations in colour negative profiling. Brilliant and deep reds, and red casts in colours containing red are the main culprits from my experience. The non-reproducibility of brilliant and deep red is not immediately obvious either in Silverfast or in Photoshop. They look great on the monitor until soft-proofed in Photoshop, where it is seen that they will emerge from the printer as Magenta with no detail. When this threatens, I re-scan the negative in ARGB98 colour space, and if that doesn’t suffice, in Photoshop I use an HSB Adjustment Layer to reduce the saturation of the Red channel, sometimes adding a Selective Color Adjustment Layer to reduce Magenta and increase Black in the Red Channel. Careful adjustment with these tools can generally yield a reproducible red that retains detail and is believable relative to the scene photographed. When confronted with “suspicious” hues, it can be a real time-saver to do a quick scan, open the image in Photoshop and softproof it before spending time doing anything else. If trouble appears, a trip back to the scanner for a change of colour space is indicated. Interested readers will find much more background on this problem in the Luminous-Landscape Discussion Forum in the thread “What’s Wrong with Silverfast”. The issue is also illustrated further on here.
Inset A5 shows remaining adjustments and controls in Silverfast, not covered above. These are on a thin strip of buttons to the left of the Prescan window.
Inset A5. Pre-scan Strip Settings When Film Carrier Is Inserted
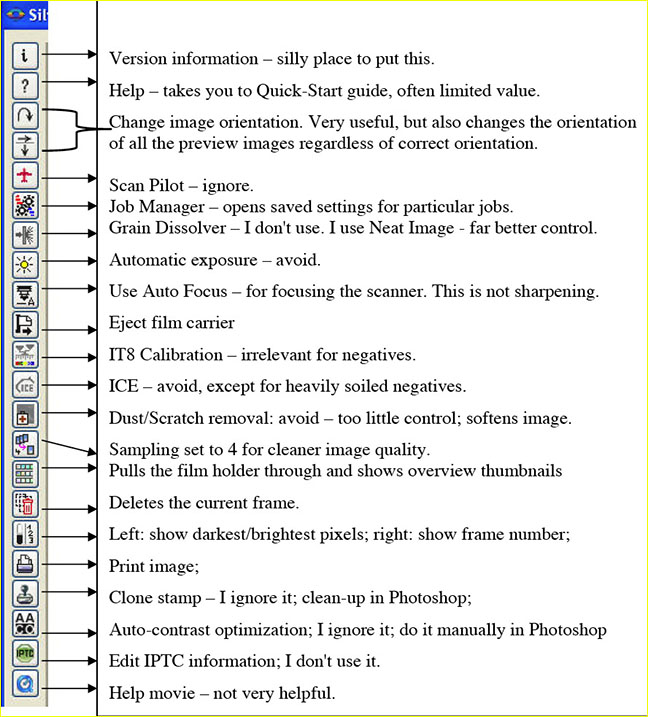
After tweaking all this as appropriate, the scanner software is now set-up to make a scan. Readers will have observed that my approach is generally as follows: (i) nothing automatic except colour-correction of the negative to positive conversion and scanner focusing (some people think they can focus the scanner better manually, but I’ve tried and I can’t beat the auto-focus on my set-up); (ii) scans are unburdened with ICE, grain remover, noise removal etc. (none of it provides the desired control and all of it hugely increases scan time – except ICE – takes time also, but a savior for heavily soiled images;
(iii) most other corrections done in Photoshop where control is far superior, except as mentioned below; when editing in 16 bit there is no visible advantage to using most of Silverfast’s luminosity and colour balancing adjustments, again except as noted below.
Quick process for using Silverfast after all the above is done:
– Insert the negative strip into the carrier making sure there are no spaces between negative and frame;
– insert the carrier into the scanner;
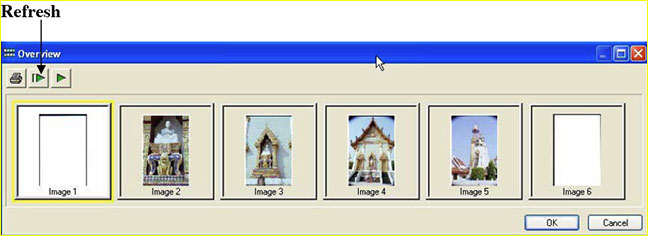
– click the film carrier transport button to make the overview thumbnails;
– press the refresh button in the overview pane (Inset A6);
– select a thumbnail for pre-scanning by clicking on it and clicking OK;
 the image auto-focuses and opens in the Pre-Scan window;
 make sure the image guides are all within the picture area;
 examine the exposure and colour balance;
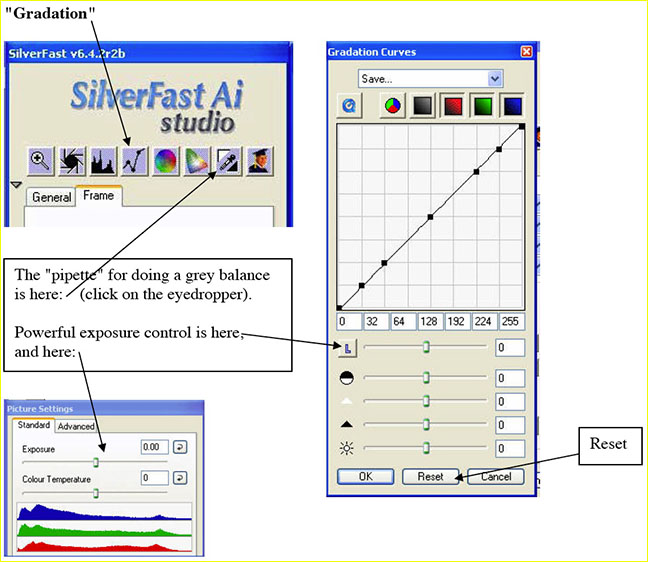
 click on the gradation tool and click “Reset” (Inset A7)  adjustments from the previous image are sticky in Silverfast  I find each image needs its own;
 check the exposure and colour balance;
 easiest colour balance is to use the grey pipette on a hue that should be true grey;
 under-exposure is most effectively corrected using “L” in “Gradations (Inset A7);
 name the file (Frame Tab  see Inset A2, “Name”) and click Scan.
Inset A6. The Scan Overview
Inset A7. Reset “Gradation” and Tweak Colour Balance / Luminosity
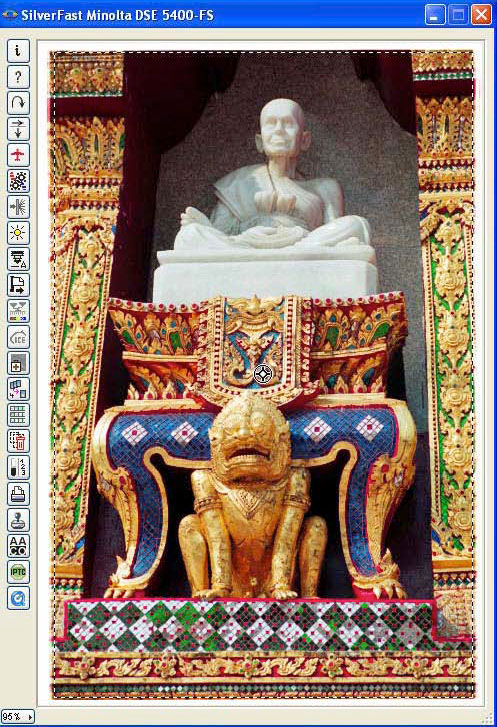
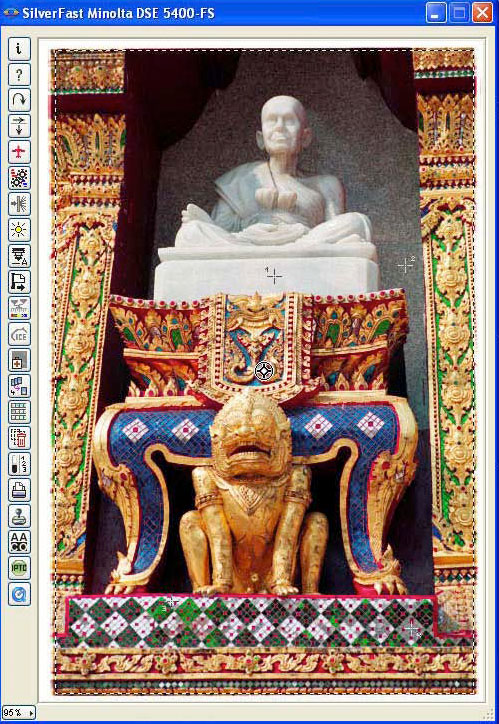
Inset A8 illustrates the effectiveness of the grey pipette in balancing the image. The alabaster sculpture appears rather more green than it should be. I assume it should be neutral grey-white. The numbers in the densitometer confirm that it has a slight greenish cast. I set one grey pipette on such a spot. I can use this pipette on three other locations in the image for fine-tuning the grey balance, provided none of them produces a colour range conflict. I generally avoid using shadows for this, because shadows are not necessarily neutral even though they may look it. The colour cast involved here is indeed slight, because the photograph was well-exposed and the Negafix film settings are very close to correct for the film I was using.
Inset A8. Use of the Gray Pipette for Colour Balancing
BEFORE ADJUSTMENT
Inset A9. Re-Scan in ARGB98
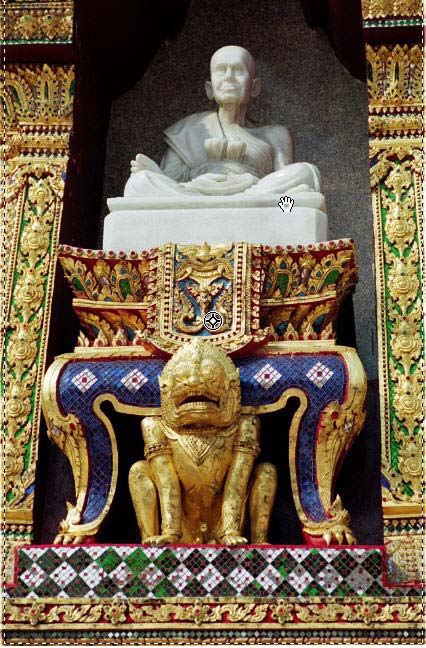 |
The above image has another problem: there is a pervasive, unnatural reddishness in the gold tones. The culprit is the saturation of the magenta component of Gold in ProPhoto, not the colour balance, which is theoretically correct. When I reset the scan for this image to Adobe RGB98 in the CMS Options, the result is the rendition in A9 – more natural gold tones, needing only a very slight correction for a mild green cast. From a colour balance point-ofview it is a toss-up whether to remain in ProPhoto and correct the gold in HSB channels, or Selective Colour channels, or retain the ARGB98 scan. In this case I believe the ARGB98 solution takes me closer to my end-point with less editing. |
This demonstrates the importance of not being dogmatic about image editing matters. Colour space and bit-depth have become theological issues supported by convincing theoretical arguments on all sides. I do whatever is the most efficient based on what my eyes tell me is the most natural, believable result.
Mark D. Segal Toronto, February, 2006


Elevate Your Vision


Read this story and all the best stories on The Luminous Landscape
The author has made this story available to Luminous Landscape members only. Upgrade to get instant access to this story and other benefits available only to members.
Why choose us?
Luminous-Landscape is a membership site. Our website contains over 5300 articles on almost every topic, camera, lens and printer you can imagine. Our membership model is simple, just $2 a month ($24.00 USD a year). This $24 gains you access to a wealth of information including all our past and future video tutorials on such topics as Lightroom, Capture One, Printing, file management and dozens of interviews and travel videos.
- New Articles every few days
- All original content found nowhere else on the web
- No Pop Up Google Sense ads – Our advertisers are photo related
- Download/stream video to any device
- NEW videos monthly
- Top well-known photographer contributors
- Posts from industry leaders
- Speciality Photography Workshops
- Mobile device scalable
- Exclusive video interviews
- Special vendor offers for members
- Hands On Product reviews
- FREE – User Forum. One of the most read user forums on the internet
- Access to our community Buy and Sell pages; for members only.
You may also like


