


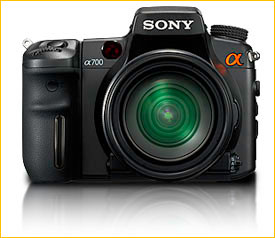
Released in Sept. of 2007, the Sony A700 is a worthy entry in one of the most competitive DSLR market niches – the semi-pro or serious enthusiast level.
Clad in a tough magnesium alloy/polycarbonate outer skin, this camera boasts fast 11 point auto focus, with special overlapping cross type sensors in the centre for ultra precision, a 5 frames per second shooting rate, 12 megapixel file size, which is currently the largest file size available in this category (shared with the upcoming Nikon D300), a very fine resolution 3 inch LCD for image review, and HDMI output that will turn your large screen TV into a high resolution photo monitor.
The A700 has effective built in image stabilisation, lending a stabilising influence to every lens used with the camera, and an automated sensor cleaning function to keep dust bunnies under control.
It’s an impressive and very capable package.
I attended the official Sony Canadian launch for the camera and had the opportunity to use the camera with a couple of different lenses and the well-designed accessory grip.
We also got to see the new HDMI option demonstrated on a 40 inch Sony Bravia TV.
Traditionalists may scoff, but the fact is fewer people these days are converting their photographs into prints (as proof of this, the three main commercial labs in Toronto have all either gone out of business or shifted to other business plans) and the HDMI option offers an alternative to viewing on the relatively smaller computer monitor. It could also be useful feature for client presentation and wedding studios.
On the full size screen the newer format is clearly superior to older methods of displaying on a television, even besting HD mode. The HDMI output truly does deliver impressive resolution, contrast and tonality to the big screen.
The camera can even be set to shoot in a more format friendly 16:9 ratio, which trims the top and bottom of the frame to fill the wide screen.
A couple weeks after the launch Sony Canada arranged to lend me the A700 with their new general purpose 16-105mm lens (24-158mm equivalent) for a couple of weeks.
During this time I used the camera for work and play, shooting images that were eventually published online, sent to clients and distributed to the media, and as well, some family and travel shots more in line with your typical enthusiast’s use of the camera.
This article is not meant to be an exhaustive technical exercise but rather a user’s perspective on how the camera performed in several challenging real world situations.
____________________________________________________________________________________
A Night at The Opera: A Three Way Comparison
I have a few other cameras, and while not all are state of the art, each occupies a special niche that allows me to respond to differing client demands and shooting conditions.
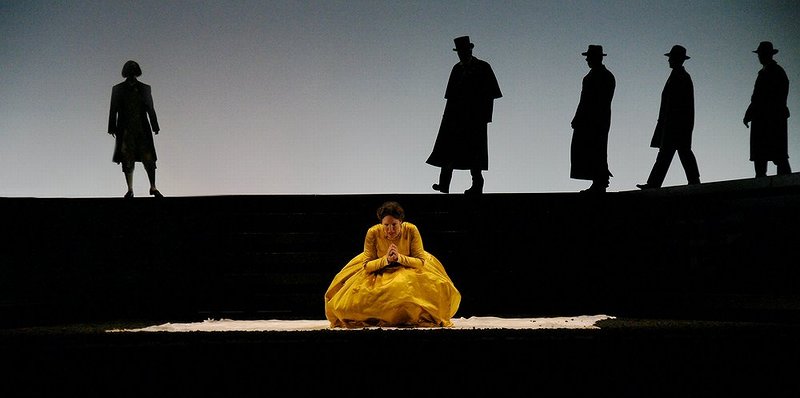
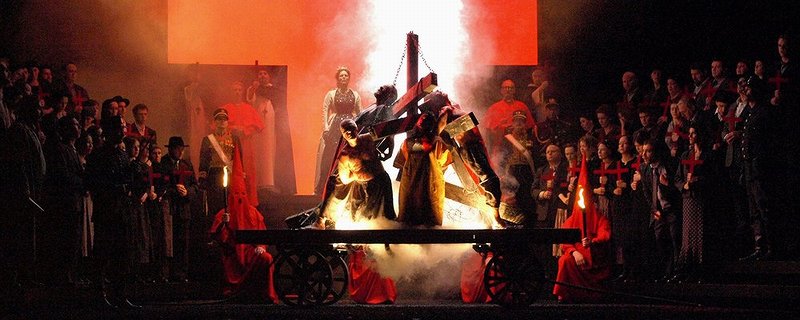
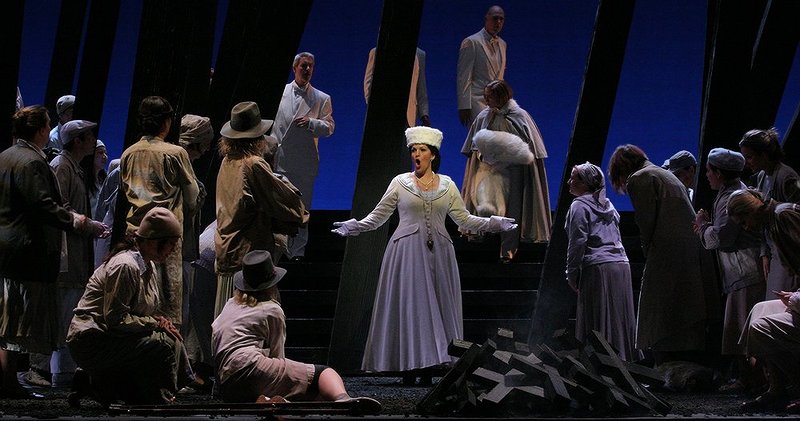
Since I was booked to shoot the Canadian Opera Company’s production of Verdi’s Don Carlos during my time with the A700, a three way comparison with the other main cameras seemed in order with the slightly lower speced Olympus E510, the Canon 20D (cousin to the 30D, and a more distant relative to the newly released 40D), and the Sony A700 thrashing it out.
Sony A700 w/ 16-105mm 3.5-5.6
____________________________________________________________________________________
Focusing accuracy and speed
A dark, dramatic story set during the Spanish Inquisition, the lighting for Don Carlos was very atmospheric with some really dimly lit scenes and high contrast moments. Despite this all three cameras managed to keep up with the 20D and E510 struggling in just a few spots.
The A700’s double cross centre point focusing was completely un-phased no matter what the lighting was, locking consistently and achieving accurate focus quickly despite using the slowest lens of the group (16-105mm f3.5-5.6 used mainly at the slower tele end of the range). The Canon 20D with a 70-200mm f4L was close behind. The Olympus E510 with 14-54mm f2.8-3.5 and a rudimentary three focusing points was the Canon’s equal in speed but loses points with me because of the constant need to focus and recompose owing to the lack of focusing points. However it’s focusing accuracy was up there with the leading A700.
Something to note, the built in IS in both the E510 and A700 allowed me to shoot handheld all night, while the 20D without an IS lens required a monopod support.
____________________________________________________________________________________
Ergonomics
All three cameras are very comfortable to hold in differing ways.
The A700 has a thick chunky feel and moulds itself quite nicely to the hand with rubber accents in all the right places to give a comfortable and very secure grip. Because of the hooks in the handgrip and back thumb support it’s actually possible to hold this heavy, substantial camera with just your thumb and forefinger.
After years of using Canon film cameras, then migrating to their digital DSLR’s the 20D offers no surprises. It’s smooth and comfortable, the control placement familiar. While there’s nothing particularly wrong with the camera’s ergonomics, it’s a bit vanilla and predictable. Some see this as admirable consistency; others see it as a sign of a company that hasn’t been spending much time thinking about this aspect of their camera design lately. Either way it’s big, solid and inspires confidence in use.
The Olympus E510 is the most diminutive of the three, coming in at less than half the size of the 20D/grip combo. Yet the camera feels instantly comfortable in the hand. Despite a thinner hand grip on the front, and smaller overall body size it’s no strain to hold the E510 for long periods of time – unlike the similarly-sized Canon XTi, which I also own, and which has is very problematic hand-held unless the accessory battery grip is attached.
____________________________________________________________________________________
Control Layout
Photographing the opera’s dress rehearsal is a nice test of camera control layout because it’s a bit of a blindfold test. Since there is a large audience in the theatre for the rehearsal, and the house lighting is extinguished, you can’t be fumbling around with distracting flashlights to make changes. Camera control layout must be intuitive and sensible.
Olympus E510 w/ 14-54mm 2.8-3.5 lens
My main criteria for control and button placement on cameras is entirely shooting orientated. If a camera maker wants to put the button for live view or image review in some out of the way location I really don’t care because the camera is being held away from the eye and all fingers of both hands are available to do the task.
But when the camera is up to your eye, in shooting position there are only two digits that are really available to make changes with.
The forefinger can be moved back from the shutter release to operate a control wheel or press a closely located button – although, obviously, this affects your readiness to take a picture momentarily – and the thumb is able to range through an arc of movement on the back of the camera.
The second of the two is the critical area for being able to make adjustments quickly and intuitively while simultaneously shooting your subject.
Ideally, there should be nothing within the arc of the thumb that does not involve control adjustments pertaining directly to either exposure or focus. This would include the trinity of focus point selection, exposure lock, and exposure compensation. Secondary considerations like ISO, white balance, continuous or single frame advance, are all adjusted with the camera away from the eye, but Select, Lock and Compensate have to be right under your fingertips. They not only have to be easily accessible, but easily identifiable by touch while your eye is still up to the viewfinder.
____________________________________________________________________________________
So how do these three compare?
The Canon 20D has the most basic layout with the fewest buttons, yet packs a lot of functionality into this sparse arrangement. With the joystick set up to select focus points, the exposure lock button comfortably under the thumb up and to the right, and exposure compensation being handled by the Quick Control wheel, all the basics are covered. What I don’t like is the row of four buttons across the top plate which are all identical and in a rush sometimes easy to forget which is which.
Adding to the confusion in the dark is the fact that each of these buttons controls two functions depending on which control wheel you are using. This is the bane of using a menu-driven design. It gets the basic job done but can sometimes be confusing in use.
The E510 has less real estate to play with and hence the buttons and control pad are more closely spaced. One thing I don’t like about Olympus’s design is the location of the live view button which I sometimes end up unintentionally activating just by picking up the camera in the dark (in daylight I never find this to be a problem). But it does have the exposure lock right under the thumb, and a nifty feature of the E510 is that you can select a different metering pattern for the exposure lock function. I have mine set to spot metering so it’s possible to lock a very precise light value. Exposure compensation is set by removing your trigger finger from the release and pressing a small button back from the release and then using either the arrow pad or top dial to select. This takes a little getting used to, and the button itself could be more distinct and less flush with the surface, but eventually it becomes second nature. Still, with the camera’s smaller size I find it just slightly more cramped and awkward than dialling in exposure comp with either of the other cameras.
The A700 at first seems confusing, there are so many buttons, but actually it’s the easiest and most intuitive of the three. Sony has done a good job here, recessing the top deck buttons so you can easily find them by feel. The AEL button is large and right under thumb, and the collar around it can be used to select metering patterns. The joystick just below it makes selecting focusing points easy and has a far more positive feel to user input than the 20D joystick. As with the E510, exposure compensation is a button located back from the shutter release, but Sony have recessed this button giving it a tactile advantage, and the larger size of the camera makes this movement more comfortable. It’s a very well thought out camera that allows for full functionality while shooting with no menu diving required.
Something I particularly like about the A700 is the way the photographer’s selection of the function he or she wants to access is prioritised. For instance, when pushing the exposure compensation button you can use any of the main dials to make changes. The front wheel, back control dial or rear joystick are all enabled allowing you to use the most convenient or comfortable of the three to make changes. Same with any of the other top function buttons.
It’s as if the designers decided that when the photographer asks for exposure compensation, or white balance, or ISO, that making changes to the selected function is the priority of the moment and facilitating these changes from any position on the camera is best. I like this thinking.
____________________________________________________________________________________
Image Quality
At 800 ISO, and it was frequently possible to shoot at this setting during the Don Carlos production, there isn’t much difference between the three. The Olympus has a tiny bit more noise, the Sony is slightly softer due to more aggressive noise reduction. But basically all three are very usable, the differences between them minor, and each is capable of very good results.
At higher sensitivities (1600 and up) the Sony A700 and Canon 20D pass the E510. Although it puts up a good fight at 1600 ISO, the E510 is a bit hit and miss with the quality depending on the nature of the lighting.
I think of it as being somewhat fragile or brittle at highest ISO. When the scene is well lit but the overall light level is just a lower value, the camera does as well as the others. But when there is a lot of shadow information present noise is more present. I also find high ISO Olympus images less malleable in post-processing.
The A700 and 20D can still keep going strong at tortuous low light levels with both going to 3200, and the A700 reaching 6400 ISO.
Between these two, the Canon will give slightly better image sharpness as Sony applies more noise reduction (remember we are talking about an 8MP sensor vs. a 12MP sensor here) but either will yield acceptable quality at these high ISO’s – although I would only want to use the 6400 images for smaller prints or online use.
Comparing the three in normal light conditions you could pick up any of them and produce stunning results.
The E510 and A700 have the advantage of image stabilisation built in. You never have to think about it, it’s just there in the background for every photo. Personally, I like this system over the in-lens ones, and think eventually Nikon and Canon will follow in this direction. While some people contend in-lens systems are more effective it really becomes like PC evolution, a matter of ‘good enough’ technology. Does an extra half stop of hand-hold ability really out weigh the convenience and simplicity of in-camera systems, not to mention generally cheaper lens prices on the in-camera brands.
The E510 allows you to use the superb telecentric Digital Zuiko lenses and makes for a more portable, lighter system – the 12-60mm + 70-300mm give you an effective focal range of 24mm- 600mm with just two small lenses and a lightweight body.
The A700 has a longer tonal scale courtesy of the DRO (Dynamic Range Optimisation) function, something that is of real benefit and superior to normal post-processing technique for boosting dynamic range. It also has excellent focussing, and produces punchy saturated files suitable for big enlargements.
The 20D is an old favourite I’ve logged a lot of mileage with this camera, but it looks a little long in the tooth feature-wise in comparison to the other two. However you can always depend on the image quality of the 20D, and it’s low light behaviour is still among the very best available.
____________________________________________________________________________________
Toronto FC
Soccer, football in other parts of the world, is a high speed, wide ranging sport. Unlike North American football, where the action takes place in short frenzied bursts within relatively narrow confines, keeping track of soccer with it’s continuous swirling motion is actually quite tiring on the neck, arms and right hand shutter release finger.
Canion 20D 70-200mm L f4
By definition you’re going to need a long lens to provide coverage out to mid-field, and a shorter-range zoom for closer in action to cover this sport.
This past summer I covered the FIFA U-20 World Cup and David Beckham’s appearance at Toronto FC’s BMO Field. The lenses in use for these two events were huge. I’ve covered sporting events many times in the past – football, baseball, tennis and auto racing. But when it comes to soccer everyone seemed to have a four-foot long behemoth lens on their camera.
For Toronto FC’s final home game of the season I came to the match with my usual underwhelming set-up that served me surprisingly well covering the World Cup, toting along the trusty Canon 20D w/ 70-200mm + 1.4 converter as the long lens, and the newly arrived A700 w/ 16-105mm for wide shots.
The 16-105mm proved to be a near ideal zoom for this purpose as it’s wide end got everything in when players were up close against the end boundary of the field, while the long end of this lens made it possible to follow them moving towards the goal or making passes through the goal area for scoring opportunities – not a moment when you want to be caught flat-footed changing cameras. I really liked this zoom for close in action.

With centre focus point selected, the focus tracking on the A700 was just excellent and the camera’s 5 frames per second gave an abundance of usable photos of peak action moments because of the quick focusing.
While the 20D has the same 5 frames per second rate, I find when you mix focus acquisition into the equation its slower and less accurate focusing module causes the frame rate to drop. I shoot beside guys with 1D’s all the time. Their cameras sound like machine guns compared to the 20D and the sophisticated focusing module of the 1D is what allows that camera to maintain it’s top 8-fps rate.
____________________________________________________________________________________
In use the A700 felt faster.
As for the game itself, it was a nail-biter. By late in the match Toronto FC had fallen behind 2-0 and New England appeared poised to hand Toronto a disappointing season-ending loss.
Suddenly TFC rallied to put intense pressure on the opposition with time running down and were able to break the shutout with minutes remaining.
Then in the dying seconds of extra time Danny Dichio scored on a long shot that just eluded the grasp of the New England goalie to tie the game.
The stands exploded with a huge delirious roar, streamers wafted down onto the field, confetti canons shot geysers of multi-hued particles into the air, Danny Dichio ran right across the goal area, his team-mates swarming towards him, in celebration. And I caught every joyful moment of it happening right in front of me at 5 frames per second (while seat cushions fans were hurling out of the stands like giant Frisbees bounced off my head and back)
Each frame was sharp and perfectly exposed with the A700.
This is what I like so much about this camera. It does things reliably, repeatably with no drama. It’s a Bridezilla-taming, Art Director-soothing, Scenery-chewing, Goal-Scoring-Image-taking machine. A real workhorse camera that just shrugs off all challenges and goes about getting the shot.
____________________________________________________________________________________
L’Oreal Fashion Week
For the opening shows of the 5 day L’oreal Fashion Week Spring Collections I wanted to play with the live images of the models projected on a large screen in the background, which were in the frame when positioned slightly to the side of the riser. I liked the double exposure effect of the projected and real images in one photo.
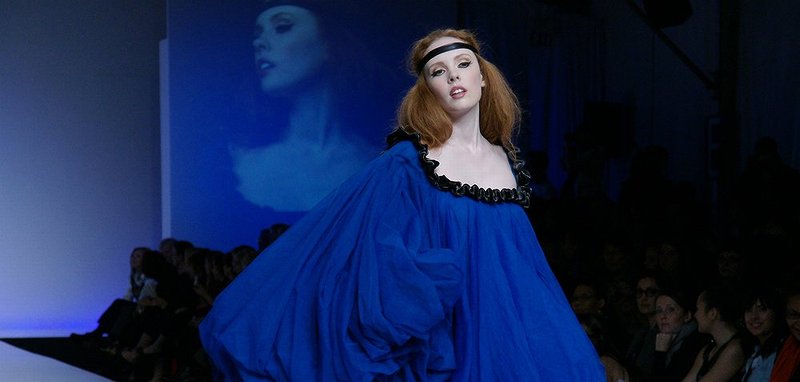
At this event the A700 just shone. Despite a really slow lens, f5.6 at the long end, focus was very fast and spot on.
The metering and DRO function maintained a nice balance between the foreground exposure on the models and the screen in the background. My Olympus E510, which I was using as my second camera, was less successful at getting this balance right.
The high resolution 3 inch LCD screen on the back of the A700 really came into it’s own for me here as checking for colour accuracy, verifying exposure and confirming the focus on moving subjects was a breeze.
After the first burst of shots I would press the magnify button while the last image was still on the screen to see a very detailed close-up of the photo. Because of the screen size and outstanding resolution it’s possible to accurately gauge the focus, noise level at the selected ISO, and colour balance under the artificial light sources.
I’ve found you can rely on the A700’s feedback via this high resolution screen to a much greater extent than with any other camera I’ve used, thus saving a lot of post-show processing hassle.
Turning the rear wheel zooms the image in or out. A quick tap on the shutter release and you’re ready to shoot the next model.
With the next burst, while the image was still being displayed, a press of the custom button (C) to the right of the LCD screen and the review image switches to a small thumbnail with blinking highlight or shadow warnings, RGB and luminance histograms, and basic camera settings. With the camera now confirming your exposure, a tap on the Custom button returns the display to full screen and you can relax and shoot beautiful woman in elegant stylised fashions all night long (hey, everyone deserves a nice vacation from reality once in a while)
____________________________________________________________________________________
Mayoral Press Conference and Red Carpet
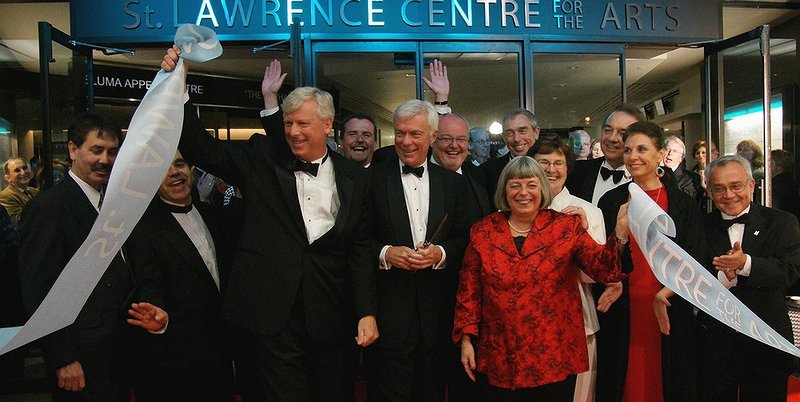
One of the first things I had to shoot when the A700 arrived was a red carpet event featuring the Mayor of Toronto, David Miller, (the guy holding up the ribbon) and a host of local theatre celebrities and socialites opening the St. Lawrence Centre For The Arts.
Of course in a typical Canadian low key manner, most of the celebrities eschewed the red carpet and just walked in through the crowd – straight to the bar! So I missed my chance to jump around like a hyper ventilating paparazzi, which was just fine by me.
The interesting thing to note about the ribbon-cutting ceremony photo above is the way the A700 handled the colour balance in this scene so well – late day existing light with a decidedly blue cast mixed with two tungsten balanced floodlights, and just to make it real interesting, overhead florescent fixtures.
I can tell you, the E510 didn’t handle this scene as well, and the DRO influenced metering on the Sony balanced out the exposure more evenly with no hot spots.
The publicist liked the photo of the event enough to arrange with us to distribute it with the follow-up press release to all of the city’s media. The St. Lawrence Centre also asked to use this photo on the home page of their web site. Not bad for a first attempt with a camera that wasn’t even out on the market at this point.
____________________________________________________________________________________
Tourism Toronto – Waterfront Project
As their contract photographer, I was tasked by Tourism Toronto to shoot the city waterfront from one end of the Toronto to the other. I felt with the 16-105mm lens (equiv. 24-155mm) and extended dynamic range of the A700, this was be the ideal combo for the job.
The project contains lots of different kinds of photos, but as many photography enthusiasts are heavily into landscapes I thought I’d include a few from this project.

Like the ridges and whorls on a giant fingerprint, current and wave action etch abstract patterns in the submerged sand of this Etobicoke beach on the western fringe of the city. Shot at the widest setting of 16mm.
Toronto’s beaches have earned an international designation for pollution-free waters and cleanliness, which is quite remarkable considering there is a modern city of 2.5 million people crowded up against them.
The city’s signature CN tower is in the distance.

Stretching the definition of waterfront slightly, we’ve headed a short distance up the Don River, a major tributary flowing into the lake, stopping at The Brickworks to catch some Fall colours. This is a rehabilitated quarry that features acres of natural habitat, waters teeming with Koi that are home to Herons, Kingfishers, and one pesky beaver who had to be relocated up north before he chewed his way through the entire surrounding forest. I have even seen White-Tailed Deer in this location just a couple kilometres from the downtown core.

Waves crash against the outer break wall of Ashbridges Bay harbour as sailboats speed along outward bound in the distance.
This photo was shot with the camera set to 16:9 mode. The viewfinder has four small markings protruding from the side of the frame that indicate the cropping for 16:9 mode. Unfortunately, against dimly lit or dark subjects these lines are all but impossible to see. A separate focusing screen with more clearly marked cropping would be a good idea for Sony to add for customers who want to shoot in this mode as a standard aspect ratio.
Most people have experienced results from shooting directly into the sun. I like to try for a cinematic day-for-night effect in situations like this.
Here you can see that the multi-coating on the 16-105mm lens is doing a fine job of suppressing flare, but also the DRO function is pulling detail out of shadow areas where you wouldn’t ordinarily expect to see it. The contrast in this scene is quite extreme when comparing the exposure for the bright highlights on the water to the shoreline areas, yet the A700 provides detail of the rocky beach in the curve of the landmass and also the shadow side of the trees. Honestly, I’m continually amazed at what DRO will pull out of JPEG exposures. In many photos it counters the need to shoot RAW to capture extended dynamic range and without the hassle of stacking layers in PhotoShop.
Squint your eyes while looking at this image for an idea of what you could normally expect from such a contrasty scene.

I was crouched down with one foot getting soaked in the chilly November waters of Lake Ontario, trying to get a group of weather-worn rocks in the foreground of a shot of waves lapping against the base of the towering Scarborough bluffs, when I noticed something moving in the upper part of the frame.
Looking up from the camera, some lunatic had jumped off the Bluffs with a para sail attached and was floating, literally hovering in mid-air due to the updraft at the cliff face, right overhead. I quickly zoomed in to capture a series of shots before he twirled and spun his way down the coast.
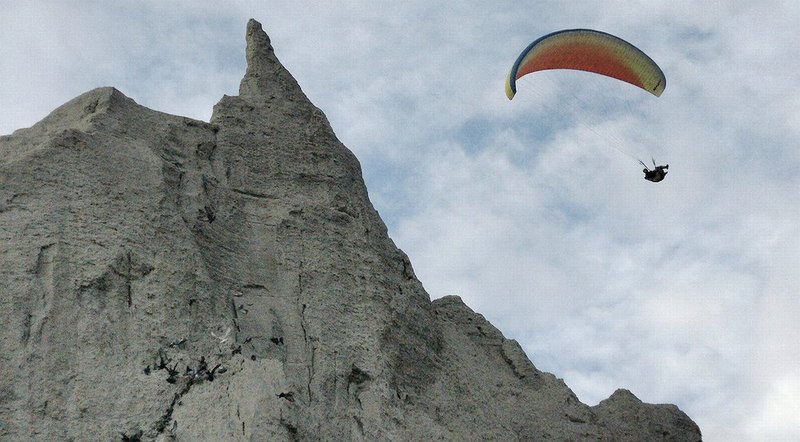
Then I went back to using the lens at full wide position to get the Bluffs shot before losing all feeling in my left foot.
This is what I mean about how useful the range of this 16-105mm zoom lens is. It’s just so adept at catching whatever comes along.
____________________________________________________________________________________
Conclusion
The A700 is a beautifully crafted photographic instrument. In my time with it I grew quite comfortable with the camera and found it’s output to be very dependable.
It’s tough, ergonomically well designed, intuitive to use (I still haven’t read the manual and yet managed to instantly come to grips with and even customise a lot of the camera’s features)
In action it’s fast and responsive. Changes are easily made as all of the important control inputs are via buttons and physical interfaces rather than menu-driven. The focusing is near instantaneous and very accurate.
It’s fast 5 fps frame rate and focus acquisition are easily on par with the 20/30D (which is my reference for comparison as I have used them for years) making it a joy to use for fast paced sports or news coverage.
The A700 has a great viewfinder – large and bright, it’s also easy to see the outer frame with the information overlay through the eyepiece even with glasses and most importantly, with sunglasses.
The camera is heavy, and very solid, inspiring confidence in its long-term durability, and comfortable to hold for extended shoots.
I even managed to test out the environmental sealing on the photo below getting the camera quite wet while shooting on a misty, foggy day.

The images the A700 produces have a lovely tonality. With DRO Advanced set to mid-level – I switched between 2 and 3 setting depending on subject matter – the contrast and saturation for most situations is just outstanding with impressively wide dynamic range. And I find the white balance in challenging lighting situations to be very effective.
Metering with the A700 is the most idiosyncratic of the three cameras used. In matrix metering I found myself using AE lock and Exposure Compensation more with the A700 than with either of the other two.
This seems to be a side effect of the DRO technology, which, while doing an impressive job of extending dynamic range in photos, will often skew exposure to a lighter tone than you are looking for. Thus, for a lot of photos I found I was applying minus one stop of exposure compensation routinely. Doing so kept the dark tones true while DRO lightened shadow areas and suppressed highlights.
I was going to write that the Achilles heel of the A700 – and there’s always one with every camera – was noise reduction. The smearing of fine detail in JPEG, or to a lesser degree RAW images, in the initial release cameras was excessive and greeted by a small firestorm of controversy in online forums.
But since Sony issued their latest firmware update this is no longer a concern in my view. If you’ve heard lingering commentary about this issue, you really owe it to yourself to check out the latest ‘version’ of this camera. It’s quite different
I would have no hesitation in using the A700 with latest firmware on paying jobs, and in fact I have. If you’ve purchased one recently be sure to check the firmware version as it is well worth it to have this up to date.
It would be nice to see Sony go one step further and offer a ‘noise reduction off’ setting as the Olympus does – the increased detail and sharpness at low ISO’s, especially for landscapers, when the noise filtering is dropped out completely is a revelation – but as it stands the A700 more than holds it’s own in it’s category for image quality.
The only small irritant I found has to do with the rear control dial.
In order to lock this wheel you have to go into the menu, something I always find inconvenient in real world use. And when carrying the camera over your shoulder unlocked, this wheel will rub against your hip with the result that often when you first bring it up to your eye the exposure comp will be wildly offset.
My solution was to simply turn the camera off to avoid accidentally resetting the exposure compensation and as it is next to instantaneous in start up, this is a lot faster than menu diving to unlock it.
Still it would be nice to have a simpler way of locking this control, perhaps using a wheel that can be pushed in, as with a computer mouse device, to toggle the lock on and off would be an idea for the future.
The supplied 16-105mm lens is quite a funky little optic.
It has it’s weaknesses – some corner softness, moderate distortion at both ends – but it’s such a useful zoom range, and it does such a good job covering that range, that I could see some people buying it with the A700 and never taking it off.
While I suspect it’s Imatest figures won’t set the world afire, in use for general-purpose photography, or as an ultimate walk-around lens, the 16-105mm is certainly worth forgiving it’s few small shortcomings. The benefit of always (within reason) being able to get the shot with an impressive degree of quality, cancels out to a great degree any ‘bench test’ concerns.
Whether it’s your Toddler’s first steps, or high performance sporting event coverage, the 16-105mm will come through for you producing sharp, flare-free, saturated images with a long tonal scale worth framing and hanging on the wall, or that customers will be happy to purchase.
As I said, the Sony A700 generates great looking photos. It’s an impressively capable camera that produces images with a unique Alpha look.
____________________________________________________________________________________
December, 2007
All photos and text copyright Douglas Brown (c) 2007
All rights reserved


Elevate Your Vision


Read this story and all the best stories on The Luminous Landscape
The author has made this story available to Luminous Landscape members only. Upgrade to get instant access to this story and other benefits available only to members.
Why choose us?
Luminous-Landscape is a membership site. Our website contains over 5300 articles on almost every topic, camera, lens and printer you can imagine. Our membership model is simple, just $2 a month ($24.00 USD a year). This $24 gains you access to a wealth of information including all our past and future video tutorials on such topics as Lightroom, Capture One, Printing, file management and dozens of interviews and travel videos.
- New Articles every few days
- All original content found nowhere else on the web
- No Pop Up Google Sense ads – Our advertisers are photo related
- Download/stream video to any device
- NEW videos monthly
- Top well-known photographer contributors
- Posts from industry leaders
- Speciality Photography Workshops
- Mobile device scalable
- Exclusive video interviews
- Special vendor offers for members
- Hands On Product reviews
- FREE – User Forum. One of the most read user forums on the internet
- Access to our community Buy and Sell pages; for members only.
You may also like


