Authors Note:
This article was originally published inPhoto Techniques Magazinein the Nov/Dec 1998 issue. Fresh illustrations have been added here though the text has not been changed. Because a long time has passed since the article was written it has become dated in some areas. Nevertheless, it remains a relevant primer.
For a discussion of the latest equipment and techniques that I am using or currently considering have a look at the section calledDigital Processing. A quick-start tutorial onPhotoShopfor beginners will also be found helpful.
Also readDigital Manipulations,A Digital Printing Class,Gaussian Blur Overlays,White Sky BluesandArchival Digital Processingfor more on digital image processing techniques.
It isn’t often that one gets to participate or even consciously observe a revolution in the making. Such has been the case this past year with digital imaging. 1997 was a watershed year for digital — not simply and most obviously because consumer digital cameras proliferated. But, because of much more exciting and, I believe, significant developments in the field of printers and scanners. These developments will affect everyone involved in photography, and even the most reactionary among us (of whom I was recently one) will want to begin participating, or at least understanding what these events mean as they unfold.
I will assume that you are an enthusiastic if not committed photographer who cares about image quality, and is one who either does his or her own B&W or color darkroom work, or works closely with a custom lab to produce quality prints.
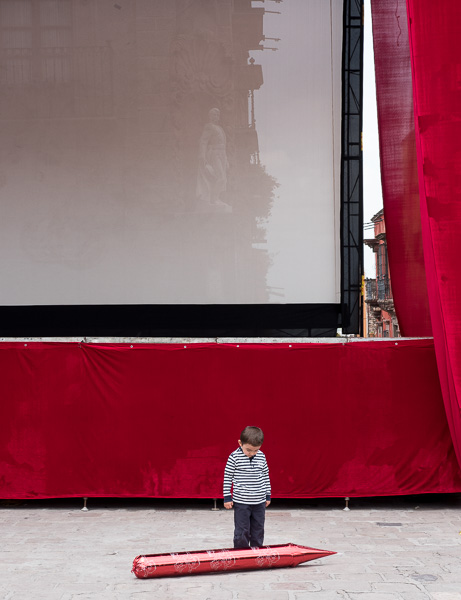
 Holy Cow — Ontario 1997
Things are not always what they seem. Though it looks like a digitally manipulated image, this photograph is a straight un-manipulated representation of the original transparency. What initially caught my eye for this sunrise shot was the delicate colour in the clouds. By the time I pulled the car over, the trees on an intervening hill added a striking silhouette. It was only when I had the camera set up on the tripod that I noticed the cow. Serendipity. Taken with a Contax RTSIII and 135mm f/2.8 Sonnar lens.
Does Digital Photography Mean Digital Cameras?
At the outset, lets get rid of the issue of digital cameras at the outset. For anyone wishing to do more than low-grade snapshots, nothing available today below about $25,000 is of interest. This will change quite dramatically over the next few years, but for now, other than for the needs of folks like real-estate agents and quick-and-dirty web publishing, consumer digital cameras don’t interest us. Already though, high-end digital backs for medium and view cameras are used extensively in advertising and catalogue work. Look at the glossy mail-order catalogues on your coffee table. Most were produced without a roll of film ever having been exposed to light. This being the province of the computer chip industry Moore’s Law tells us that every 18 months costs will half and performance will double, so don’t be too complacent. There is a digital camera in our collective futures, eventually.
This is a good time though to consider that virtually all images that we now see in print have been digitally processed. Almost every picture appearing in print has been scanned and processed in the digital domain. Most pros now submit their work to magazines on CD-R disks. No more making duplicate transparencies, and a $3 disk can hold some 25 high-resolution images, each color balanced and cropped to the photographers specific intent. What does all of this mean for the photographic hobbyist, the fine-art photographer and especially for the traditional darkroom worker? That’s what we’ll examine in this necessarily panoramic overview of the current state of the digital imaging art.
Though it may sound hyperbolic to some traditionalist, many photographers now accept that working on their images in digital form can provide greater control, precision and flexibility than do traditional techniques. In the last decade the audio world was revolutionized by digital, from the recording stages through playback. Many will recall that CDs supplanted records at retail in less than a two-year period. There are some that still bemoan the death of vinyl records, claiming superior "reality" to an all-analogue process. Further to the right, there are still those that prefer the sound of tube amplifiers. Will this happen in the photographic realm? I’m fairly sure that it will, and I certainly won’t make any claims at this point about which is "better". (In fact, I prefer the sound of the best "tube" amps.) But, whether you belong to the "if you can’t beat-um, join-um" school, or the "know thine enemy" camp, read on.
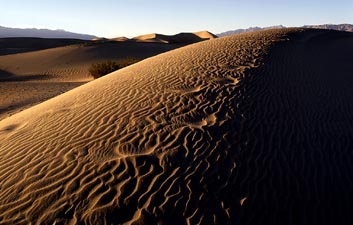 Sculptured Dunes — Death Valley CA, 1997
The sand dunes east of Stove Pipe Wells in Death Valley have one major problem — footprints. Unless you are lucky enough to be there just after a high wind wipes them clean you will find the dunes littered with thousands of tourists footprints. Rather than fight it I decided to see if I could integrate the wind blown patterns and the footprints into a cohesive image. Photographed with the Rollei 6008 and 40mm f/3.5 Super-Angulon on Provia 100 film.
Computers — The Core of Digital
Digital image processing requires a powerful computer. Fortunately, state-of-the-art machines are now available for about $3,000 and allow you to do so much more than simply create a digital darkroom. But, for that purpose consider a Pentium II 266Mz chip as a minimum. For image processing 64Mb of RAM, and preferably 128Mb or more are needed. Remember that a scan of a 35mm slide is approximately 25Mb in size, with medium format scans typically two times larger. You will have in the PC’s memory not only the operating system, the image processing program and the image file, but frequently additional "layers" or parts of images. A good rule of thumb is that you should have at least four times the amount of RAM than the size of the file that you’re working on. This means that if you are working with 25Mb scans from a 35mm slide, you’ll want at least 96MB of RAM on your computer.
Because of the large size of digital image files you’ll also want a substantial hard disk — 2GB is a minimum. For transport the ZIP drive has become the common means of transferring files to labs and service bureau because they only cost about $10 a removable disk and can hold up to 100MB. The least expensive means of archiving images, and for submissions, is with a CD-R drive. These allow you to create your own CDs, and at less than $2 for a 750MB disk archiving costs are minimal.
The monitor screen and display card are also important considerations. At least a 17" screen is preferred and the graphics card should be able to display at least 1280 X 1024 dpi in 24 bit color. At this point if the computer jargon is confusing to you, just use these as minimum requirements and you won’t go wrong.
With a computer possessing adequate memory, storage and processing power you now need to consider those things that will most effect your output quality — software, scanner and printer.
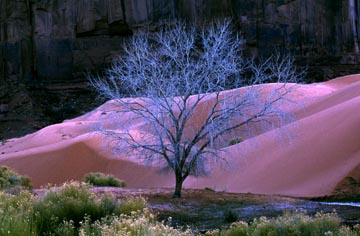 After Sunset — Monument Valley, 1999
An other-worldly sight in Monument Valley. About 30 minutes after sunset we were driving out of the valley when we came over a rise and saw this scene. A 30 second exposure on Kodak VS with aCanon EOS3and Canon L 100~400mm IS zoom, taken at 400mm.
Scanners
A scanner will allow you to bring slides and negatives, and either color or B&W into your computer in a matter of minutes. While there are outside services that will do this for you, and we’ll consider them a bit further on, once you’ve made the investment in a scanner you’ll be able to amortize it over many hundreds, or even thousands of images. With your own scanner, the only cost of scanning is your time. Another benefit is the control that doing ones own scans provides. While commercial scans can be quite good, like any outside services they are dependant on the skills of the operator and the calibration of the equipment. Buying a scanner is like buying an enlarger. Purchase the best quality that you can and enjoy it for a long time.
Currently, for 35mm work the two most highly regarded scanners are the Nikon LS-1000 Super CoolScan and the Polaroid SprintScan Plus.(Author’s Note: In early 1999 Polaroid introduced the high-resolution SprintScan 4000. Clickherefor a review.)Both are in the $2,000 range. There is a new crop of lower cost scanners from Polaroid, Minolta, Olympus and others, but for the serious workers the top-of-the-line Nikon or Polaroid are likely to prove most satisfactory.
The issues that drive scanner choice are primarily resolution and gamma range. Both the Nikon and Polaroid offer the highest resolution available from a desktop scanner; 2700 ppi (pixel/inch). This is sufficient resolution to produce an 8X10" print at over 300 dpi with a photographic quality ink-jet printer such as the Epson Stylus Photo or HP PhotoSmart. The math when considering resolution is easy. If the scanner is capable of 2700ppi then a 10" print will have a resolution of 270ppi. This is sufficient for output that rivals traditional photographic media. 300ppi also happens to be the required resolution for printers such as the Iris and Lightjet 500, which produce some of the finest ink-jet and digital-to-photo-paper images currently available.
Be wary ofOpticalVs.Interpolatedresolution in scanner specs. The only number that counts is true optical resolution. Anything else is just empty specmanship.
In terms of Gamma (contrast range), the Nikon provides a range of 3.0 while the Polaroid achieves 3.2 – a better figure. Scanners producing a gamma range of less than 3.0 are not appropriate for high quality work. Note that the gamma scale is logarithmic and therefore small increments are significant. Bit depth is also a consideration. All scanners are capable of the standard 8 bits per color (24 bits = 3X8) — the minimum needed for true full color representation. But, higher end scanners can achieve 30, 36 or even 48 bit color. These extra bits allow the scanner to resolve more color depth – a richer color palette. Some compress down to 24 bits before outputting to the computer while others will pass a 30 or 36 bit file directly to the computer. Adobe’s Photoshop will accept such files but can only perform certain basic functions on these files before the user has to convert the file to a 24 bit working space within Photoshop. This is akin to the advantages of recording audio at higher bit rates, and then downsampling for CD production.
Each scanner has its own control software that plays an important part in both the quality of scans and ease of use. Scanning software not only provides an interface between the scanner and the computer, it also provides the user with the ability to adjust a wide range of parameters before the image ends-up ready for final processing. Choosing a scanner therefore involves evaluating its bundled software as well as hardware capabilities.
 Cactus & Butte — Monument Valley, 1999
Once again the Canon 28mm Tilt / Shift lens proves its worth. An early morning hike through the dunes at Monument Valley lead to this wonderful scene, offering great depth and texture.
Image Manipulation
Once the image has been scanned the real work (and fun) is found in processing the software on your computer. All of the controls of the traditional darkroom – brightness, contrast, color balance, burning and dodging are available, but with infinitely more control and ease than you’ve ever had or imagined. One of the most important advantages for me of working in the digital realm is that adjustments are made with real-time feedback. With a well-calibrated system the changes that you make, which are instantly displayed on-screen, are closely akin to what you’ll see on the final print. Most importantly, once made these changes are saved to disk as part of the final image and therefore making subsequent prints is a snap. In fact, I sometimes will save multiple versions of an image when I’m refining how I want the final result to look, which is another reason for having as large a hard disk as you can — a few variations and a couple of hundred megabytes of disk space can be consumed.
Which program is best to accomplish these tasks? For most serious workers the choice is Adobe Photoshop V4.0. This is virtually the de facto standard for image processing software on both PCs and Macs. While it’s expensive, it is without peer in terms of versatility and power. There are several sub-$100 programs that are competent, but Photoshop should be your choice for several reasons. In addition to being arguably the most powerful program, it also is the best supported in terms of third party books, courses and add-in products, as well as support through on-line forums on the Internet and commercial services like CompuServe.
A freshly scanned image is referred to as beingraw, even though one might have exercised some control over it during the scanning process. Assuming a good clean scan there are a number of basic steps that are performed on almost all scanned images. These include adjusting contrast and brightness, color balance or tonality, sharpening, and cleaning up any dust spots or other unwanted artifacts.
Depending on the image this process takes anywhere from a few minutes to several hours — just as its counterpart activity does in the darkroom. But, unlike in the darkroom, once the alterations and adjustments have been performed to your satisfaction they are saved to disk, and an identical print can be produced at a moments notice, even by someone else.
For many people darkroom work has its unpleasant aspects, including the isolation and the chemical fumes and dermatological effects. The digital darkroom allows them to avoid these unpleasantries. This is to not to deny the pleasures of the darkroom, but there is something to be said for working in a well light, well ventilated space closer to the rest of the family.
There are quite a few multi-hundred page books on Photoshop, and this brief article can’t even begin to show the variety and depth of the tools available to the creative digital darkroom worker. Two books which I can heartily recommend are,Real World Photoshop 4, by David Blatner and Bruce Fraser, (ISBN 0-201-68888-3), andPhotoshop 4 Artistry, by Barry Haynes and Wendy Crumpler, (ISBN 1-56205-759-6).
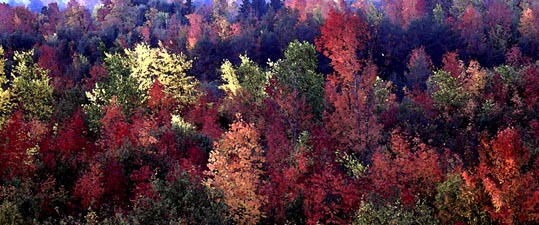 Caledon Hills, Ontario 1997 (D)
I rarely use any of the myriad of effects that image processing software is capable of. In this case the transparency of this fall landscape was slightly out of focus and was unusable as a straight print. Photoshop’s Watercolor effect added a bit of additional blur, turning a failure into a dramatic image. Taken with theRollei 6008and 180mm lens on Provia 100.
Alternatives
Though having ones own scanner and printer is most convenient, there are alternatives, and even good reasons not to use them when you have them. Service bureau offer scanning at quite reasonable prices. Kodak Photo CD scans (35mm only) cost approximately $2 per image, and while a high-end scanner can usually do better, quality from a good lab is quite good. Photo CD-Pro scans cost about $15-$20 per image and can have excellent quality as well being available for transparencies up to 4X5" in size. At the high-end, quality labs offer drum scans that cost about $75 per image, but which offer unparalleled quality.
Output
When it comes to output, there are many choices. If one wants to return to film based material to produce traditional prints, labs can transfer digital files back to film once all of the control and manipulation that you care to perform have been completed. Also, some people are enamoured ofIRISprints, particularly when done on heavy watercolour paper.
Probably the most exciting lab-grade output medium available today is that from theCymbolic Science Lightjet 5000printer. There are a number of them at labs around the country, but the most famous is that run by Bill Nordstrom, the developer of the famousEvercolor Pigment Transfer Process. These prints are true photographic prints from digital files and have to be seen to be believed.
But, I believe that one of the most exciting areas in digital imaging lies with the new generation of ink-jet printers. During 1997 both Epson (Stylus Photo) and HP (PhotoSmart) introduced 8X10" output photorealistic printers that challenged everyone’s preconceptions of what non-traditional media photographic output could look like. Simply said, these prints when made on high-grade paper are essentially indistinguishable from traditional prints. And, because of the enhanced image processing capabilities that digital provides they can frequently appear superior to what we have been used to seeing. This past spring several next-generation consumer ink-jets for photo printing have appeared, including theEpson Stylus Pro 5000,Photo 700andPhoto EX. While thePro 5000at under $10,000 provides some of the highest quality ink-jet images around, thePhoto EXhas nearly identical image quality for less than $800. The price / performance ratio of this printer is remarkable.
Up until ’97, dye sublimation printers offered the fine arts photographer some of the finest quality available. But, the latest generation of specialty photo ink-jets, such as those from Canon, HP and Epson have dramatically lowered prices and increased availability and picture quality to the point where dye-sub has some catching-up to do.
The Downside
Is there a fatal flaw? Unfortunately, yes. The inks used in ink-jet printers do not have the permanence of eitherType RorCprints, let aloneIlfochrome. Common wisdom is that while these prints will have a dark storage life of a decade or more, under indoor indirect lighting they may only last for a few years at best before color shifts and fading occur. HP has indicated that the inks used in its PhotoSmart printers offer color stability comparable to that from traditional C prints, but no independent source that I’m aware of has yet done a definitive test on the current generation of inks.
Anecdotally, I have glass framed prints from theEpson Photo StylusandEpson 1520that have been hanging in a room with bright indirect sunlight for approximately a year, without any noticeable degradation. Caveat Emptor.
Because of this issue, most fine arts photographers, for whom a display print is the final object d’art, either have their digital files output back to film, to aLightjetprinter for traditional printing, or they use a service bureau to produce more long-lastingIrisprints. Fortunately, the printer manufacturers are working on more stable inks, and companies likeIlfordare working on versions of their archival dyes for the ink-jet industry. In the meanwhile, sprays such asIris Printsealprovide significant protection and can extend display life considerably. Nevertheless, I don’t hesitate to frame and hang my pictures for my own use, but I must admit that at present prints that I make for sale are still output onto traditional media. Keep in mind though that because all image control and manipulations are imbedded in the final saved image, making a new print in future (hopefully on ever-improving materials) is as easy as clicking on PRINT.
 Paris 29 — France 1997
This monochrome image is of a wall in Paris. Originally shot on color transparency film, Provia 100, I removed the color within Photoshop and then used a Duotone setting to get the warm tone seen here.
Black-and-White Too
One area where many photographers mistakenly believe that ink-jet prints are lacking is in producing quality B&W prints. In reality, these printers produce very impressive monochrome prints, and images with an almost infinite range of toning are simple to produce. The reason that there is a misconception about monochrome ink-jet work is that beginners usually produce prints with theBlack & Whiteprinter setting. This uses only the black ink and severely limits the tonal range that can be produced. The correct approach is to use the printer’s color settings. Duotone and Tritone settings within Photoshop also enable subtle monochrome toning approaches.
Conclusion
Where to go from here? Try getting you feet wet and seeing for yourself what the fuss is all about. If you already have a computer with enough horsepower to handle digital photo processing why not start with having a few slides or negs put onto Photo-CD. There are several modestly priced programs available, and these will allow you to explore this exciting new side of "darkroom" practice. There are also numerous magazines that now offer extensive coverage of digital image processing topics and some even specialize in it. Most of all — have fun and don’t be afraid of change.

Elevate Your Vision


Read this story and all the best stories on The Luminous Landscape
The author has made this story available to Luminous Landscape members only. Upgrade to get instant access to this story and other benefits available only to members.
Why choose us?
Luminous-Landscape is a membership site. Our website contains over 5300 articles on almost every topic, camera, lens and printer you can imagine. Our membership model is simple, just $2 a month ($24.00 USD a year). This $24 gains you access to a wealth of information including all our past and future video tutorials on such topics as Lightroom, Capture One, Printing, file management and dozens of interviews and travel videos.
- New Articles every few days
- All original content found nowhere else on the web
- No Pop Up Google Sense ads – Our advertisers are photo related
- Download/stream video to any device
- NEW videos monthly
- Top well-known photographer contributors
- Posts from industry leaders
- Speciality Photography Workshops
- Mobile device scalable
- Exclusive video interviews
- Special vendor offers for members
- Hands On Product reviews
- FREE – User Forum. One of the most read user forums on the internet
- Access to our community Buy and Sell pages; for members only.
You may also like