


A frequent question to landscape photographers is: “What filter did you use in that photograph?” This is usually because the person doesn’t believe the colours and tones in the photograph are real, and thinks that the photographer has used one of the many ‘effect’ filters on the market to achieve the result.
The truth is that no filter can substitute for being in the right place at the right time to capture the most spectacular light. That’s not to say that filters aren’t important, however. Properly used, filters allow the photographer to capture a scene that would be virtually impossible to photograph otherwise. I’m talking about those known as graduated neutral density filters, sometimes also referred to as split neutral density.
______________________________________________________________
What Problem Do They Solve?
Cameras can only record a certain range of tones, known as their ‘dynamic range’. This can be quite limited and very often is narrower than the dynamic range of the scene being photographed. In that case, either the darker areas of the scene will be underexposed and a featureless black, or the brighter parts will be overexposed, a featureless white.
Graduated NDs, or simply ‘grads’, are clear on the bottom and slightly opaque on the top, with either an abrupt or a gradual shift in the middle. They are used to darken the brighter part of a scene so that it falls within the dynamic range of the camera.
In the examples below, I’ve photographed the same scene three times, holding up a different graduated filter each time. In each case, the transition line between light and dark has been placed over the horizon.
You can see in each image that the sky around the filter is virtually pure white, but that part visible through it has retained detail.
Filters are available in a number of strengths, usually given in ‘stops’. One stop is a halving of the light coming through the opaque part of the filter. So a one stop filter will darken the bright area by a factor of two, a two stop by a factor of four and a three stop by a factor of eight.
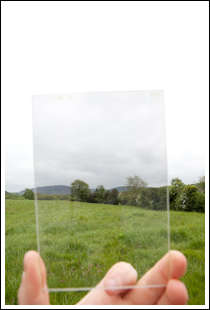
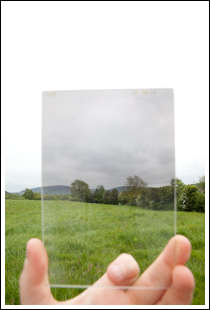
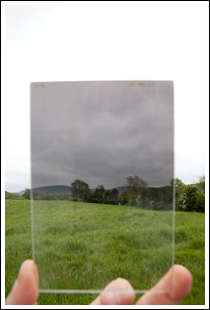 One stop graduated filter. Note that this is the mildest result, just barely retaining detail in the clouds.Two stop graduated filter. This one produces the most balanced result in this case, darkening the clouds enough to give an image that’s closest to the way the scene looked at the time.Three stop graduated filter. This one has darkened the clouds too much, producing a heavy effect that is at odds to the way the scene actually looked.
Notice in each case, that only the sky is affected. I placed the filters with the transition zone right over the horizon, so the foreground grass is just as bright seen through the filter as it is on the sides and bottom of the frame.
______________________________________________________________
Use in the Field
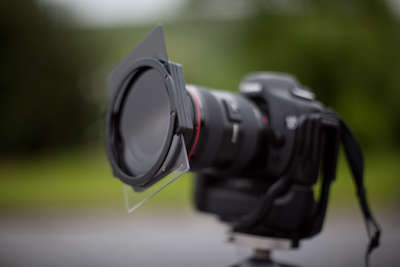
In the field, the filters aren’t held as I’ve shown them above – they are attached to the front of the lens via an adapter ring and a rotating filter holder, as seen in the image above.
This setup allows the filter to be moved up and down as well as rotated, permitting the photographer to position it exactly as they wish. The holder also allows multiple filters to be held simultaneously. This is useful when stronger filtration is needed than the darkest filter you have. Two filters, positioned the same way, will behave like a single, stronger one.
______________________________________________________________
When to Use Them
In general, if the scene has a contrast range that exceeds the dynamic range of your camera, use of these filters is a must. However, there are many times where you would choose to use them even when this is not the case.
Very often you can have a correctly exposed photograph in which the shadows are much darker and the highlights much brighter than your perception of the original scene. In these cases, extensive post-processing is usually required to balance the tones and give a pleasing (and realistic) result. Using a graduated filter in the field can both improve the technical quality of the image and the aesthetic, while reducing your postprocessing workload.
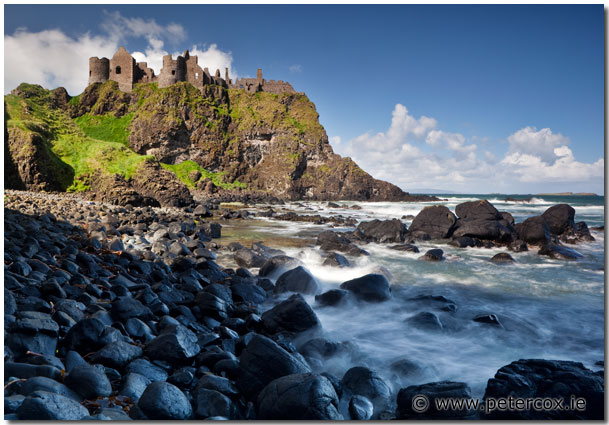
In the images below there was a severe contrast between the shadowed foreground and the sunlit castle beyond. In the larger image, I used five stops of filtration (by combining a three- and a two-stop filter) angled so that the transition matched the diagonal line of shadow. This balanced the brightness perfectly, leaving the shadows dark, but rich with detail.
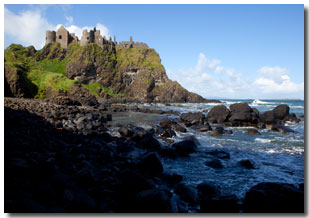
The smaller image shows what the scene looked like with no filtration – the shadows are virtually black, and extensive work would need to be done to bring out the detail within. The result would still not be as good as the filtered image.
______________________________________________________________
Choosing the Right Strength
This depends very much on the scene itself. With digital photography, probably the best approach is to simply guess, take the photograph, and check the result. This intuitive approach will, with practice, give you the correct result the first time more often than not. If the first shot is not correct, it will tell you clearly what you need to do to correct it – either using a stronger or a weaker filter.
______________________________________________________________
What Should I Buy?
Firstly, avoid the screw-in ND filters. These are the simplest option out there, but are too inflexible for real use as they don’t let you move the filter’s transition line within the composition.
So you’ll need a system including lens adapter rings and a holder. The main brands out there are Cokin and Lee, with Lee being the higher quality, and substantially more expensive, choice. Both offer fully functional and flexible systems. Which to go with depends on your budget and how important it is for you to get the best possible quality out of your images.
I own a full set of six filters – one, two and three stops in each hard and soft transitions. Probably my most used one is the two stop soft transition, so if you’re only going to get one filter, that would
be the one to get. However, I do recommend getting a full set, for maximum flexibility.
______________________________________________________________
When Can They Not be Used?
As you may have guessed, these filters only work where there is a fairly linear transition between light and dark in the image. This is not always the case – for example, if you have a large tree in the frame, it will extend into both the foreground and into the sky above. Using a graduated filter in this case would result in the top of the tree being noticeably darker than the bottom. Interior shots with bright windows are another problem area.
In these cases, you must either make a decision to sacrifice either the highlights or the shadows, or use a technique known as ‘high dynamic range’ photography, or HDR for short. This involves taking several exposures which cover the entire dynamic range of the scene and then blending them digitally.
______________________________________________________________
Peter Cox
Peter Cox is a landscape photographer and educator living in the beautiful south-west of Ireland. He offers a variety of photography workshops, from ten-day touring workshops of Ireland to shorter, two-day courses. For more of his work, you can visit his website at :http://www.petercox.ie.
June, 2009


Elevate Your Vision


Read this story and all the best stories on The Luminous Landscape
The author has made this story available to Luminous Landscape members only. Upgrade to get instant access to this story and other benefits available only to members.
Why choose us?
Luminous-Landscape is a membership site. Our website contains over 5300 articles on almost every topic, camera, lens and printer you can imagine. Our membership model is simple, just $2 a month ($24.00 USD a year). This $24 gains you access to a wealth of information including all our past and future video tutorials on such topics as Lightroom, Capture One, Printing, file management and dozens of interviews and travel videos.
- New Articles every few days
- All original content found nowhere else on the web
- No Pop Up Google Sense ads – Our advertisers are photo related
- Download/stream video to any device
- NEW videos monthly
- Top well-known photographer contributors
- Posts from industry leaders
- Speciality Photography Workshops
- Mobile device scalable
- Exclusive video interviews
- Special vendor offers for members
- Hands On Product reviews
- FREE – User Forum. One of the most read user forums on the internet
- Access to our community Buy and Sell pages; for members only.
You may also like


