


In The Beginning
Welcome!
As a Contributor you are able to create new content for LuLa. A Contributor creates the content online and then the article needs to be published by a site administrator.
A Contributor has no commitment to a minimum publication schedule and will not have a dedicated Forum section. But Contributors are expected to participate in Forum discussions, especially after a new piece of theirs has been published. There are no ad positions provided and no revenue to be derived from publication.
If you agree to contribute at least eight articles per year we will give you a free ad space on your articles, located on one of the bottom banner positions.
First Step – Registration
The site Administrators are Michael Reichmann, Chris Sanderson, Mark Dubovoy and Mark Guertin. One of these will need to approve your request to become a Contributor.
Before anything else though you must have a current active account on the LuLa Discussion Forum. If you do not have one you must first register for one on the forum before we can set you up as a Contributor.
Once you have created a Forum account, or if you already have one, please send the email address that you’ve used it to Michael at[email protected]. He will then set you up as a Contributor.
 co
co
Fig.1
You will note that at the top right of every page on the site there is now a hot spot titledContributor Login. Once you have a Forum Account and have been set up by an Administrator as a Contributor you may use your forum name and password to log in.

Fig.2
You will see at the top of the page something that looks like Fig.2 above. You can choose to create a New Article, look atArticles in Queue(those you’re working on but which are not yet published), andArticles Published, which are ones already public and online, where you may want to edit to correct a typo or add an update.
Press NEW ARTICLE and you will see something like Fig. 3 below
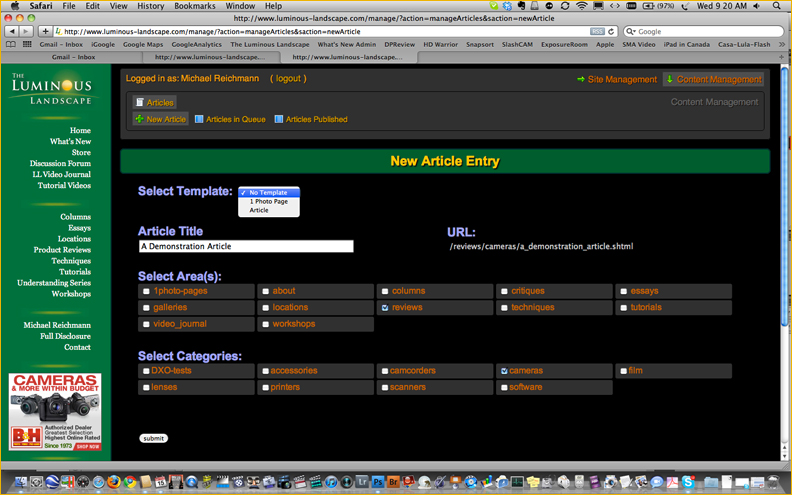
Fig 3
There are currently three choices under SELECT TEMPLATE;No Template, 1 Photo Page and Article. For now choose Article. As you’ll see shortly it will create a page with jibberish text, headlines, a picture and other layout elements to help you get started. Once you are familiar with these you’ll be able to chooseNo Template and start with a blank page.
ARTICLE TITLE
This is where you create the title for your article, which also automatically creates the article’s URL (web address). Type it as you wish it to appear. Don’t use hyphens or underscores. The system automatically adds these for you to the URL.
Click on one of the available categories under SELECT AREA(S). The system will automatically place the article in the correct section that you are authorized to publish to, and adjust the URL automatically. If there is a subcategory available it will appear and you can select it as well.
CLICK SUBMIT.
You will now see a page which looks like Fig. 4 below. It has two main sections – ARTICLE DESCRIPTION and ARTICLE CONTENT.
Note: Internet Explorer 9 betas are not currently supported with this editing environment. If IE9 is your current web browser, please download and use FireFox, Chrome, Safari (or just about any other modern browser) for the time being.

Fig.4
ARTICLE DESCRIPTION
In this block you will write the text that the system will automatically add to theWhat’s Newpage when your article is finally published. .This section is not working in automatic mode yet . You can still fill this in though and an Administrator will use it to manually post to What’s New when your article is published.
The text formatting available in this block is a subset of the tools available in the main text creation box below it, which we’ll look at in a moment.
ARTICLE CONTENT
This is where you write your article. You can write it in a word processing program or a text editor and then paste it into this section. Keep formatting to a minimum because you’ll be doing that here in the web LuLa editor. Formatting is done using the tools in the blue toolbar. It’s your choice whether to do your writing here online or elsewhere.
These tools are likely quite familiar, as they are very similar to the tools available in just about every text editor or word processing program you’ve ever used.

Fig.5
Rather than bore you with what each one does simply explore them on your own. Passing your cursor slowly over each icon explains what it does.
Note that the drop down dialog box (Body Text) at the center of the top line on the tool bar is where the various template styles are found.
Save Early – Save Often
Please be aware that if you are writing online, your text is not automatically saved! If you have a computer crash or even just close your browser window you will lose everything that you have written since the last time you saved. You can save your work to the server at any time by clicking on Save and Continue or Save Article buttons. While within the actual editor interface itself (the “Article Content” area) the hotkey you normally use for save in your OS (command+s for OSX, control+s for windows/linux) will also perform the same action as the “Save and Continue” button — saving your article and reloading the page with the updated content.
Coming Soon: Article edit history. The system saves each revision of your article (but only when you hit the save button) and you will be able to browse back through versions to view changes, retrieve previous content, etc.
CONTENT RECOVERY
There’s a new feature that’s been added to the article editor. It’s for those times when you close the editor window without saving the changes by accident, or hit the back button, or click a link elsewhere and it loads in your opened and unsaved editor window. It might also work after a browser crash (but that’s not a certainty). It’s a way to recover the last editor window content. It’s not foolproof but it works more often than not (as long as you haven’t done anything else in the editor window since the “whoops”). It’s icon is that of a life preserver and is highlighted in the image below. To use it simply click on the icon and, depending on what’s currently in the article content window it will either just update to the last version it knew about (even if you didn’t save it manually! It saves within your local browser via a few different mechanisms) or will prompt you asking if you want to replace the content with the saved version.
NOTE: This will only work on the exact same browser on the exact same machine where the “whoops” moment happened as it saves in your local browser cache/cookies.
 Recovery Icon
Editing TIps
Full Screen Mode:If you haven’t already found it by exploring all the icons in the editing bar here’s one that you may find useful. It puts you into “full screen” editing mode, meaning that you’re not stuck editing articles within the small provided window when you first load the article edit page. Clicking it the first time puts you into full screen mode, clicking it again puts you back into windowed mode. When you’re working on large articles or just want some more real estate and/or less distractions from the content around you it’s a great feature. It’s also worth noting that you don’t have to exit fullscreen mode to save your content, you can simply click the save icon (first icon, top row) and it will do a “Save and Continue” save for you. Likewise you can do a “Save and Continue” by using your standard OS assigned hotkey for save (command+s/control+s).
 Full Screen Editing Icon
A Word on Styles
With several thousand articles on the site over more than a decade, the site (for better or worse) has developed a certain recognizable style of presentation. It is important that this be maintained. This web editor provides style elements for you to use, including…
Byline
Body Text
Image Subtext1 (used under a photograph for title, location and date)
Image Subtext2 (used under a photograph for technical info)
Section Title
Section Subtitle
There are also the usual compliment of indenting, centering tools, as well as text colour , text block colour , superscript andsubscript.
Please feel free to use these tools as appropriate, but also kindly stick close to the general style that the site follows.
INSERT / EDIT IMAGE
The one tool which requires some explanation is the icon of a tree on the top line. It provides the ability to Insert and Edit Images into an article.
First though you need to prepare the images before uploading them. The best way to do this is inPhotoshop, using that program’s Save For Web and Devices. Set JPG quality to Maximum, Optimized and Convert to SRGB. See Fig. 6 below. Of course files can be created in any other program as well.
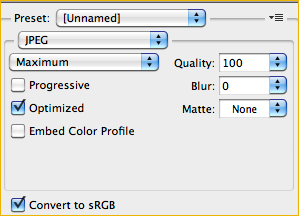
Fig.6
Keep image files under 800 pixels in maximum dimension for the largest. More typically image files should be in the 500 pixel range. Files can be saved to any directory on your hard disk or your desktop.
When you are ready to upload one or more images to the article that you are writing click on the Green Tree icon on the top row of the tool palette.
Fig. 7
You will see the above window (Fig. 7). Click on the Browser Icon at the top right to go to the file browser and find image files to upload.
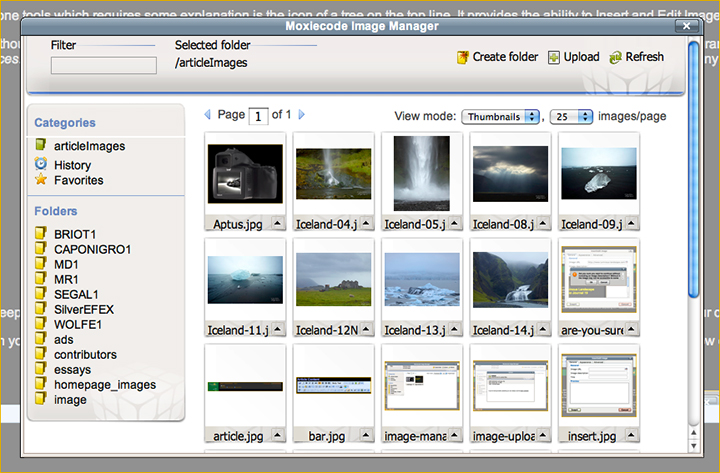
Fig. 8
You next will see a screen something like Fig. 8 above. If you don’t have a directory (Folder) for your images select CREATE FOLDER. If you do have one already, select it now. Use your name or initials and a numeral. Over time you’ll want to create new image file directories to make finding and working with new images easier and less cluttered.
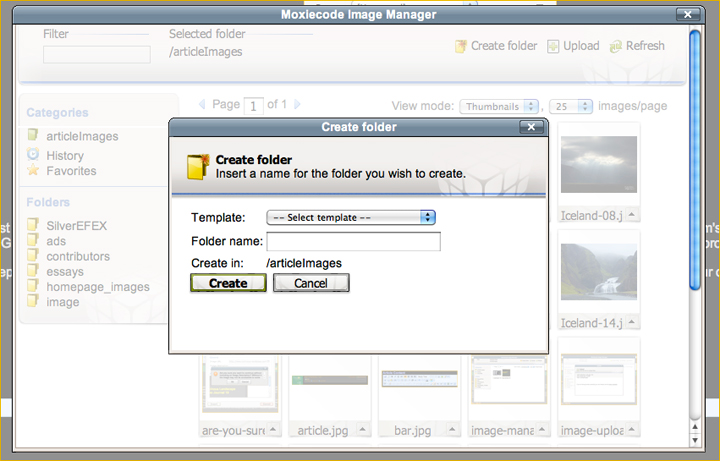
Fig. 9
Once you have a personal directory for your files in/articleimagesyou’re good to go. Your directory will at this point likely be empty, so you need to UPLOAD files to it from your hard disk.
Note the UPLOAD button at the top right of Fig. 8 above. Select it.
You may be ask if you want to include an image description. There is no need, here, or any other time that you are asked this question. You can ignore any warnings as well.
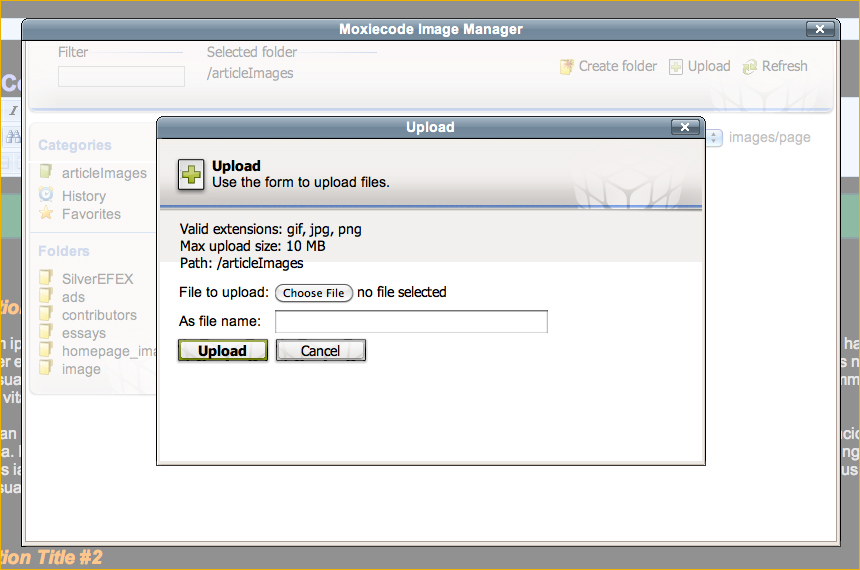
Fig. 10
UseChoose Fileand navigate to the file(s) that you wish to upload. You can only upload one file at a time. When each file has been uploaded you can do the next one until you’re done, at which point pressCancel.
You will now find yourself back to a screen similar to Fig. 8 which is shown again below.
Fig. 8
You can now select an image file to insert into your article.
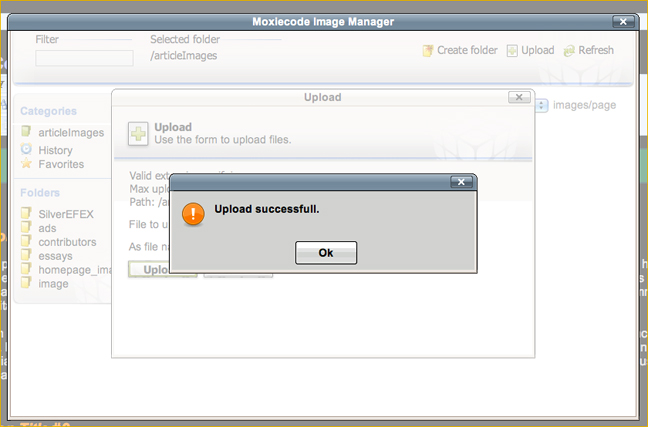
Fig. 11
That’s about it. You can use ImageSubtext1 or ImageSubtext2 for a first level or a second level title for the image.
It is common LuLa style to put a light orange border around images. You can do this before uploading in Photoshop by using the STROKE command with a one or two pixel border, or you can do it in the LuLa editor now.
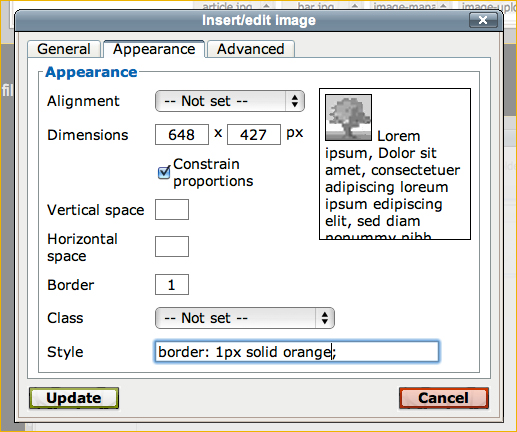
Fig. 12
To do this, go to theAppearancetab of Insert / EditImage (green tree icon), and type a ” 1 ” on the Border box and press tab. The text “border: 1px solid black” will appear in the style box below it. Edit the word ” black ” to ” orange ” and press update.
Practice
That’s pretty much all there is to it. My suggestion is that you spend an hour or two practicing. You can’t break anything and you can delete whatever you create at any time. The interface is fairly straightforward once you become familiar with it.
There are numerous additional features available, such as Spell Checker, Table Creation and the like, but you’ll likely be able to figure these out when you need them.
If you have any questions the place to ask them is on the site’s Discussion Forum. There is a private section for Contributors and you should have been authorized to access it. If you have not yet been been authorized drop Michael a line.
Michael


Elevate Your Vision


Read this story and all the best stories on The Luminous Landscape
The author has made this story available to Luminous Landscape members only. Upgrade to get instant access to this story and other benefits available only to members.
Why choose us?
Luminous-Landscape is a membership site. Our website contains over 5300 articles on almost every topic, camera, lens and printer you can imagine. Our membership model is simple, just $2 a month ($24.00 USD a year). This $24 gains you access to a wealth of information including all our past and future video tutorials on such topics as Lightroom, Capture One, Printing, file management and dozens of interviews and travel videos.
- New Articles every few days
- All original content found nowhere else on the web
- No Pop Up Google Sense ads – Our advertisers are photo related
- Download/stream video to any device
- NEW videos monthly
- Top well-known photographer contributors
- Posts from industry leaders
- Speciality Photography Workshops
- Mobile device scalable
- Exclusive video interviews
- Special vendor offers for members
- Hands On Product reviews
- FREE – User Forum. One of the most read user forums on the internet
- Access to our community Buy and Sell pages; for members only.
You may also like


