


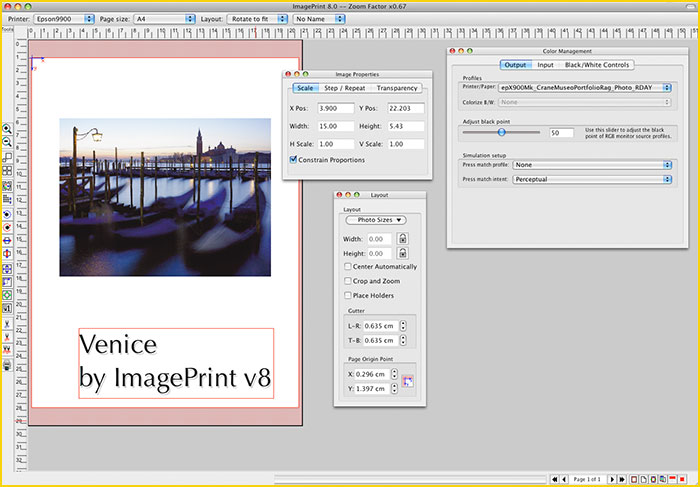
ImagePrint v8 and its interface – intuitive and versatile
For well over a decade,ImagePrint by ColorByte Softwarehas been a life saver for many fine art printers and photographers working with Epson pigment ink printers. For those demanding the highest possible quality in their output, ImagePrint was well known for its ability to deliver a drastic improvement over the often lackluster free drivers and paper profiles provided by the printer manufacturer.
Over those years, however, the free Epson drivers have steadily improved, while affordable profiling tools have become widespread (some printers now even sport onboard spectrophotometers) allowing users to easily build their own profiles for printer, paper, inks and climatic conditions. Now, as never before, it is possible (though perhaps not easy) to achieve an acceptable print without investing in a dedicated RIP.
So – does it still make sense to invest in software which costs between 20 and 70 percent of your printer’s price?
The answer, of course, depends on your needs.
For many people (perhaps most), "acceptable" prints are perfectly fine, and basic workflow tools are all that’s needed. But for those who need more than just "acceptable", and are willing to pay for it, ImagePrint may still have a lot to offer. In fact, if you are in that niche group of users that need to reproduce high-end photography or fine art as accurately as possible, or have demanding, professional workflow needs, I believe it may well be indispensable.
But, that is one fine art printer’s opinion. What follows is a brief tour of some of the features of ImagePrint that I find most useful.
___________________________________________________________________________________
Profiles Matter!
Creating accurate printer/paper profiles often seems to be as much an art as a science. Squeezing the (usually) larger color gamut of an image into the (usually) smaller color gamut of a printer isn’t just a matter of applying mathematical rules–there are strategies and situational decisions to be made that rely on the skill and knowledge of the color scientists behind the creation of any profile making software. A color management system must assign weights to different aspects of an image (saturation, skin tones, natural colors, etc) in such a way as to minimize gamut loss, while making what reductions do occur go unnoticed. These decisions will have a huge impact on how a given profile reproduces the original image. And, every profile maker does it a little bit differently.
In that regard, perhaps ImagePrint’s greatest claim to fame is its profiles. ColorByte provides more than 27,000 profiles for more than 400 printing substrates free of charge for ImagePrint users, with new profiles added almost every day as new media comes onto the market. These profiles are built via ColorByte’s in-house profile making software and their quality cannot be matched (at least without a lot of tweaking) by any do-it-yourself profilers available today. Please note that these profiles cannot be used for the Epson driver or any other RIP since ImagePrint has its own color management – independent from what is happening in your operating system.
While ColorByte provides a huge library of profiles, you can of course still make your own to be used with ImagePrint. Though the only reason to work with the original driver or use different RIP applications where you build your own profiles and linearize from time to time – in my opinion – would be for long-term reproduction printing where differences in paper coating, humidity and pigment density have to be taken into account daily, or when using special needs non-coated papers for which no profiles are available. For the vast majority of normal printing on modern inkjet printers, however, the slight benefits you may derive from a custom profile created for your individual printer would not come close to compensating for the loss of gamut and tonality you would likely see compared to the ColorByte created ones.
Seeing is believing, however, and the best way of judging ColorByte’s profiles is to test and compare them with those made by Epson or the paper manufacturer, or with ones you have created yourself. I have done this myself, with many profiles and many printers, and am invariably amazed that the "canned" ColorByte profiles always managed to be more accurate, and produce a larger gamut, than the profiles I have carefully created on my own.
Here’s an example. Remember, when comparing profiles, one is not "better" simply because it may look more pleasing. A profile is better if it is more accurate (when compared using soft proofing and proper light conditions) in reproducing the image being printed.
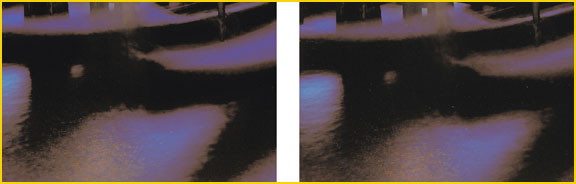
Shadow details in a print using the Epson driver (left) and ImagePrint (right)
Many profiles tend to over-saturate areas when colors are approaching the limits of the printer-paper gamut. This is illustrated in the above two scanned print samples taken from prints of an Epson Stylus Pro 9900 using Museo Portfolio Rag paper. The left scan used the original Epson driver in combination with a profile from the Museo Fine Art web site. The right used ImagePrint and the ColorByte provided profile. Notice how the ImagePrint print shows more differentiation in the dark blue areas? While at first sight you may say that the blues on the left are more pleasing because of the higher saturation, when compared to the original image and its actual saturation/tonal spread it becomes apparent that there is a significant improvement with the ImagePrint print in terms of reproduction accuracy. (Note: It may be quite a challenge seeing these differences on some computer monitors, which brings me to an important aspect of a proper printing workflow: the monitor. The more colors your printer can print, the better your monitor should be to accurately judge the final output. Therefore, when soft proofing for new printers like the Epson 7900/9900, it is best to work on displays capable of showing the entire Adobe RGB gamut, or more, since that is what these printers are capable of.)
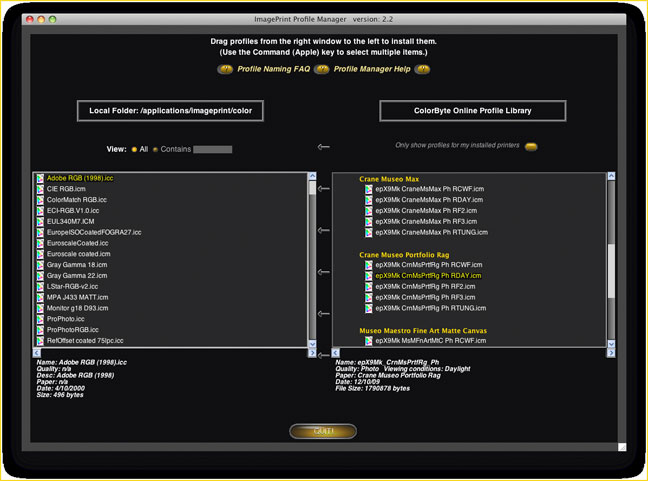
ImagePrint’s Profile Manager is an easy way to download and organize profiles
___________________________________________________________________________________
Managing All Those Profiles!
The profiles for ImagePrint can be downloaded from ColorByte’s web site using the included Profile Manager utility. With the Profile Manager, it’s much easier to decipher the sometimes cryptic names of the profiles, and its drag and drop interface takes the pain out of downloading and installing them. The Profile Manager will also help you to install the profiles for Photoshop soft proofing, allowing you to compensate for any changes to your images brought on by printer/paper limitations.
Five for Color
As you are perusing the profile library you will note that there are actually 5 color profiles available for each paper—this is because ColorByte provides profiles for different lighting conditions: DAY for daylight, WF for white fluorescent, F2 for cool fluorescent, F3 for mixed (daylight and fluorescent, i.e. office lighting) and TUNG for tungsten. This allows you to optimize your prints for the conditions they will be displayed in—if you know your print will be displayed under tungsten lighting in a museum, the TUNG profile will make sure it looks its best. All inkjet color prints have some degree of metamerism, or the tendency of the print to look different under different types of light, so these profile choices can be critical in ensuring your prints look correct in their ultimate destination. (For situations where you don’t know the display conditions, DAY or F3 are the best general purpose choices).
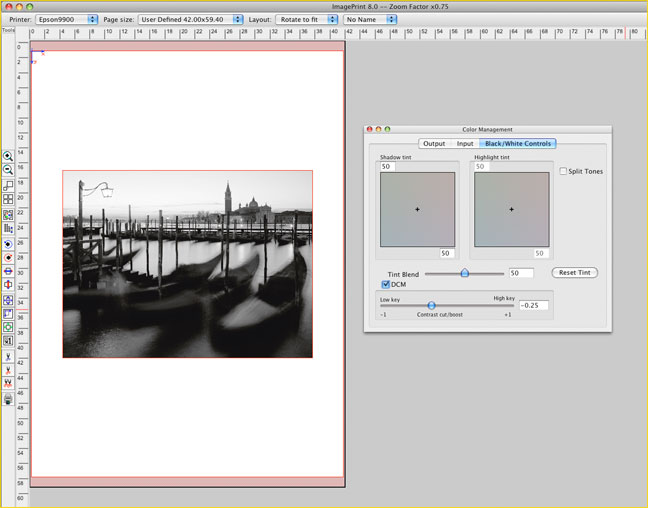
One for Gray
Apart from the color profiles you will also find gray profiles for optimized grayscale printing. ImagePrint’s grayscale output is completely neutral by default and exhibits none of the metameristic effects that exist with color prints—they will look the same under any lighting. (So no need for multiple versions for different light sources). If you want to add a tint, ImagePrint has a tint picker tool that allows you to interactively tone the image, either as a whole or treating the shadows/highlights independently (split toning). There’s even a colorized feature that allows you to use the grayscale profile for the neutral zones of an image, and the color profile for the colored ones, allowing you to produce a very, very neutral grayscale image with some areas jumping off the page in vivid color.
___________________________________________________________________________________
Dithering (or the secret art of putting ink drops together)
Inkjet prints reproduce an original image by blending millions of ink droplets on the page using a process called dithering. Many well known and not so well known methods exist for combining these dots into images, but as with color management, just when and how these techniques are used can vary greatly with the skill of the programmers (scientists, really) involved. It’s an important part of any print driver, because better the dithering is, the larger the gamut of colors that can be printed, the clearer the details that can be reproduced, and the smoother the transitions. And… the harder it is to see the dots.
Creating its own proprietary dithering rather than relying on the default dithering of the free Epson driver like many other RIPs do is another thing that allows ImagePrint to push the quality envelope. How far does it push it? Let’s take a (very) close look.
As you can see from these enlarged scans of prints from ImagePrint (left) and the Epson driver (right), the dithering of ImagePrint seems to actually be more coarse at 200%. Coarse dithering typically results in sharper image and better details at the expense of an overall "grainier" appearance. However, when looking at the print at 100 %, ImagePrint’s print actually shows smoother transitions and a more natural (and accurate) appearance. This seems to be due to those proprietary dithering techniques ImagePrint employs, which they say are created specifically for the needs of inkjet printing. However it’s done, ImagePrint consistently manages to produce prints that look smoother and show more details then that of the standard driver.
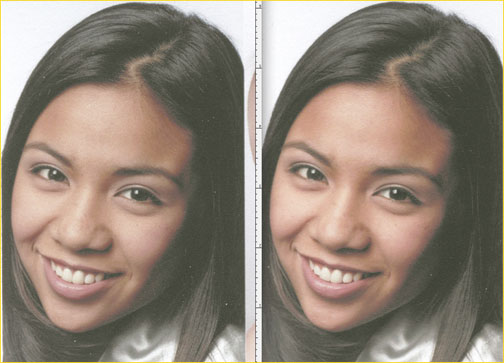
Dithering at eyes distance: ImagePrint on the left and Epson driver on the right

Dithering at 200 %: ImagePrint on the left and Epson driver on the right
___________________________________________________________________________________
Workflow
Workflow has often been an exercise in frustration when printing through the standard Epson driver. Many applications are not suited to the creation of large, multi-image layouts, and those that are often seem more focused on CMYK (press) output over the specific needs (RGB and Grayscale) of photographers. And even the most photographer-friendly applications with strong layout abilities often have issues with soft proofing that can make getting a print that matches what you have on screen a matter of trial and error at best. Adding to the struggle, neither the Mac nor the Windows print spoolers are well suited to the professional needs of users who require precise status reporting and control of their print jobs.
In contrast, ImagePrint is designed, solely, for printing (with an emphasis on photography and fine art) so its workflow is dedicated to doing just that, and only that, as easily and efficiently as possible.
For example -WYSIWYG. Your images will be where you expect them to be on the page—not off center, or the wrong size, or falling off the paper. This is because you are always working on a representation of the physical media as it will print, with any non-printable borders clearly marked. It is also very simple setting the page size just as you like. This tends to take all the guess work out of page composition. And it’s easy to create that composition – ImagePrint allows you to position any number of files by simply clicking and dragging them or by using more sophisticated tools such as preset layouts and templates as well as positioning and scaling by numbers. When you have more than one page to print, ImagePrint automatically generates new pages as old ones are filled up. You can even save these layout settings for later use.
Unlike the operating system spoolers, ImagePrint’s memory management is streamlined for efficient printing of large jobs, and (for most printers) it supports much longer panoramic printing (up to 100 feet) than the standard Epson driver will allow. Laying out and printing a large number of images is quite easy, too. My recent output of 1.5m x 30m of different images on an Epson Stylus Pro 11880 was a simple task taking all of 3 minutes to compose – a feat that would be quite time consuming to do, say, out of Photoshop with the Epson driver. You’ll also notice that ImagePrint starts printing after a relatively short time once you click Print. This is because it sends its output to the printer line by line without first creating huge temporary print files. Once printed, each job is saved in a "finished" queue, and as long as the original images are kept at the same location, you can reprint the job through the spooler as many times as you like.
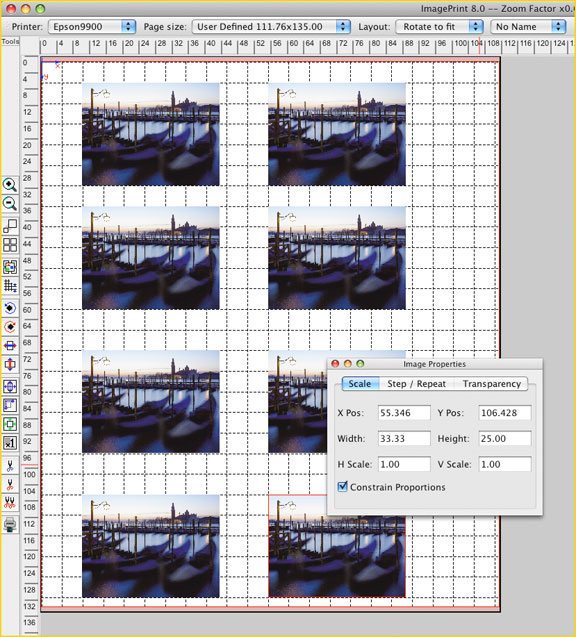
Go ahead and load up that page – ImagePrint has a very smart nesting feature.
___________________________________________________________________________________
What’s New in Version 8?
The basic functions of ImagePrint mentioned so far have been in place for years. So…for those already using ImagePrint 7.0 or earlier, what new abilities does ImagePrint 8.0 have to offer–and is there enough additional value to justify an upgrade? (Upgrade prices vary with how long you owned the previous version, but for those within 3 years since their last upgrade it’s typically 35 percent of the original retail cost to go to the most current release).
New Operating Systems
ImagePrint 8 supports Mac OSX 10.6 (Snow Leopard) and Windows 7. If you are on version 6.1 or earlier, and you plan on getting a new computer, then you may need to upgrade for that fact alone—those older versions don’t work on anything later than OSX 10.4 (Tiger) or Windows XP. The previous version of ImagePrint, 7.0, works fine with the new Microsoft and Apple offerings though, so 7.0 users can get along on that shiny new computer without going to 8.0.
New Printers
ImagePrint 8 does, however, support new printers that version 7.0 doesn’t – namely the Epson Stylus Pro 3880 and, even more exciting, the new x900 printers (Epson Stylus Pro 7900 and 9900). So if you plan to update to Epson’s latest and greatest, ImagePrint 8.0 is a must.
Speaking of those new printers–the ImagePrint’s 7900/9900 drivers utilize a new color model built with those printers in mind. These drivers were specifically created to optimize the additional orange and green of these printers.
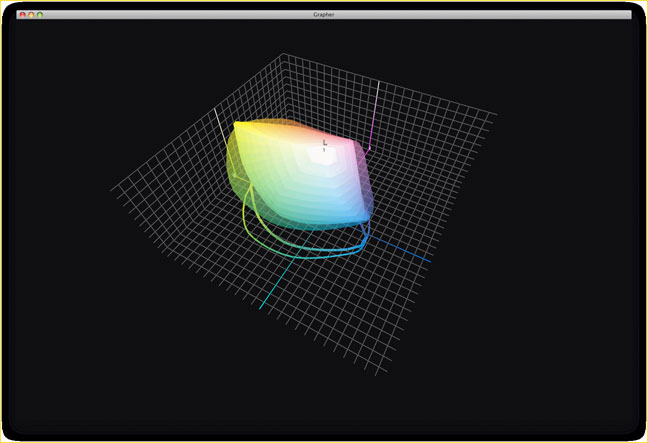
Gamut comparison between the Epson Stylus Pro 9900 (transparent) and the 3880 (solid)
Comparing the gamut of the 3880 (which doesn’t have orange and green) and the 7900/9900 on both matte and glossy paper you will get between 15 and 30 percent bigger gamut. This translates to wider color gamut in virtually all areas, but especially the greens and the blues. And in my experience, ImagePrint’s 7900/9900 prints provide significant, though not quite as large, gamut increases over the Epson drivers for the 7900/9900.
ImagePrint 8 provides new layout and text features.
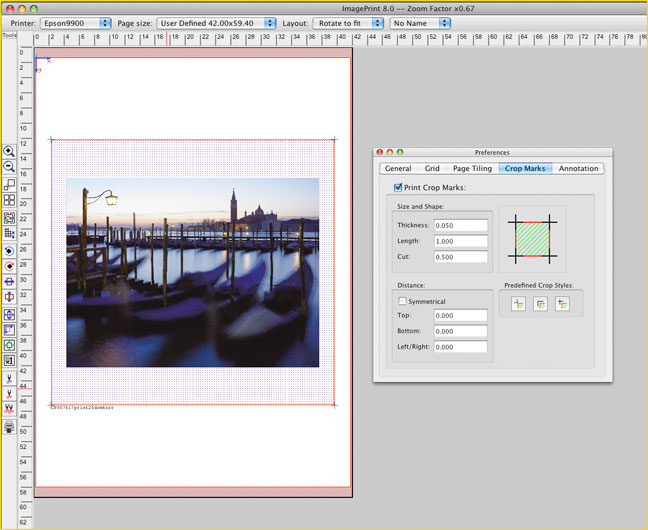
ImagePrint v8 now gives you full control for annotation and crop marks
___________________________________________________________________________________
New Tools
Boundaries are a unique feature that allow images to be grouped within a defined area by simply dragging them into it. Each image can be moved independently within the boundary, or the boundary itself can be moved as a single unit. Annotations (captions) and crop marks act on the boundary as a whole, and the boundary can be colored, filled with a background image or bordered. If you have the need to create custom album pages easily, this feature alone is worth looking into updating to 8.0.
Another feature that for some users is enough reason by itself to update is Gallery Wrap. This useful little function allows you to automate the process of producing a wrap-around print for "frameless" canvas prints. Apply this to an image and its edges are duplicated and mirrored, greatly simplifying the currently Photoshop-intensive process of creating the same effect on your own. If you never print gallery wraps, no big deal, but if you do, this feature is a must have.
ImagePrint 8 now gives you full control over crop marks and annotation. And, unlike in past version, the marks and annotations aren’t only visible on the print – you can also see them on the screen preview (finally).
The new text feature can be interesting for wedding photographers, greeting card printers or other fields where custom decorative text is needed. It is limited in its features and can not replace an application like Adobe InDesign® for text layout, but if you need to quickly place drop-shadowed, colored text using any font on your system anywhere on the page, this feature is all you need.
New Spooler
As mentioned before, ImagePrint’s spooler, SpoolFace, has always given users the ability to monitor and control their print jobs. This kind of control may be useful, but not strictly necessary in a single user environment but becomes vital in a networked, multi-user one. (ImagePrint, by the way, is very network friendly—an unlimited number of "client" computers on the network can run the software and send prints, with only the "host" computer needing a printer license). With Version 8, SpoolFace has a redesigned interface, and includes thumbnails of your print jobs which can be a great help in seeing what is going on with your queued up print jobs. As always, SpoolFace gives give you the ability to easily reprint old jobs, but now it also has an archive and restore function, allowing you to back up old jobs to another location for safe keeping.
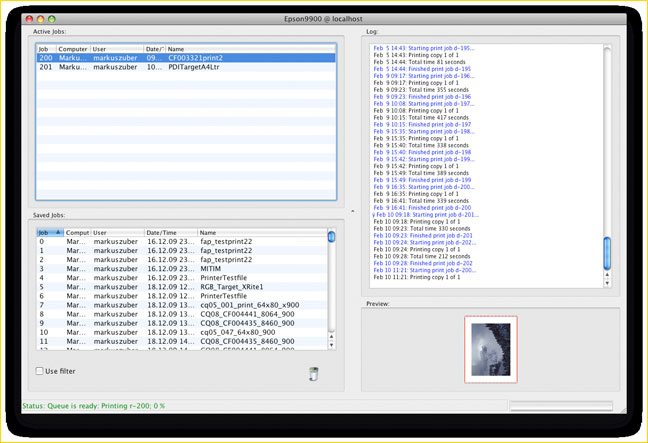
SpoolFace is ImagePrint’s printing control center – thumbnails of the print jobs help you find your jobs in the list.
New Profiles
Starting with Version 7 and continuing with Version 8, ColorByte has utilized a new kind of profiling technology—Dynamic Contrast Matching, or DCM. These profiles are built with the specific tonal characteristics of each media in mind, allowing them to produce much better tonal values and a larger gamut.
DCM profiles provide better tonal response than standard profiles of the past
Going forward, all of the new printers ImagePrint supports – starting with the 2880/3880 and the 7900/9900 – will only have DCM profiles available. To maintain consistency, users of older printers will still have the choice between the original non-DCM profiles and DCM versions.
When you use DCM profiles on glossy and semi glossy papers that have a relatively large range of tonal values you will get very good screen matching when soft proofing within Photoshop on a well calibrated monitor. For judging/comparing your prints, the viewing conditions should be at approximately 1500 lux and within 5500–6500 K. When printing with matte paper however you may notice that images tend to close a bit in the shadows with some dark colors getting an elevated saturation. While this does produce more accurate contrast in the mid-tones, you may need to be careful when soft proofing to compensate.
One more side note: Regarding soft proofing within Photoshop—some users prefer to work without soft proofing enabled until they are ready to print. They then save a copy of their adjusted image to be used for printing and make whatever further adjustments are needed to optimize their output for a given paper/printer/ink. Others essentially soft proof all the time, starting on a copy of their untouched original and doing all adjustments with printing for a specific paper in mind. The first method gives you more flexibility for using your image for different purposes (e.g. matte and glossy paper) with relatively minor further changes needed after your initial "global" optimizations are made. Though potentially more labor intensive, the second method carries the advantage of reducing the likelihood that the image will be "overworked" (particularly in the shadow areas) as portions are re-adjusted after the initial optimizations are made.
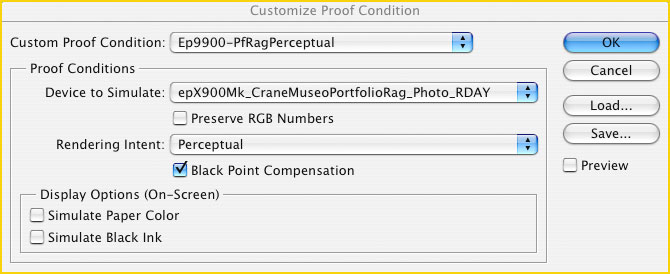
Photoshop’s soft proof settings for a color workflow
DCM profiles are also available for grayscale printing where they have the added benefit of a "contrast cut/boost" control within ImagePrint’s Color Management window. This slider allows you to choose the level of contrast that will be applied via the DCM technology. Of course, you may prefer to adjust the contrast using Photoshop’s soft proofing. A nice (and long overdue) change that comes with the grayscale DCM profiles is that they are recognized by Photoshop’s proof setup feature. Previous, non-DCM grayscale profiles were not, meaning before DCM, grayscale soft proofing was not available. (When soft proofing with grayscale profiles in Photo-shop, the “preserve numbers” button has to be turned on to ensure an accurate match.)
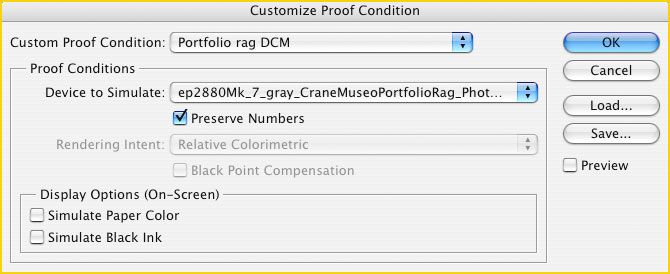
Soft proof settings for grayscale profiles – ImagePrint improves the grayscale workflow quite a bit.
___________________________________________________________________________________
Conclusion
So there you are—my overview of ImagePrint. There are many other abilities that I haven’t mentioned—Phatte Black, which allows both Photo black and Matte black ink to be loaded simultaneously on Epson printers that normally only allow one black to be in use…….Photo Package creation……the ability to add borders, backgrounds, and frames on the fly.
ImagePrint is a tool (and not an inexpensive one) that is completely dedicated to improving the quality of your output and the ease of your workflow. But like any tool, it is only valuable for those who have a need for it. For those who struggle with the quality of their prints, for those always in quest of the perfect reproduction, ImagePrint can save you a great deal of frustration and very likely give you a boost in quality above what you can achieve otherwise. For those who need to create complex photo packages, or gallery wraps, or large panoramas, ImagePrint’s mature set of workflow tools can quickly pay for itself in saved time. And if you regularly print on different media, then ColorByte’s profile library is worth far more than the cost of the software.
___________________________________________________________________________________
Trial Version
I would strongly recommend trying ImagePrint on your own before buying. ColorByte maintains trial versions onits web site, but unfortunately only the Mac version will produce output (with the word DEMO watermarked on the prints). ColorByte also maintains a 30 day money back guarantee on their purchases if you want to try it on a PC or have a Mac but want to see output without the DEMO watermark.
April, 2010


Elevate Your Vision


Read this story and all the best stories on The Luminous Landscape
The author has made this story available to Luminous Landscape members only. Upgrade to get instant access to this story and other benefits available only to members.
Why choose us?
Luminous-Landscape is a membership site. Our website contains over 5300 articles on almost every topic, camera, lens and printer you can imagine. Our membership model is simple, just $2 a month ($24.00 USD a year). This $24 gains you access to a wealth of information including all our past and future video tutorials on such topics as Lightroom, Capture One, Printing, file management and dozens of interviews and travel videos.
- New Articles every few days
- All original content found nowhere else on the web
- No Pop Up Google Sense ads – Our advertisers are photo related
- Download/stream video to any device
- NEW videos monthly
- Top well-known photographer contributors
- Posts from industry leaders
- Speciality Photography Workshops
- Mobile device scalable
- Exclusive video interviews
- Special vendor offers for members
- Hands On Product reviews
- FREE – User Forum. One of the most read user forums on the internet
- Access to our community Buy and Sell pages; for members only.
You may also like


