This software is available for Windows PCs. A Mac version is not available
By: Nick Rains
There are a great many decent image viewers out in the marketplace – and many of the shareware thumbnail/viewers are extremely good at what they do. Most of the cheap ones only generate the thumbs, preview the files for editing and sometimes generate web pages out of the thumbs. For quick editing they are essential, I use one calledIrfanViewwhich is free, and generates previews extremely fast – like about 0.5sec per image to step through a sequence of RAW files on my local hard drive.
Some of the more commercial ones, such asIiView MediaPro, Canto Cumulus, ACDSee 7, FotostationandExtensis Portfolio, offer much more sophisticated options, including the facility to archive the thumbnails into an image database for viewing later.
It is this facility of making an image database which is becoming more and more critical as we all progressively produce more and more digital photos on even increasing arrays of CDs and DVDs. I don’t know about you but I seem to shoot many more frames when shooting on a digital camera than on a film camera – but that is a discussion for another time.
OK, so we have all these images, in my case many thousands. How do you find that elusive image that you shot last year, that you were sure was on that CD, but seems to be elsewhere. Viewing CDs is a slow business so you need to know exactly what is on your storage media, without having to ‘mount’ it and see what it contains.
Enter Digital Media Management software.

Airlie Beach. Canon D60 17–40L.
The best known software packages are probablyPortfolio,FotostationandCumulus. I have used Portfolio, I have looked at Cumulus but I know nothing of Fotostation except that it is a high end piece of software designed for central servers and is very expensive. Iview Pro is good but at USD199.00 it is no more powerful the Imatch and the USD49 ‘Light’ version does not work with RAW files.
Portfolio is OK, but I found the ‘keyword’ concept of categorizing images fine in theory but tedious in practice. I know from my own experience that if a chore is clumsy and tedious, it tends not to get done, but if it is easy and intuitive, then it does get done. Adding keywords is tedious, so with Portfolio I ended up with very nice sets of thumbnails but no easy way to cross reference images unless I added intelligent keywords to each image. I was using an older version, so to be fair I believe Portfolio 7 is a lot better. It is, however, also somewhat more expensive at USD199.00
Which brings us to the USD59.95IMatchfromwww.photools.com.
Some software just ‘clicks’ with you when you start using it, Imatch is one of those utilities that feels right, tools are where you expect them to be and the whole package is somehow logical.
Right away, Imatch is a snap to use. There are a series of detailed ‘coaching’ popups which explain everything you do for the first time and after reading each one you can dismiss it permanently, or reactivate them later if you forget how to do something.
______________________________________________________________________
The Database
The very first task is to set up a database structure that will be used for all your images. A detailed Wizard leads you through this and whilst there are many options, the power of this software only really becomes apparent later, when you become more familiar with how it works and what it can do. Initially the only really important decision is to set the size of the thumbnails to something suitable for your screen – this cannot be changed later for a particular database. I used 120px square and this was fine.
There are also options for how Image Categories are set up and you can choose from sets of pre–made styles or start with a generic one and add your own later.
Image ‘Categories’ are the heart of Imatch’s power, at least for the tasks I need it for which is cataloguing and cross–referencing images. Each image ‘lives’ in the folder from which it was ‘scanned’ – this can be on a local hard drive or an offline DVD, it doesn’t matter since the thumbnail of that particular image is always stored locally in the Imatch database. Each thumbnail can be assigned to as many categories as you like thus allowing a single image to appear in many different categories at the same time.
For example, an image of the Great Barrier Reef might be stored on an offline DVD but its thumbnail image lives in the online database. This thumb might have been assigned to categories of Australia, Queensland, Nature, Reef, Textures and Colours. This does not mean there will be 6 thumbs in different places, just one thumb with 6 different category ‘tags’.
The clever bit is how you view your collection.
At the left of the main screen are 4 Tabs – Database, Categories, Selections and View. These tabs give different views of the same database.
______________________________________________________________________
Database View
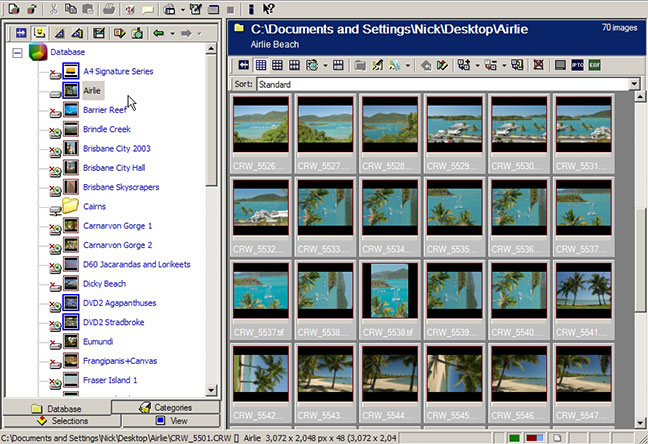
This view shows the images grouped by their ‘physical’ location; ie which CD, which hard drive folder etc, the actual original image is stored. This is a traditional view and is pretty easy to understand. Click on a folder in the left hand list and all of the images in that folder will appear as thumbnails in the right hand pane. These might be of all different subjects – what they have in common is their physical location.
One nice touch here is the option to use ‘Friendly Names’ for the folders. Rather than use a specific path name in ‘Windows Speak’ you can call it something more useful such as “Barrier Reef DVD6”. This means that if I want an image out of this folder I need to find DVD6 and look in the Barrier Reef folder. It is also a good idea to also use this Friendly Name as a Folder Comment to make finding the original media easier in other views.
______________________________________________________________________
Categories View
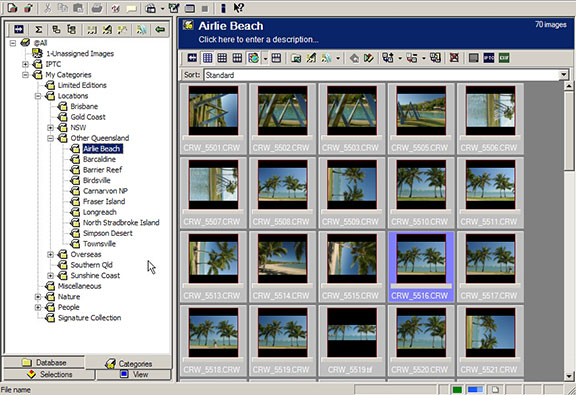
The other way of looking at a collection of images is to group them by common traits regardless of where they are actually stored. It makes much more sense to view images by type than by location.
The Categories view has a simple hierarchy structure which you can very easily build up, adding new categories as you need them in a very intuitive and flexible way.
Any image may be assigned any number of categories – a little like assigning keywords in other programs. The difference is that it is really easy to perform this task on large numbers of images at the same time and, once done, you can view your images by their subject matter in many different ways.
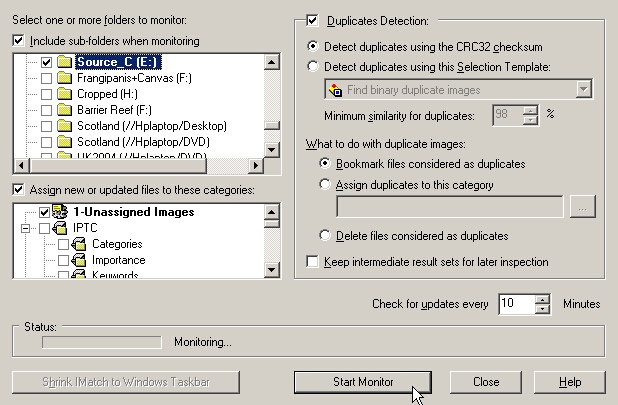
Categories can also be assigned when you first scan and thumbnail a folder. In fact this is the best way to use Imatch: point the Database Wizard to a new folder and assign all the images broadly to a high level category. Once the thumbs are done, use the Categories view to select sets of images from that folder and assign them more categories
In my Barrier Reef example above I would start by scanning the folder into the a level category called New Images using the Database Wizard. I would then use the Categories view and view all New Images. I will still see the same set of images as I just scanned.
Now, by selecting sets of like images out of this set of new images I can deselect the New Images category and select any other categories I like based on the subject of the image.
I might have a collection of Barrier Reef images. I would bring them into the database as New Images. Next I would view the New images category in the Categories View. I would then ctrl–click thumbnails in the right hand thumb pane to build up a series of like images. I can them bring up a Assign Categories palette and by deselecting the New Images category and selecting new categories I can re assign the images to new, more logical categories.
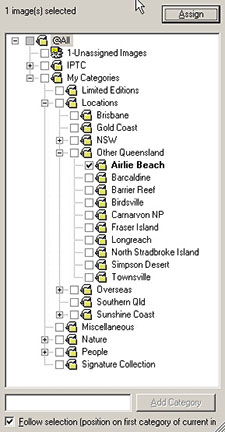
A Category only shows images assigned to that Category so the New Images category will progressively get smaller as I re–assign images to other categories. When none are left, I have finished. In reality, this takes only a few minutes since a shoot will often be quite specific in subject matter.
The power of this approach is that you can assign one image to multiple categories thus allowing it to show up in many different places in your collection. I have categories for Location (obviously) but also Nature with subcategories of Textures and Colours. One of my Barrier Reef aerial shots might appear in ‘Queensland’, ‘Barrier Reef’, ‘Aerials’ as well as ’Nature/Textures’ and ‘Nature/Colours/Blue’.
All these categories are viewed in the Categories Tab and by selecting the one you want you instantly see all the images assigned to that category.
With a Keyword system you need to ‘search’ for a keyword and view a subset of the total collection. One of the biggest drawbacks with this approach is that if you spell a keyword wrong, even by a little bit like a single capital, it will not show up in a search. With Imatch you just pick a category and bingo, there they are in a thumb collection. You can also set each thumbnail to display the Friendly Name of it’s physical folder, in fact I think this should be set by default since it took me a while to find this option (Options/Preferences/Thumbnail View).
Phew, this has taken far longer to explain that to actually DO!
______________________________________________________________________
Selection Tab
This is where you set selection parameters and do searches through your database. Imatch has full EXIF and IPTC compatibility and so you could search for all images shot with a 20mm lens or something. If it is stored in the EXIF or in the IPTC data, Imatch can find it. You can also add you copyright information to all your files so that it shows up when the image is viewed in Photoshop File Info.
______________________________________________________________________
View Tab
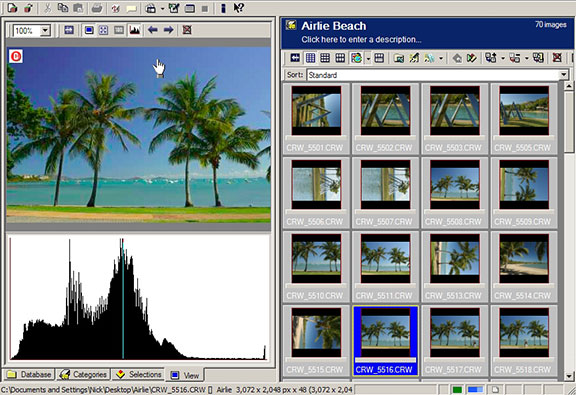
This section is much like a traditional image viewer with a pane for thumbnails and a pane for an enlarged image of a selected thumb with a histogram. If the image is online, ie stored locally, you can see a full preview. If the image is offline on a CD or DVD, Imatch will work with an offline cache image which is a bigger version of a thumbnail. The size of this image is set in Preferences – the trade off is between quality, speed and storage space.
One thing to watch for here is that if you select an image which is offline the preview pane not only displays an enlarged image but also where that image is physically stored.
The problem is that the actual media ‘name’ can be somewhat arcane ie the serial number and date of the CD or DVD – whatever the default was when you burned the disc. It’s a good idea to name the discs something meaningful when you burn them but if you have missed this step, use Folder Comments in Imatch to add a plain English title for the folder, and then write that on the CD case.
Now, when you preview an offline image, this Folder Comment will be displayed to allow you to find the image much more easily.
______________________________________________________________________
In use
Imatch is fully Colour Managed and you can assign screen profiles and image file profiles for accurate viewing. I guess this is not strictly vital in the database but it sure is a nice touch.
Imatch is full of nice touches like this, obviously a lot of thought has been put into this software and the above description only scratches the surface of Imatch’s abilities – there are facilities for WebPage generation, Scripting, Automation, Smart File Renaming (very powerful) and Emailing. The Help system runs to hundreds of pages and is very comprehensive.
I have worked out a simple workflow which I think would be very useful for a busy shooter and only needs part of the power of this program.
1. Set up a folder called New Images on a nice fast local hard drive with at least 4.7GB free and defragged.
2, Set Imatch to Auto Scan this folder. This means that Imatch will scan for new images only and not the whole folder. If you add new images they will be thumbed into the New Images category ready for you to set final categories. This is done in the background and only marginally affects other tasks.
3. Shoot images.
4. Copy the RAW files from the camera or card into the New Images folder. Do this before any RAW processing since we want to set up an archive of RAW images.
5. Allow Imatch to do its thing and thumbnail all the new images, this takes about 4–7 secs per RAW image depending on the speed of the system and the hard drive.
6. Edit the new images but only looking for technically unacceptable one to throw out such as out of focus or way off exposure. Don’t throw away anything that is reasonably well exposed and sharp – you never know if you might want it in the future. Assign these new images to relevant Categories.
7. Keep adding and Categorising new images in this folder until it gets to about the size of a DVD, then burn the whole folder to DVD and ‘relocate’ the folder in Imatch to tell the database that this folder is no longer online and resides on a DVD. Because of Imatch’s offline cache, you will still be able to preview all images, just not at full size.
In this way you are only working with new images, and Imatch can help you keep the workload to a minimum by Auto scanning the new images as you add them. All you have to do is assign them to Categories.
One word of warning – use Imatch’s Backup facility regularly! This will be your master list of all your images and to rebuild it could take hours of inserting archive DVDs and rescanning the images.
______________________________________________________________________
Conclusion
Imatch is a very powerful and well thought out package. There are layers under layers of options and tools – I have only looked at the easy stuff but you could make Imatch into a very powerful search tool with collections into the hundreds of thousands
I found it easy and intuitive with few conceptual stumbling blocks one you get used to the idea of Categories instead of Folders. I for one will be using this software as part of my normal workflow.
Recommended, and at USD49.95, a bargain.
Text and Photographs © Nick Rains 2005
www.rainspirit.com.au
Nick Rains has been photographing landscapes all over the world since leaving University in 1983.
In 1986 he spent a year in Perth, Western Australia covering the Americas Cup for a variety of International magazines such as Yachting World, London Times, and Boat International. Images from this event also appeared in Sports Illustrated, Stern, Paris Match, Regatta and many other well known publications.
Over the last 10 years Nick has traveled the length and breadth of Australia covering over 250,000km in his search for fine "Australian" images for the stock photography market. He makes his home in Brisbane, Queensland and he operates a fine-art photographic gallery in that city.
Nick is a frequent editorial contributor to this site.
______________________________________________________________________
