


Here’s a second contribution to this site fromThom Hogan’s Nikon DSLR Report(this is excerpted and updated from Issue #1). Details on subscribing to his newsletter can be found atwww.bythom.com/d1report.htm. — Michael Reichmann
__________________________________________________
By: Thom Hogan
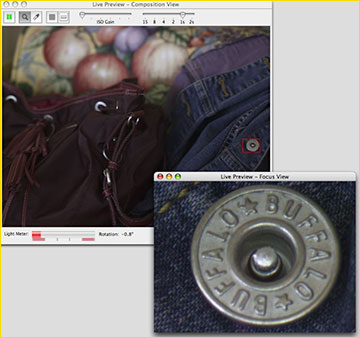
Taken with a D2h, JPEG, at Anza-Borrego Desert State Park
at the palm oasis (f/11, 70-180mm Micro-Nikkor at 170mm).
Nikon uses the autofocus sensing mechanism from their film cameras (except for the D2h), and hasn’t scaled it to the smaller sensor size. The net result is that the autofocus sensors, which on the film cameras are bunched inside the 1/3 lines of the full frame, are stretched towards the edges on the digital bodies. This has two consequences:
1. Autofocus occurs with objects closer to the edge of the frame on a Nikon DSLR than it does with 35mm bodies.
2. The “spread” between autofocus sensors is larger, leaving a gap where autofocus doesn’t occur.
Personally, this hasn’t really bothered me much, as I rarely take pictures of things that move and often have my lens set at the hyperfocal distance, anyway. But I’ve heard enough complaints from Nikon DSLR uses that shoot more active subjects, such as wildlife, that I decided it was probably wise to do a bit of testing and try to put the facts straight for DSLR owners.

Figure 1
As often is the case, my backyard was my test subject (see Figure 1). The red laundry pole gave me a perfect straight edge that I could place at the close focus point and use to test the “edges” of the autofocus sensing at each of the five sensors on my D1x. Note that this shot is taken a bit further back so that you can see the “testing grounds.” In the actual test, I moved in close with a 14mm lens so that pole was close to minimum focus distance. This insured that there would be a distinct focus change between the pole and the background as I moved the camera. The camera itself was set on a tripod and leveled. I then used the pan head to slowly move the camera with the shutter release partially pressed. The test was performed in both single area autofocus mode and dynamic autofocus mode with closest subject priority enabled. I worked one sensor at a time, panning so that the pole started outside an autofocus area and slowly neared it. At the point where the focus changed from the background (usually the garage) to the foreground (pole), I took a picture. I then started from the other side and did the same thing for that sensor.
After getting the horizontal “start” and “stop” points for each sensor, I flipped the camera to vertical and did the same thing for the vertical axis. I repeated these tests twice. In Photoshop, I then used the rule to measure the placement of the edge of the pole from the edge of the frame to determine the actual coordinates. Where I had differences between single sensor and dynamic sensor, or between the first and second test, I took the worst case.
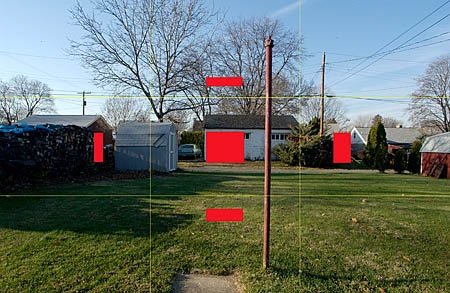
Figure 2
Next, I mapped these coordinates onto my original image (see Figure 2). The red boxes are the worst case detection of a near edge. For reference, I’ve also added faint 1/3 markers in yellow. You’ll note that the left sensor seemed to have a worse worst case than the right sensor. I attribute this partly to the dramatic difference in lighting between the left and right edge of the pole (at this time of year the sun is quite low even mid-day here in Pennsylvania). The angle at which the camera was pointed was also slightly different for the two sensors, so that, coupled with the lighting difference, may be the culprit here. Nevertheless, I wanted to know the worst case, not the best case, so I’ve reported my results exactly as found.
Note that this is a particularly harsh test, and tends to minimize the sensor size. When you put a narrow near object on the sensors, the sensor doesn’t usually respond until a significant portion of the sensor (more than half) sees that object. In practice, you usually don’t put a slim edge at such a radically different focus distance on the sensor, and the focus range tends to stretch slightly further than is shown in Figure 2.
__________________________________________________
So did I learn from this little experiment?
• Autofocus sensors are not the size of the viewfinder indicators! Every one of my books have long pointed this out, but it’s something you need to come to grips with. Doing this test will get you there.
• The top and bottom sensors are significantly closer to the 1/3 lines than the left and right sensors! Indeed, they’re closer to the central area than the left and right sensors. This means that top to bottom focus (or left to right if you’re holding the camera horizontally) is tightly packed, and there’s not much of a gap to worry about. Objects moving left to right (or vice versa) in the horizontal frame will hit dead spots in the autofocus, though.
• While Nikon claims the left and right sensors have the same coverage as the central sensor, in practice this isn’t always true. In the same light, with the same edge-oriented object, my central sensor consistently has a larger sweet spot than do the two outlying sensors. I find this curious, to say the least. The left, right, and top sensors of the D1x, you may recall, are skewed slightly off axis. You’ll note that these were the worst performers on my edge test (i.e., have the smallest area in Figure 2), which is probably explained by the skew angle—they needed to see more of the object before all of the sensor had a portion of the edge on it. Note that only the D1 series has the skewed sensors; the D100 and D2h have straight sensor alignment, as do the S2 Pro and Pro 14n. It’s these little differences that make a big difference in the field, though, so pay close attention!
• There are big gaps between sensors on the horizontal axis, at least in this worst case scenario. I did some follow-up tests with some wider subjects, and these outlying sensors do hold autofocus over a wider area than the worst case detection shown in Figure 2. Still, there were significant gaps in the horizontal coverage between sensors, and this can be a real issue covering some subjects. For instance, if you were shooting soccer framed loosely and a player fell exactly between the center and outer horizontal sensor (framing on the 1/3 line, for example), you’d better reframe slightly lest the sensors not catch the player.
• One thing that was heartening: my central autofocus sensor is centered. I was slightly surprised to find that it was dead-center, virtually to the pixel. Given that the autofocus sensors are in the bottom of the camera and light to them is relayed via a double mirror system, that’s pretty precise alignment!
__________________________________________________
I’ve alluded to some differences between cameras, so here they are:
o D1 series: 5 sensors. 3 horizontal sensors are cross hatched, top and bottom sensors are lines. Top, left, and right sensors are skewed off axis slightly.
o D70, D100, S2 Pro, Pro 14n: 5 sensors. Center sensor is cross hatched, all others are line. No sensors are skewed.
o D2 series: 11 sensors. 3 horizontal sensors are cross hatched, the three above and below them are T’s or inverted T’s. The left and right sensor are lines. Unlike the other bodies, the nine central sensors actually have almost no gap between them (i.e., the T’s connect to the cross hatch).
I encourage you to set up your own tests and map your camera’s sensors. Besides the edge detection test, you’ll also want to do a “hang on” test (how long does the autofocus sensor hang onto the focus for a near area before it lets go and focuses on the background?).
Once you’ve mastered WHERE the autofocus sensors are in your camera, you next have to master using them. Here’s my suggestion: find a merry-go-round. You’ll be able to master virtually every type of autofocus use in this simple environment:
o Camera stationary, subject moving. Camera is on a tripod, back from the merry-go-round. Pick an autofocus sensor, pick a subject on the merry-go-round, now try to get the former to focus the latter. First goal is to not move the camera or sensor, but get predictable in-focus shots with each sensor as the subject moves to it. Second goal is to have the camera follow focus on subject (which may require you to move position from the first goal spot). A third goal might be to move to another sensor while focusing.
o Camera moving, subject moving. Camera is handheld and you’re closer to the merry-go-round, where you’ll have to pan with subjects. Same two goals as before.
o Camera moving, subject stationary! Get on the merry-go-round with the camera and have a subject stand off the merry-go-round. Again, same two goals: focus using only one sensor and let the camera follow focus for you.
The reason why the merry-go-round works so well for autofocus training is this: it’s a predictable motion that repeats. You can control the “speed” at which things move by altering your distance from the merry-go-round. Thus, you can start far away and move closer and closer as you get better and better at following focus. You MUST master autofocus in this kind of environment before you run out and try to shoot something that moves in less predictable fashion, such as a bird in flight.
© 2003Thom Hogan


Elevate Your Vision


Read this story and all the best stories on The Luminous Landscape
The author has made this story available to Luminous Landscape members only. Upgrade to get instant access to this story and other benefits available only to members.
Why choose us?
Luminous-Landscape is a membership site. Our website contains over 5300 articles on almost every topic, camera, lens and printer you can imagine. Our membership model is simple, just $2 a month ($24.00 USD a year). This $24 gains you access to a wealth of information including all our past and future video tutorials on such topics as Lightroom, Capture One, Printing, file management and dozens of interviews and travel videos.
- New Articles every few days
- All original content found nowhere else on the web
- No Pop Up Google Sense ads – Our advertisers are photo related
- Download/stream video to any device
- NEW videos monthly
- Top well-known photographer contributors
- Posts from industry leaders
- Speciality Photography Workshops
- Mobile device scalable
- Exclusive video interviews
- Special vendor offers for members
- Hands On Product reviews
- FREE – User Forum. One of the most read user forums on the internet
- Access to our community Buy and Sell pages; for members only.
You may also like


