


Written By:Neil Duffin
Getting The Red Out
Redeye can ruin an otherwise perfectly good portrait, but there are ways to remove it. Unfortunately some of these methods can remove detail in the eyes and make them look very unusual, even lifeless. The following is a simple method of removing the problem while still retaining detail and a normal appearance to theƒ«windows of our soulÃ.
IÃm going to be usingAdobe Photoshop 6, but the technique should be possible in other packages too. All you need are channels, layers and layer masks.
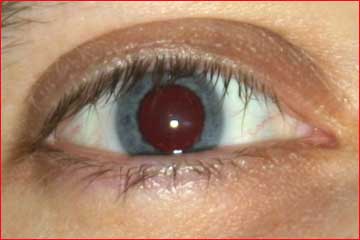 Figure 1
Figure 1 shows the original image‚ not exactly the best picture of an eye ever, but it serves to show redeye. We start by duplicating the image into a second layer, layer > duplicate layer.Here IÃve called the new layerƒ«false colourà for reasons that will become obvious in a moment (plus I live in the UK :). Figure 2 shows the Photoshop layers after this step.
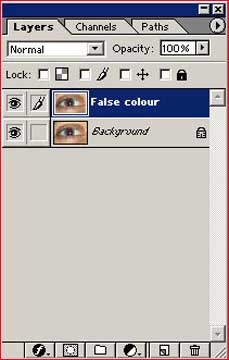 Figure 2
Now to remove the redeye. We do this by removing the red channel from the duplicate layer. To do this, first select theƒ«false colourà layer only (Figure 2), then switch to the channels and select only the green channel (Figure 3). YouÃll notice that in this channel the eye appears normal, but only in grey scale (Figure 4).
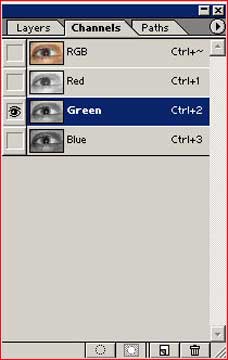 Figure 3
 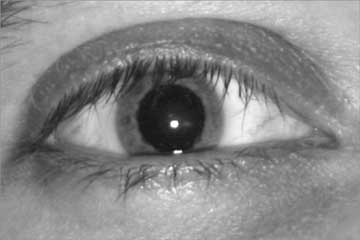 Figure 4
Select the entire channel, select > all, and copy it, edit > copy. Then select the red channel and paste the green channelÃs data into it, edit > paste. If you now select all the channels,ƒ¬RGBî, you will see that there is an awful colour cast, butthe eyeÃs pupil is black (Figure 5).
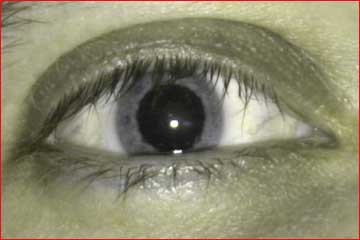 Figure 5
This leaves the problem of having no redeye, but a colour cast in one layer and no colour cast, but redeye, in the other. So, the final step is to combine the useful parts of both layers. To do this we use a layer mask. Go back to the layers, ensureƒ«false colourà is still selected and add the mask, layer > add layer mask > hide all. The original image should pop back into view, redeye and all.
The final step is to select the parts of the false colour image that we wish to overwrite the original image. Painting into the layer mask performs this. Any area of the layer mask, which is black, will select the original, correctly coloured image. White parts of the mask will select the new, redeye removed,ƒ«false colourà image. Any grey shade in-between will blend the two layers.
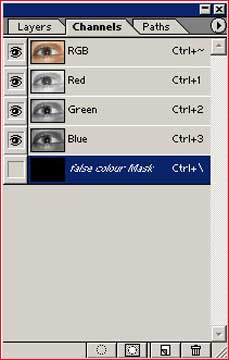 Figure 6
So, with theƒ«false colourà layer still selected, go back to the channels and select the mask channel. This will be named something similar toƒ¬ False colour maskî (Figure 6). Select the paintbrush tool, press B on the keyboard, and select a brush with a graduated, grey edgeƒ± the size will depend on how large the eyeÃs pupils are in your image. It will also help if you zoom in on the eyes.
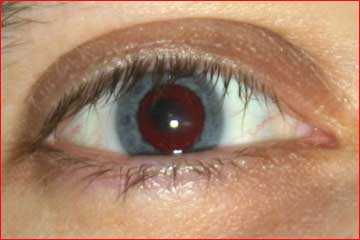 Figure 7
Now simply select white and paint into the eyes. They will become black within the pupil (Figure 7). This is because you are selecting theƒ«false colourà layer by painting white into the mask layer. You are not painting into the colour channels (red, green and blue) and this is the reason the image does not become white.
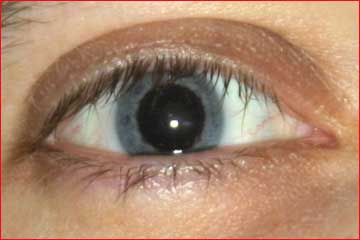 Figure 8
Be careful not to paint into the iris or it will become discolouredƒ± as it appears in theƒ«false colourà layer. If you do this by accident, select black and paint over your error. This will reselect the original layer. You should find it easy to produce an image without any redeye, while retaining all flash highlights (Figure 8). Additionally, you donÃt have to worry about eyelashes, as they will be black in both layers (in most cases) and hence you will no longer need to paint round them.
Comparison
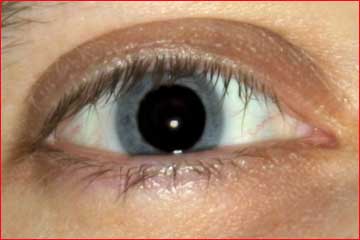 Figure 9
For comparison, I have included an image produced using the more normal,ƒ¬paint blackî, method (Figure 9). As you can see the image produced using the above technique looks much more life like.
The final step would be to flatten the layers to return the image to a normal RGB format, layers > flatten. However, you may not wish to do this if you are going to do further manipulation of the image.
Of course, it would have been easier to have not had any redeye in the first place! However, I find the use of in-cameraƒ«redeye reductionà a real pain. Firstly it usually doesnÃt work and secondly, it delays the shot by several seconds in some cases. This normally results in you missing the shot. These days I leave the redeye reduction off on all digital cameras and use this technique if redeye should occur.
About The Author
Neil Duffin is a 32 year old computer games programmer.
"I have been a keen photographer since my late teens. However, I had faltered due to the cost of film, development, and the lack of a darkroom. Then came the digital age – allowing me to combine my skills as a programmer with my creative photographic side."
[email protected]
http://www.neilduffinphotography.com


Elevate Your Vision


Read this story and all the best stories on The Luminous Landscape
The author has made this story available to Luminous Landscape members only. Upgrade to get instant access to this story and other benefits available only to members.
Why choose us?
Luminous-Landscape is a membership site. Our website contains over 5300 articles on almost every topic, camera, lens and printer you can imagine. Our membership model is simple, just $2 a month ($24.00 USD a year). This $24 gains you access to a wealth of information including all our past and future video tutorials on such topics as Lightroom, Capture One, Printing, file management and dozens of interviews and travel videos.
- New Articles every few days
- All original content found nowhere else on the web
- No Pop Up Google Sense ads – Our advertisers are photo related
- Download/stream video to any device
- NEW videos monthly
- Top well-known photographer contributors
- Posts from industry leaders
- Speciality Photography Workshops
- Mobile device scalable
- Exclusive video interviews
- Special vendor offers for members
- Hands On Product reviews
- FREE – User Forum. One of the most read user forums on the internet
- Access to our community Buy and Sell pages; for members only.
You may also like


