by Kevin Raber

Decisions – Decisions
September, 2014
It’s two days before I leave for Photokina and I am debating which camera system to take. As many of you know, I own a number of different camera systems. Unlike my friend and this site’s founder, Michael, I tend to hold onto a camera system long enough to see it mature and cycle into round two and three of its hardware evolution. So, do I take the Fuji XT-1 or the Olympus OMD-E-M1?
I was going to be traveling for two weeks, covering Photokina and then spending a week in Cornwall, England. I knew I would be traveling on trains and doing a lot of walking on a trade show floor. So, it was easy to make the decision that for this trip I’d leave my big boy medium format and full frame Nikon DSLRs at home and shoot with one of my mirrorless systems.
I love the Fuji XT-1 and figured the camera and 18-55mm lens would be a good all around camera for the show coverage. The 10-24mm, 55-200mm and the 56mm lenses could round out the kit for my week in Cornwall. Then again I also knew my E-M1 with the 12-40mm lens would be a great choice too and that could be rounded out with the 7-14mm Panasonic as well as the 100-300mm Panasonic lenses. With this set-up I would have the full frame equivalent of 14-600mm.

Each camera had its pluses and minuses. The Fuji system fits in a Think Tank Sling Bag. The Olympus could too but normally it sits in my Gura Gear Bataflae 18L small backpack. Each kit is lightweight and can be interchanged with both bags. So, it all came down to the toss of a coin – literally. In the end the Olympus won the toss. Plus, I figured it was a good toss as I had taken my Fuji XT-1 on my last trip to the Palouse.
These are both excellent cameras producing amazing image quality. I have to admit though, that the Fuji XT-1 really has found its way into my hands more than the Olympus. Mainly because the XT-1 has a dedicated lens line where the Olympus lens offerings are kind of hodge-podged together from other brands and / or the original 4/3 lens line with a micro 4/3 adapter. This will all change soon with the introduction of the 40-150mm and 7-14mm Pro lenses. The Olympus 12-40mm Pro lens is to-die-for and that is the lens I would mainly use on this trip.
Let’s Get Packed
In my man cave I have a large table that I can use for all sorts of things. One is laying out camera gear and packing it for trips. I gathered all the things I thought I would need for this trip, I decided on the Olympus O-MD E-M1 and the 12-40mm Pro lens. I was seriously thinking if I should bring the Olympus 4/3 lenses I have but then decided to travel light and I opted for the Panasonic 7-14mm and 100-300mm lenses. I also included the Panasonic/Leica DG 45mm Macro lens. I included the Dsptch neck strap and wrist strap. I gathered 6 batteries and the charger, lens cloths, LED flashlight, multi-tool kit (includes wrenches for tripod, micro-screw drivers, and all sorts of other items that I have needed in my travels). Then I loaded up the Lee 7/5 filter system, with a Big Stopper and Little Stopper along with a few graduated filters. Oh, and lastly, the remote cable release. This all fit neatly with room to spare in the GuraGear backpack.

Transporting this system was a breeze. The pack was light enough I hardly knew it was on my back. I traveled with my Club Glove XL duffle which held my tripod and clothes along with my GuraGear Chobe shoulder bag. This was well thought out as I knew I would be doing train travel from Dusseldorf to Cologne on my arrival to Germany. The Chobe and Batalae pack fit neatly into overhead storage on the plane too. I kept thinking how much easier this was than hauling around the Nikons or medium format kit I usually traveled with.
Let’s Go Shooting

Shot With The Panasonic 100-300mm Lens
Shortly after arriving in Cologne and joining up with Michael Reichmann it was time to go out and do some street shooting. This is something Michael and I love to do. I took the Olympus with the 12-40mm and the wrist strap. I put the 100-300mm in my front pocket. When traveling I wear very comfortable North Face cargo/hiking pants. These pants have large Velcro closure pockets. The 100-300mm easily fit into this pocket. How cool is that? I was walking around with a 600mm equivalent lens in my pocket.


We had a great time shooting people, alleys and the buildings with different lighting. As we were strolling down one street I saw a father and his son playing with a big red balloon. I was to far away to catch the action with the 12-40mm lens so I reached for the 100-300mm lens and from across the street I began to capture some amazing shots of a little boy that was just enthralled with a big red balloon. What amazed me was how fast the Olympus was able to auto-focus on the action and also the reach it had. I remained completely undetected but was able to catch all the action. It was only when I loaded the files into Capture One that I saw how sharp this lens was and how well it performed. Overall it was a good afternoon of street shooting.

Nikon D800E With Tamron 150-600mm

Olympus OMD E-M1 With 100-300mm (200-600mm Equivalent)
Time For The Show
The Photokina trade show was five long days of walking and countless meetings. I used the Olympus primarily with the 12-40mm lens and occasionally switched out to the Panasonic 7-14mm lens for wider shots. I shot everything with available light and at times used 3200 and 6400 ISO. The noise on these images was not so noticeable and the images were just fine for inserting into the articles we published on the site.

Shot with the 7-14mm Panasonic Lens

Panasonic 7-14mm lens with Capture One Keystone Correction applied
I was very impressed by the fast auto focus in various lighting condition with the 12-40mm lens. The 7-14mm lens sometimes took a bit of time to find a focus point but that wasn’t unexpected. I imported my images into Capture One 8 and the software automatically applied lens corrections as the 12-40mm lens is one of the profiled lenses in C1 v8.x.
A Day In London

The 100-300mm Let Me Shoot Tight When Needed
After Photokina I headed to London for the weekend. There I met up with some friends and fellow photographers. We enjoyed a day of shooting near the waterfront in London and had a great time. The Olympus performed really well – as expected. Most images were captured with the 12-40mm lens. I did use the 100-300 for some shots though. I was amazed by the focus speed and sharpness of the images.

The 300mm Lens Length Allows For Good Compression
The nice thing with the Olympus is you can set the rear screen up to be touch sensitive so that you can indicate where you want a focus point to be. This was a real plus when shooting some subjects that were not focusing properly in auto-focus. In addition I used manual focus a few times and the magnification with focus peaking made sure I got the shot. I also had exposure warning set for 15 on shadow and 245 on highlights. I’d get a warning with colored flashies if my image entered into any of those ranges. Compensation for the exposures when this happened was just a twist of one of the command dials

Panasonic 100-300mm Makes A Good Street Shooting Lens
On several occasions I used the lever on the rear of the camera to switch ISO settings. I forgot to switch the lever back to the 1 position on several occasions and found I was changing white balance and ISO unintentionally. The set-up of this makes for some real versatile shooting but you do have to remember where the switch is. I have it set up so that in the 1 position, the dials allow me to change f-stop and exposure compensation. While carrying the camera it is real easy to accidentally move the dials, thus changing the settings.

The Lever With 1 & 2 Allows For Different Settings For The Front and Rear Dials
On more than one occasion I found I was shooting at f/2.8 instead of f/8. I also ended up messing up exposures by dialing-in an unintended exposure compensation. In practice, because I like the way this is set-up, I’ll just have to be a bit more careful. The beauty of this camera is it allows so much control so easily. All of these settings are customizable. When I was shooting fast and had everything the way I wanted it, using these controls allowed me to change things very fast and to get some amazing images.

The Front And Read Dials Can Be Turned Easily Sometimes
Allowing For Settings To Change Accidently
Bottom line, if you have big fingers watch your settings. After a few days I was in good shape and made a habit of watching my settings more carefully.
I had a lot of fun on the London walk with the Olympus. I had the 100-300mm lens in my pocket and I could change lenses very quickly if needed. I didn’t need to carry a bag either. I had two spare batteries in my pocket, a lens cloth and the 100-300mm lens. It was great to shoot so unencumbered.
Heading To Cornwall
On Monday after a great weekend in London I was off to Cornwall with my good friend Miles Flint. For the next few days we were going to explore this beautiful region of England photographically.

Dynamic B&W Art Filter
Our first stop was Stonehenge. It was very touristy. We visited mostly so I could say I had been there. It’s very cool to see the structure but really disappointing to be part of thousands of tourists. I decided that I would make the most of it and thought I would get creative and switch to the creative filters in the Olympus – the Dynamic BW with a border. I could always crop the border out later but thought it would be fun to see how they looked. In addition, I set the camera to 5 shot 2 stop variance HDR. This made each of the artistic filters a little more interesting. I shot verticals with lots of sky, close ups zooming in and did everything I could to at least get something I could use.

Tourists
It was amazing to see tourists shooting with their phones and even iPads. It reminded me of why I so dislike being categorized as a tourist and going to places like this. Both Miles and I struggled through as we walked around the roped off attraction. I knew that if I was going to get anything, it would need a bit of creative content-aware work on any image I selected. Needless to say we didn’t spend much time there. I did have fun though shooting with the Dynamic BW filter effect. The cool thing is that the original file is still RAW if I wanted it but I used the in-camera conversion to JPEGs for the effect. The bad thing is you cannot see the color RAW image on playback of images – but I knew they were there.

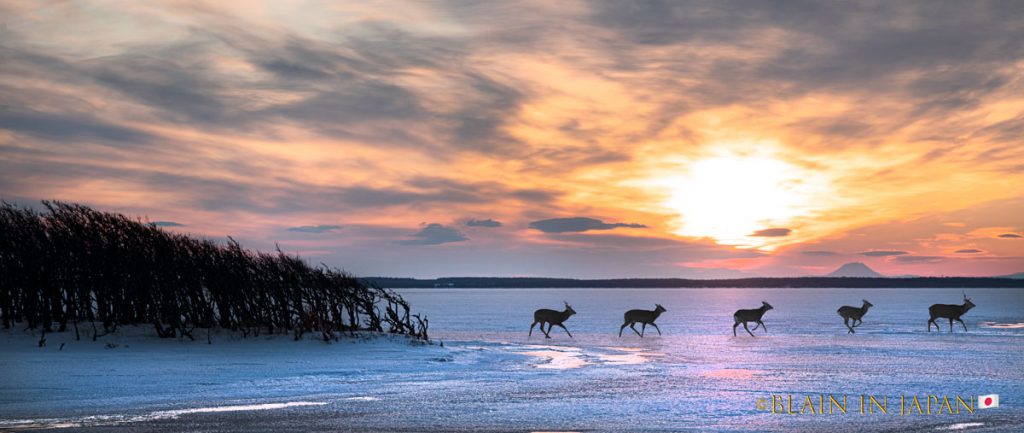
Sunset shot with Panasonic 100-300mm at 300mm
We quickly left Stonehenge behind and arrived in Cornwall in time for a fantastic sunset. I shot this from the top of the hill where we were staying with the 100-300mm Panasonic. There is nothing like a sunset shot with a long lens. I have been shooting sunsets like this since the film days and the Olympus did not let me down for this shot.

Sunrise – 50 seconds with Lee – Big Stopper

Olympus 12-40mm Pro

Panasonic 7-14mm at 7mm

Panasonic 100-300mm at 300mm
Over the next several days we photographed landscapes, seascapes as well as small villages and harbors and the locals. Cornwall is a beautiful area of England and offers many photographic possibilities. The Olympus was well suited for this work. It was light and easy to hand hold. The in-camera stabilization performed really well, especially as the days came to a close. My camera set-up included the optional battery grip which suited my larger hands really well and allowed for easy operation in vertical orientation.

Olympus 12-40mm

Olympus 12-40 with Lee – Big Stopper

Dynamic BW Art Filter with 16:9 Ratio Set

Panasonic 100-300mm
Wrap Up
This camera is one of the most customizable cameras I have ever come across. I customized my settings to suit my shooting style. I actually set it up much like my Nikon system with rear button focus activation. It’s very easy to set new ISO settings as well as f-stops while shooting. As mentioned above this did trip me up a couple of times but I quickly adjusted to making quick checks of my settings. I may be able to dig down deeper into the custom settings to make this a bit easier. On the few occasions when I needed to do HDR, the options were easy to get to and usually I selected the 5 exposure at 2 stops over and under. I found the dynamic range of this camera to be very nice. In shots where I was shooting the outside of a building I was still able to pull detail from the inside. High ISO performance was amazingly good. I was shooting numerous times at ISOs of 800-3200.


With and Without The In Camera Dynamic BW Art Filter
The articulating rear screen allowed me to shoot low angle shots without having to lie on the ground to see the framing. The standard 12-40mm Pro lens was amazing. It’s solidly built and feels good in ones hand. The speed of auto-focus is remarkable. The sharpness of the lens is excellent. I have made several 17×22 inch prints of images from this trip and they are tack sharp. I have no doubt I could take them even larger. My printing set-up for those that are interested is output to an Epson 3880 printer through Colorbyte’s ImagePrint RIP. I will be doing some large prints with my Epson 9900 soon.
I found that I could shoot all day long with over a thousand exposures on two batteries. I have the camera set up to be powered off the vertical grip before switching to the internal camera battery. I usually switch the battery out before the camera battery needs to kick in.

The 7-14mm lens
What really amazed me is the quality of the Panasonic lenses I brought with me. The 7-14mm lens is not the best wide angle I have used but really does a good job. I found some purple fringing at the wider setting but Capture One was able to fix that. As with all wide angle lenses you get some challenging keystoning of objects and people at wider settings. Capture One has very clever keystone correction tools and was able to compensate nicely for some of the distortions that I encountered with the 7-14mm lens. Olympus is scheduled to release their own 7-14mm lens in the Pro lens line up next year. I have already pre-ordered mine.

The 100-300mm Is Able To Handle Action Very Well
The stand out lens though for this trip was the 100-300mm Panasonic. There is something strange about a small lens that gives you a 600mm full frame equivalent view. I was a skeptic but having used the lens before I thought it would be adequate. That word adequate now needs to be changed to capable. On my first day doing street shots in Cologne I was able to catch the shot of the boy and the red balloon. I was blown away by the ability to keep tracking on auto-focus as well as how sharp the shot was. This lens continued to deliver under all sorts of conditions during the trip. Once in a while I encountered slow auto-focus on certain scenes. The lens had to hunt a bit to catch the focus. The in-camera stabilizing was a big plus too when using this lens. You couldn’t ask for more, especially from a lens you can put in your pocket.


The Future 7-14mm and 40-150mm Soon To Be Released Pro Lenses
Olympus will soon be releasing a 40-150mm 2.8 lens with an optional 1.4 tele-extender. This will be an f/2.8 throughout the zoom range and will be part of their Pro line up. I played with this lens at Photokina and was very impressed. It has extremely fast autofocusing and is built extremely well. Mine is on order and I’ll report back once I receive it. I also ordered the 1.4 tele-extender. And, it has one of the coolest and best engineered lens hoods I have ever seen.

The 7/5 Lee Filter System With Lens Hood
I’m not a big fan of graduated filters. I can usually accomplish a lot of what is needed in regards to darkening skies as well as color adjustments inside Capture One with local adjustments. Capture One 8 allows for not only masking with outlining but you can change the color temperature, exposure, contrast, clarity saturation and more. So, it is very seldom that I will use any kind of graduated filters in my shooting. However, the Lee Seven/5 (7/5) Filter system designed especially for mirrorless cameras is a must have for neutral density filters. Like a lot of photographers I like to do long exposures to smooth out cloud and water movement. The Lee Big and Little Stopper filters are perfect for this. The 7/5 system I have is adaptable to all my lenses in both the Olympus and Fuji systems through adapter rings. I have each box for each ring marked for what lenses it should be used with. Thus setting up long exposures with this kit is very easy and works great. You will get a color cast that may mean you have to do extreme color temperature adjustments to your RAW file. This is not a system to shoot JPEGS with. I was able to do some nice long exposure shots in bright daylight using this set up as seen in images in this article.

The 7/5 Lee Filter System
The Final Word
I couldn’t be happier with the O-MD E-M1. However I’d say that for the Fuji XT-1 system too. The Olympus performed admirably and consistently on this trip. Exposures and focus were dead nuts on. When I needed to focus manually, the focus peaking worked perfectly. The ergonomics of the camera are pretty good and I could certainly operate everything with the set up I had. I did get tripped up occasionally with the rear touch screen but there was nothing I couldn’t think my way out of. This is a very strong camera system. You can customize it just about any way you could think of. I would definitely recommend the battery / vertical grip.

Once the rest of the Pro lens line is available, this camera will be very strong. I presume we may see more Megapixels in the future but as it is now, it is an extremely capable camera. My hesitation all along was whether I’d have enough resolution to make large prints. So far the files have passed with flying colors up to 17×22″. And, based on looking at how well that print looks, I’m confident I could enlarge to at least 24×30″ and be good to go.
Will I sell my Nikons? No, not yet. But I am using them less and less these days. And the word yet is the qualifier. I am fortunate enough that I can hold onto these systems and pick and choose what I use. If that wasn’t the case I might just have to put the Nikons up for sale. I am that convinced that mirrorless is that good.
Now, if it comes to Fuji XT-1 or the Olympus then that is another story. I really like both systems. The Fuji certainly has the advantage of a large lens line-up with more scheduled to arrive soon. The size of each is about he same. The Olympus is more customizable and has more thought in what it offers. For example, two things I really miss on the Fuji that the Olympus has, are the histogram after the exposure is made and the various HDR settings. The XT-1 has only one HDR setting and it’s just about useless. Who does a three exposure 1 stop bracket? On the Fuji, to see a histogram you have to push the playback button, and there is no live highlight warning available.
Both companies have done a good job with firmware updates. Olympus released a major firmware upgrade during Photokina and it is a must-have upgrade. Fuji has a lot of new features announced in their soon to be released firmware upgrade. I hope Fuji is listening and fix the HDR and histogram issue.
As far as image quality goes it is almost a toss-up, but I’d give the edge to Fuji. The Fuji has a larger APS-C sensor which is a bit bigger than the Micro 4/3 sensor of the Olympus. This gives it a slight edge as far as comparative prints that I have made.
The bottom line is you can’t go wrong the Olympus OMD E-M1. I look forward to shooting a lot more with it, and was extremely happy with the two week trip I made with this system. It has made me more confident about leaving the bigger cameras home. As a matter of fact, either the Fuji or the Olympus will be making the Antarctica trip with me this January. Who knows – I may just take both, as it will still be lighter than carrying down my Nikon kit.
One More Thing
I’m about to head to Scotland to lead a workshop on the Isle Of Skye. I will be taking the Fuji XT-1 on this trip and I’ll do a similar report on my two weeks with the XT-1

Brilliant Color, Great Contrast, Excellent Sharpness . . . The OMD E-M1 Is A Fantastic Camera
Published October 10, 2014
Elevate Your Vision


Read this story and all the best stories on The Luminous Landscape
The author has made this story available to Luminous Landscape members only. Upgrade to get instant access to this story and other benefits available only to members.
Why choose us?
Luminous-Landscape is a membership site. Our website contains over 5300 articles on almost every topic, camera, lens and printer you can imagine. Our membership model is simple, just $2 a month ($24.00 USD a year). This $24 gains you access to a wealth of information including all our past and future video tutorials on such topics as Lightroom, Capture One, Printing, file management and dozens of interviews and travel videos.
- New Articles every few days
- All original content found nowhere else on the web
- No Pop Up Google Sense ads – Our advertisers are photo related
- Download/stream video to any device
- NEW videos monthly
- Top well-known photographer contributors
- Posts from industry leaders
- Speciality Photography Workshops
- Mobile device scalable
- Exclusive video interviews
- Special vendor offers for members
- Hands On Product reviews
- FREE – User Forum. One of the most read user forums on the internet
- Access to our community Buy and Sell pages; for members only.
You may also like