


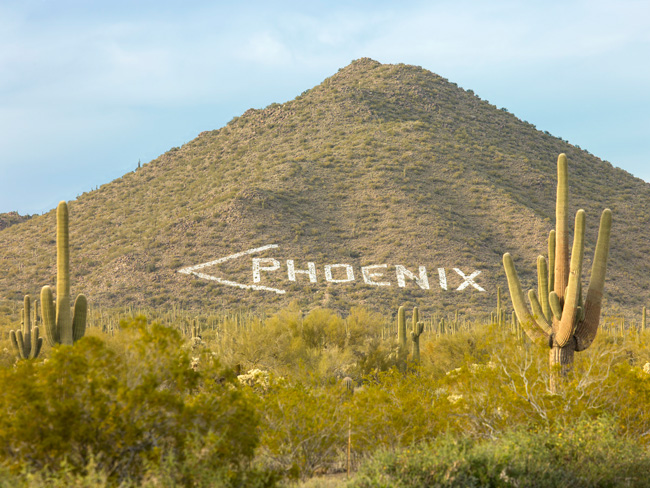
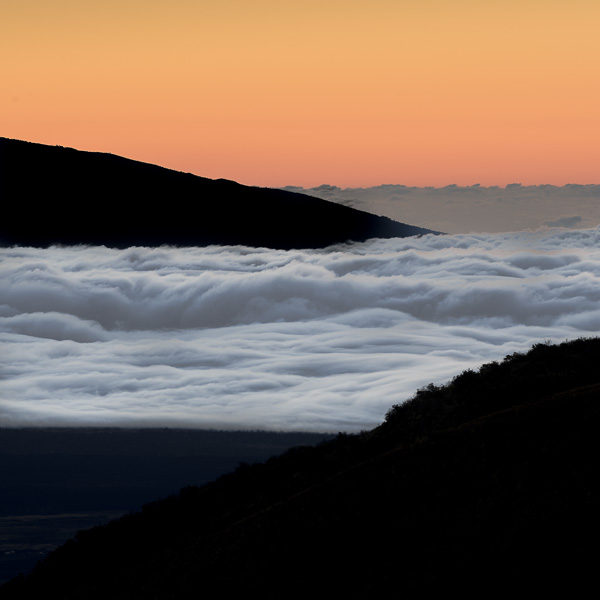
Cambo Wide RS, Rodenstock 40mm – f 8, 8 Seconds, iso 35
Easy Decision…The process of using a digital back gets even more special.
It’s been a quick 4 years since bringing the Leaf Aptus II-10 to my gearbox and reviewing my thought process on its purchase. My last article on Luminous Landscape covered this in late 2009. Since then, there’s been a whirlwind of projects to shoot from all over the US, Canada, the Far East, and Europe. Business has been very good during that time and I have thoroughly enjoyed being fully immersed in work with the associated air miles. So join me in outlining my decision process in upgrading to the new Leaf Credo 80 to take my digital back to the next level.
Cambo Wide RS, Schneider 60mm – f 8, 1/15
th second, iso 35
Growing your skills…
The first 10 years of my photographic life were spent as a sponge, learning the techniques, learning to see, understanding limitations of film and equipment, and trying to put as many experiences under my belt as possible. Most of this, to my dismay, was a solo effort, without real mentors or a traditional apprentice program. I would probably go back and fix that aspect during that time if I could, knowing what I do today. Getting my start as a photojournalist at a state paper and then the wire services in the late 80’s set my course and much of my approach. It taught me how to answer questions and tell stories with my images that I applied to the commercial world.
The next 10 years of my photographic life were spent UN-learning the moves of the masses, to try to set myself apart, and find the spirit, subject, and style that was true to who I was. Along the way, digital cameras replaced the Leaf scanners and film I used for news-work and made this period easier for me to experiment, grow and get work.
Now, early into my third decade of photography, I feel I have entered a final phase that will not be capped at the end of a ten-year span. My main focus now has been refining my images, my focus, and looking toward creating a body of work that will be remembered long after I am gone. My experience has enabled me to spend less time on the technical side – it’s exciting to be on cruise control with how you shoot. It’s just a nice flow for how you approach a subject and react to limitations or what you run into. It’s really like a dance at this point or driving your favorite car or motorcycle on your favorite road – No police or chaperones around. You pick your lines.
Cambo Wide RS, Rodenstock 40mm – f 8 , 1/15
th second, iso 35
The Gear Backstory the last 4 Years…
I shoot a lot of images. Last year alone, I broke the century mark with over 125,000 frames. That was a banner year on the road shooting for over 200 days. I ended up pulling about 400 images into my library that were my favorites from all the ones delivered to the clients. I had a hard time editing those down much further – so that’s a great place to be. Cameras used for that ‘take’ were the Nikon D800e, Canon’s 1Dx, a Leica M9, and the Leaf Aptus II 10 on a Cambo Wide RS. While a majority of the frames were with the 35mm full frame sensors, the Leaf clocked 6000 frames. It has covered 20,000 images and been bulletproof since I picked it up in 2009.
Like most photographers, I like both the artistic and technical sides of life. I evaluate the equipment that I am shooting with each year when new products are announced and decide what I might swap or add to get the most out of my toolbox and open up new avenues for images.
I swapped my Nikon D3x’s in 2012 for D800e’s when they were first released. I originally hoped that the smaller, quicker, and versatile D800e would simplify my travel bags and reduce the need for a tech camera, digital back, and MF setup, but the opposite occurred. It made me appreciate, AGAIN, that one tool is never the right fit for every scenario and that maybe 35mm had traveled a ‘bridge too far.’ Lesson learned. I decided to go back to two main areas for my gear selection:
1. Lower resolution full frame cameras around that 20mp sweet spot.
2. Go-big or go-home with the digital back and its tech cameras and higher flash sync capabilities.
I sold the D800e’s and invested back in Canon. If the Contax 645 had leaf shutters in the lenses with higher sync speeds, then they would likely still be with me today.

Cambo Wide RS, Schneider 120mm – f 8, 1/15
th second, iso 35
The Planning for the third decade and beyond begins…
In planning for the future, I decided to expand my focus to two parallel sides of my image making. The left side of the equation was to continue to pursue work from my current clients and continue refining what I was already known for in my location photography. The right side of the equation was to build a separate but related brand of ‘special works’ focusing on combining my environmental portraits with the landscape side of my life. I had a list of goals and end products in mind for this including a traveling gallery, editorial features, books, and civic activism on things that I was passionate about.
The newer side of my image focus would benefit from even larger prints and more strobe work outdoors. With the Cambo and tech-camera lenses, flash sync maxed out at 1/500th of a second. While that was a great start and a one-stop advantage over the Canon’s, I wanted to be able to use some smaller power packs in the field, which an even faster sync speed would benefit. I also wanted to add a system like the Contax with a big viewfinder and quick operation but a faster flash sync. The Contax had a max sync at 1/125th of a second. So I started to think about options on what MF systems were available to replace the Contax 645 that I had sold. There was the Mamiya DF+ with Schneider Leaf shutter lenses, the Hasselblad H system, and the Leaf AFI / Rollei Hy6 that would fit the bill for higher syncs, and what I was after. I had to figure out which of these systems would work with my current Leaf Aptus II 10 back and if there were any limitations with pluses and minuses.
Work picked up with long fall trips to China and Canada. Things compressed this year and slowed down my ability to make decisions on any new gear changes.
Cambo Wide RS, Schneider 60mm – f 8, 1 second, iso 35
How do you like to drive?…
December arrived in full force and I made time to start planning for the new special projects that I would be moving forward with. I put in a call to Steve Hendrix at Capture Integration in Atlanta to talk about my plan and equipment needs for the year. I had picked up some Canon lenses and Profoto battery packs from him earlier in the spring – so he was already on board with where I was heading. I asked Steve to give me a rundown on the pluses and minuses with the three MF SLR options I had settled on. He said all were doable depending on my goals. Steve is a good listener. I like to think of him and Dave Gallagher as my problem solvers. They have been great at matching me up with equipment as my style and needs have evolved. Steve and I came up with a list of features to try to fit with a new setup. Later that day, he emailed me a list of solutions to consider. Some would consider keeping the Aptus with the new camera platforms and others would start fresh with a different back.
My list on what I was looking for boiled down to the following:
• Fast Sync
• Large Sensor / Full Frame Medium Format
• High Megapixel
• Plays nice with tech cams
• High ISOLong exposures
• Good LCD
• Won’t Break the Bank
Steve immediately followed that with:” Ah, doesn’t exist.” with a smiley face! And then hit me with the next line: “Well some of it does.” You can pick some of these in a combination but not get all. So, just like in dating, you can get some of the things important to you but rarely get all 10 out of 10. I started to read that the Aptus back would not work on the latest Hasselblad H4x body. Phase/ Mamiya had a DF+ that would work on the Aptus but a new body seemed imminent sometime before Photokina. The Hy6 would work with a mount swap but was slower to run-and-gun handheld. It also had a slightly fragile grip that I had seen crack from pretty easy use. Maybe their mod II had fixed this. The DF+ and the H4X are more complete systems in terms of available modern, auto focus lenses so I was leaning that direction. So if I wanted to go with the newer bodies, a mount swap was a costly necessity and I was seeing this as an opportunity to add some new features by possibly starting fresh. The other options focused on the Phase IQ backs, the Leaf Credo backs, and the Hasselbad combos.
To me it really boiled down to how you like to drive. Do you like a six-speed or a DSG gearbox? Do you like tight handling or a cushy ride? AND do you NEED cup holders…
Hasselblad H4x with 300mm – f 8, 1/30
th second, iso 35
The Options – Phase, Leaf, and Hassy…
Hasselblad makes good MF products. They are easily found in rental houses across the globe. Image quality is excellent, and the system is very complete with just about anything you could need. Buying into one system can have its pluses with good tolerances and one place to go if any problems arise. With the H3d and H4d, separating the back from the bodies for tech camera use wasn’t their main focus. A straightforward seamless approach wasn’t really there. The H5d introduced an add-on battery pack to make this a little easier. The H5d’s screen had half the resolution of the Phase One IQ and Leaf Credo but it’s usable, and much better than in the past. The Hasselblad maxes out at 60mp in single shot mode with a full frame sensor so without going into the 4-shot MS backs, you could compare it with the other 60mp backs but there wasn’t an 80mp offering. The pluses were controlling many of the back’s features from the camera instead of going through its complex menus on the back. I liked the camera operation, leaf shutter lenses, and bright, big viewfinder. It’s fun to shoot with and with a longer mirror up delay and the leaf shutters, image quality could be crisper than with a focal plane shutter camera when not using flash and longer exposures. The other plus with Hassy was that I could choose an H4x camera to use with a Phase or Leaf Credo back without any trouble. Maybe that was the best of both worlds.
I used the Phase One IQ backs at a Capture Integration workshop I taught in New England when they first came out in 2011. Image quality was great and the new rear screens were fabulous. It seemed to have most modern features that would make life much easier in using MF. It is the “top of the line” and many photographers head straight to the IQ backs because of their reputation and “they simply want the best.” Image quality is great and it has moved the bar on MF. They have solved the long exposure issue that shooters missed with the newer 260 back, and have added Wi-Fi as well. I was ok with the DF+ body with excellent Schneider leaf-shutter lenses. I had used them before with great results. Maybe a newer body design would allow the photographer to select either the focal plane shutter or the leaf shutters like in the Leica S camera. Or maybe it would be mirror-less… A lot of unknowns there that only time would reveal. As a Leaf user, Phase’s four-button setup and menus seemed less second nature than I would have preferred. But, in fairness, I only worked with new owners and the Phase backs for a few days at that workshop. I would liken the operation of the Leaf to an iPad and the Phase to a Droid operating system. Both good – but it all depends on how you like to drive and what is comfortable and quick for you.
I love using the Leaf Aptus II, from the easy user interface to that great color right out of the can. It never had any hiccups and the “look” from the files really put me in my comfort zone. I tried out the Leaf Credo a couple of times after it followed the IQ backs in 2012. It seemed like a virtual copy to the Phase One in many ways except it retained some DNA from Leaf’s history and designers. The main differences were the way the rear touchscreen cleanly operated without any buttons – just a power button and a smooth screen. There were several main functions and then well thought out sub-menus brought up within the center window. Another difference was the color palette and profiles so I could keep the look that I already had with the Aptus. It seemed that Phase One valued the independence of the Leaf brand and their die-hard users, and Phase didn’t need to assimilate them. They didn’t take the special sauce out of the mix, which so many Leaf owners crave. The Leaf Credo backs come in at a lower price point than the ones from Phase. In keeping costs down, the designers omitted several features found in the top of the line Phase backs. Gone is sensor+. Gone is the auto-straighten tool used in C1. Gone is Focus Mask in the back. Focus Mask is still available from the Phase One software on a laptop if you’re tethered. But the very fast 100% zoom on the rear screen makes focus checking very quick and easy in the field. It’s so much better than doing it on the Aptus, which could be on the crunchy side. So I could live without the focus mask even though the back would be on a tech camera much of the time. I also didn’t need the auto-straighten tool. The Sensor+ wasn’t something I was too worried about because of the availability of my 35mm systems in that 20mp, great, high-ISO range already. I had already decided to avoid putting all my eggs in one basket opting for separate tools for separate specialties. The Credo has the same virtual horizon tool as the Phase, and the same in camera live-view capabilities. So these siblings aren’t that different. It’s how you like to drive.
I was also aware of the likely new offerings from Canon and Nikon this year getting closer to the MF world in resolution. But based on my findings with the Nikon d800e, I was happy adding a back with 80mp to push further away from the 35mm crowd that would also give me a bit more room on preserving the value of my MF investment. Once you absorb the initial cost of investing in a MF back, upgrading is a pretty cost effective way to stay current while adding new features.
Cambo Wide RS, Rodenstock 40mm – f 11, 30 seconds, iso 35
Making the Choice…
The email from Steve Hendrix lined up my options on each of these. Based on my goals, I chose the Credo 80 as the best bang for the buck. I could have gone with the Phase or Hassy and been very happy, but opted for what felt right for me. The increased long exposure capability of the Credo 80 to 2 or more minutes based on temperatures also seemed like a great bonus over the 32 seconds I had with the Aptus II. There is actually no exposure “limiter” on the Credo, you can expose as long as you like and “even 3 to 5 minute exposures can be acceptable with a little “work”. For architectural interiors and twilight landscapes where light can be in tight supply, that was perfect. So I don’t feel like I missed anything from the Phase. I got to keep Leaf’s fantastic color and secret sauce and went with the easy menus.
The only tricky part now was picking the right mount. You can get the Credo in just about anything including the Hy6, which Phase doesn’t include. I took the road less traveled here and texted Steve to get me the H mount. I purchased the 3-year, gold warranty, which includes a free mount swap in case Phase comes out with that mirror-less MF marvel later this year. I packed up the Aptus II and sent it on its way to Steve, and got them paid for the upgrade. The hardest part was waiting several weeks for the new back.
Cambo Wide RS, Rodenstock 40mm – two image stitch – f 8, 2 seconds, iso 35
Meet the Credo…
Following an Orlando shoot in January, I stopped at Capture Integration on the way back. Since Atlanta was right in the middle of a winter snow/ice storm, I was probably the only crazy person WANTING to go to Atlanta that day, but my Credo 80 was waiting for me…
The rest of the travel plans went smoothly and I arrived at Capture Integration’s office after lunch. Phase One had just released the new IQ250 CMOS back and there was going to be an open house that same day where I was headed. So I got to see the new technology as a bonus that day. The real reason for the visit was of course to have the experts show me the ropes and special features of the Credo and get some tethering time with C1 software. It was great to run the Credo through some test images on the Cambo wide. Steve Hendrix had an H4x waiting for me as well. We were able to trigger the Credo and Hassy camera from the computer. That was smooth as I wasn’t sure the camera and back would work so seamlessly tethered. With the mirror up and triggered from the computer, the H4x essentially turned into a tech camera with much longer lenses available and a bright mirror box for focusing instead of using a distance scale. Same great light leaf shutters. No vibrations at all. You could get the same results with a wired remote or the self-timer. The True-focus also worked as advertised which was another bonus for this combo. We also noticed that the older Hassy finder the HV90x showed a perfect matched frame with the Credo’s file on the computer. The HVD90x did not have a match on framing and was definitely off on what you saw vs. what you got on the computer. So avoid the “D” viewfinder if you opt for the IQ or Credo shot on a Hassy. Otherwise your framing will surprise you like using some Leica M’s! The results were good handheld. I think I will stick with the Hassy on a tripod though unless I am using strobes to get every ounce of image quality out of the new back. I’ll make sure to use proper techniques and enjoy how good it can get.
Dave Gallagher took Steve and me out to a great southern restaurant for dinner, called The Feed Store to talk shop and celebrate the new back’s arrival. I grew up in the South so the food was a great fix. Best fried chicken, macaroni / cheese, and baked beans I have ever had. The year looked promising with the new gear and new direction for my work. Dave had some great suggestions for angles on my special projects and some people to talk to on making it happen.
Hasselblad H4x with 100mm – f 5.6, 1/400
th second, iso 35
Back to the Southwest – Credo in Hand…
I ran some test shots with the new back in the foothills near my home in Mesa, AZ. Operation was a breeze. The results were very nice. I opted to shoot at ISO 50 but would rotate back in forth with ISO 35 depending on if longer exposures were needed. There were no real differences between the two in most normal shooting. Taking it up to ISO 400 would also be fine depending on the circumstances. I had also traded in my Schneider 28mm Super Digitar XL lens for a Rodenstock 40mm HR Digaron-W. The Schneider had some colorcast issues with the 80mp sensors that were still noticeable after a good LCC in C1 software. Once I saw the results with the 40, I was REALLY impressed. It was so clean. So it’s in the bag now with the new 60 and 120 Schneider’s – all three with the Cambo tilt-swing mounts.
I packed up my bag and headed for Las Vegas for several days with my wife to put the Credo through its paces. I had a courthouse to shoot in the upcoming weeks and some portraits scheduled so I wanted to be comfortable with the new back before arriving on the jobs. While my wife was attending some seminars, I headed out for some photography…
I decided to go fairly light with the Credo on this outing. It sat in a large rugged Domke satchel mounted to the Cambo and the 60 with some extra padding. The other pouches in the bag cradled the 40 and 120 lenses with the rear extension for the long lens underneath. I opted to leave the charger at home and packed 8 new batteries fully charged. I wanted to see how far they would get me. I also chose to run the Credo like the Aptus II in zero-latency mode so that I wouldn’t need the special KaptureGroup Wake-Up Cable. Steve Hendrix told me to expect higher battery use in this mode and some slightly warmer temperatures out of the back depending on use time and outside temperatures. I might have to order the $300 cable at some point, but I wanted to operate as closely to my previous methods as I did with the Aptus keeping it simple, so I had less chance for any mistakes.
The bag also carried a dedicated older iPhone with Finder mount and Alpa viewfinder software. An LCC filter, meter and some odds and ends rounded the bag out to a weight of 15 pounds all-in and ready to go. A carbon fiber, 2-series, Gitzo with Arca-Swiss ball head would keep it stable without weighing me down. The flight to Vegas was only an hour but it ran late so I opted to get started the next day after a good night sleep.
Hasselblad H4x with 210mm – f 5.6, 1/100
th second, iso 35
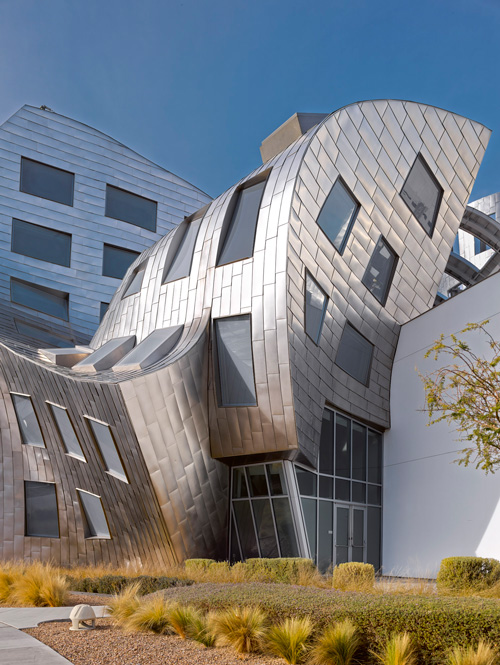
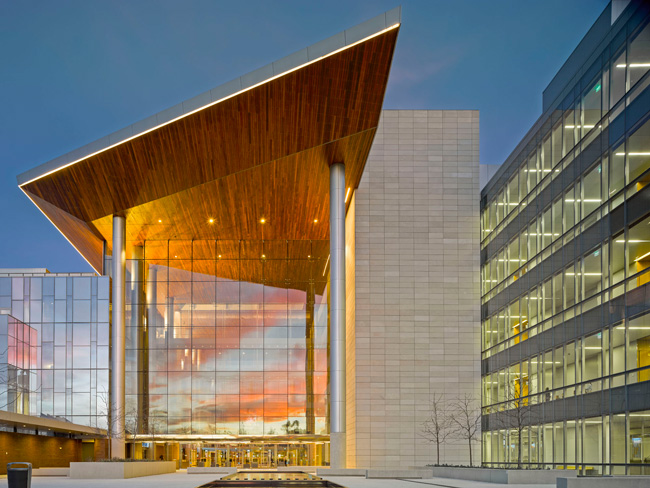
The weather the next morning was a bit cloudy and murky, so we slept in a bit and then got my wife to her conference. After taking care of some planning for the upcoming shoot in Long Beach, I headed out for some lunch, made some more calls and then looked at what areas in Vegas might be fun to shoot in the afternoon. I headed over to the Cleveland Clinic, Lou Ruvo Center For Brain Health, north of the Strip. This metal clad modern building designed by Frank Gehry looks like architecture on a roller coaster. I had to see how the Credo and Cambo would do with the newest lenses in the bag. I arrived at the site around 2:30 in the afternoon and had a walk to scout some of its stronger angles. I shot for the next hour and a half covering about 150 frames, some for stitching, LCC’s, and others getting framing correct. I went through one battery during that time and filled up most of a 16gb card. All of these images were shot at ISO 35. The 40mm and 60mm were the only lenses used on this shoot with the majority of images going to the 40. The 40mm had plenty of movement. I was hitting between 15 and 20mm with no issues on many of the images being fairly close to the building staying out of the nearby busy streets during rush hour. The screen was great. I loved the way to navigate between frames and the histogram. Man, those lenses are sharp. The double clicks to get 100% views were quick and it was easy to see the sharpness that was there. It was also great to slide through the image from one area to another, just like on an iPad. There were no hiccups during the inaugural shoot so that was good news.
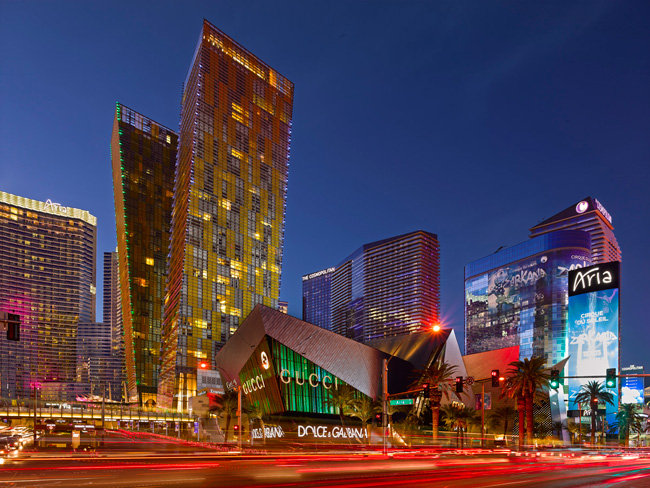
I finished up shooting with about a half-hour to sunset and hustled over to Caesar’s Palace to pick up my wife from her seminar. I was enjoying a bit of downtime and getting to know the Credo without any pressures of a new project in front of me. I had photographed the new City Center hotels and shopping areas back after getting my Aptus II, so I felt it fitting to go shoot a bit at twilight of that area again before we grabbed dinner.
We walked down a block from The Cosmopolitan and I set up in a good position to show some of the newer buildings at City Center. I opted for the 40mm without any stitching. It was a perfect focal length for my framing. I dialed in 16.5mm of fall on the Credo and I was set to watch the evening and activities float over the camera.
After shooting about 40 frames, exposure times were dipping to 1-2 seconds. I think I must have triggered a frame before the camera had completed a dark frame on one of the exposures. After that, I got an error message saying the camera was having trouble communicating with the CF card. I rebooted it but it still had the same issue. It was probably the result of not formatting the older card used in the Aptus 100% correctly. So I swapped in a new card, formatted if fresh and kept rolling without issues. I’ll have to make sure the “ready” beep is loud enough to follow so I don’t jump the gun. The dark frames are something I didn’t really experience with the Aptus II, so it was good to experience that now, rather than on a paying job. After the twilight faded, I put the camera away and my wife and I headed for some R&R the rest of the night.
Hasselblad H4x with 100mm – f 7.1, 1/500
th , iso 100
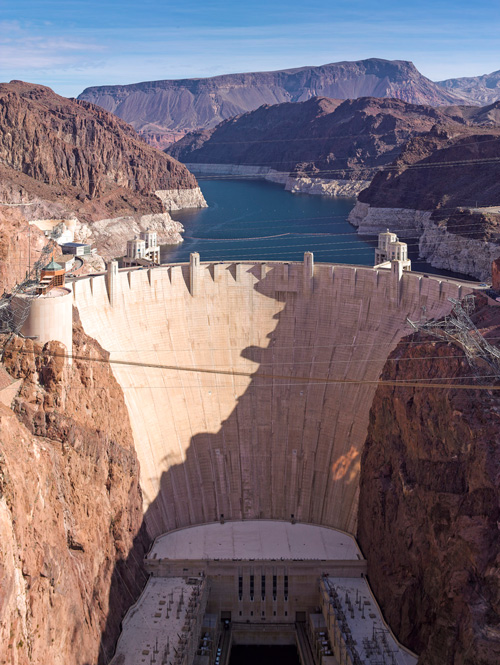
I headed out the next day after dropping off my wife at the conference for her second day. The Hoover dam and Lake Meade were the next spots to investigate with the Credo since I was in the area. I got to the new bypass bridge and went out to the center of the span overlooking the dam below. I used the 60mm lens with about 15mm rise on the rear back to capture the lower floodway areas. Using the iPhone with Alpa software makes it pretty easy to line up your shots left to right. I still find myself using the spirit bubble levels on the camera to get a starting point. I haven’t felt a need to use the electronic spirit level in the Credo yet but I’m sure I will get around to adjusting my working methods before too long. Old habits are hard to break – especially when they work. I returned to the car and drove over to the Lake Meade overlook. I popped on the 120mm lens with the rear back spacer for this short barrel design. Got everything lined up in 2-3 shots fine tuning movements. I turned on the grid lines on the back screen to help my composition with the rule of thirds. I held my Heliopan polarizer over the tiny front piece of glass on the 120 and wrapped up with an LCC. I knew that the 60 and 120 lenses don’t really require an LCC very often, but go through the motions anyway with the Cambo to just keep the process uniform. The 60 and 120 lenses are so clean; it seems with any combination of movements, that it’s just painless. These lenses had just come back from a yearly check-up from Cambo at their factory in the Netherlands. I sent my body in as well so that they could make sure the setup was ready for the exacting tolerances required with the 80mp back. Rene Rook at Cambo didn’t disappoint. The setup was totally in the zone and the images were everything I expected with ridiculously sharp results.
Hasselblad H4x with 100mm – f 7.1, 1/250
th , iso 100
On to Long Beach…
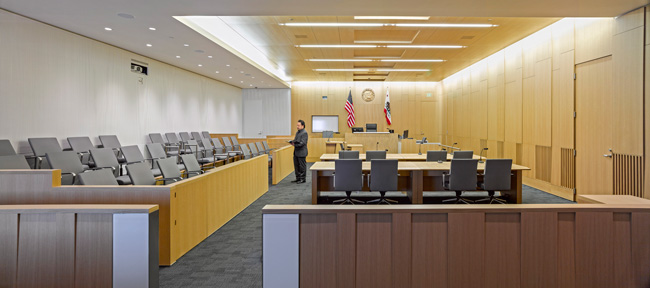
I headed back to the airport the next day to cover a new Courthouse in Long Beach, CA for AECOM, the largest architectural and engineering firm in the world. I really enjoyed shooting with the Credo. I was in the groove. The new Rodenstock 40 cut down a lot of my exposure times because it doesn’t need a center filter and optimum sharpness is a stop wider than the Schneider’s. I really think for interiors the 40 and 60 are great tag team partners. I’m very pleased with the clarity of the images with my three-lens set up with the Credo. This new building had lots of large open spaces so I used stitching for several of the images and used big, vertical movements on these lenses. I had close to 20mm back fall using the 40 in a vertical frame and it corrected out fine with the LCC. It’s nice when you can see where the image is going with the depth on the rear screen. I’m pretty impressed. The longest exposure I went with was around a minute when I needed some depth of field and using a polarizer. I noticed the back getting a little warm at longer use times because of my zero-latency mode with the standard cable release. I will definitely be calling Steve Hendrix to add the special cable for using the other latency mode moving forward. I don’t want to take a chance on introducing any unnecessary noise with longer exposures because of any heat. So I guess I will learn the operating order of the double cable release / extra wake-up button for when I know the camera will be on for a prolonged time.
Lighting in the modern facility was good. The Profoto’s added fill, and I was able to cover ground almost as fast as with the Canon’s because of the clear info on the bright screen. Checking focus was easy and I didn’t need to tether. This saves me a lot of time and cuts down on the amount of extra stuff to bring. I used the built-in, live view to quickly set up the back with framing. It worked quite well on the interior scenes where lighting did not have too many hot spots. I closed the aperture a couple of stops and could work with the slower frame rate just fine. I don’t know that it’s a crucial feature to my workflow, but it’s good that it’s there if the iPhone viewfinder breaks or runs out of juice as a backup. I work by myself most of the time and hire local assistants for bigger architectural or portrait projects. The less I have to keep track of, once shooting, the better. The smaller the production, the better for what I do. So I’m pretty happy with this setup.

Hasselblad H4x with 300mm – f 5.6, 1/800
th second, iso 50
Add the H4x…
Headed back to Phoenix for some heavy processing time for the architectural deadlines. I had some packages waiting for my return from Anthony Festa, the National Tech Manager at CI. My new H4x had arrived. Looking forward to putting it through its paces with the 100mm, 210mm, and 300mm for the longer side of imaging to complement the Cambo.
I was scheduled for two environmental portrait sessions and some time in the great outdoors. I used the H4x freehanded with strobes but locked it onto a Gitzo for all available-light shots. Love that big viewfinder. If only the body was black to match the Credo. I guess you can’t get everything you want. Maybe an H5x or H6x would do that in the future. I was really happy with the operation and look of the lenses even on an 80mp sensor. I’ll send some RAW images to Dave Gallagher that readers can download to review in full size to see the details with this combo. I like the remote release. Combined with the leaf shutter lenses it provides an extremely smooth and quiet, vibration free release. However, the placement of the port – jammed right below the mirror up button – could be better. Image detail is great in this mode.
Each of these three Hassy lenses offers what you just can’t really get on the Cambo – compression and faster apertures with less depth of field. The true focus worked as advertised when re-compositioning the portraits off-center. I’m not sure I would ever need it with landscapes or architecture, but it’s nice that it is there.
I feel the Credo brings the goods and makes my life easier. Combined with an H4x or H2 and Cambo system, it really is the best of both worlds and best bang for the buck. The process of using a digital back for me is now even more special. Is spending this much cash on a camera system a decision taken lightly?
No.
I know how much hard work it took to earn that. But just like LASIK eye surgery was priceless to me 20 years ago, the Credo is in the same boat today. It was money, very well spent.
About Robb
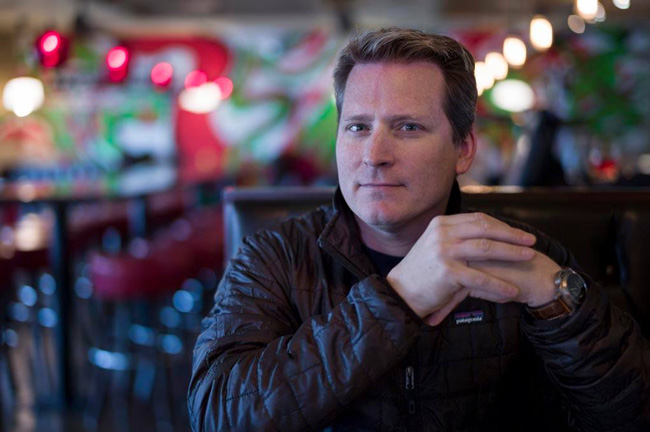
Robb Williamson is a commercial and editorial location photographer specializing in aviation, architecture & design, and infrastructure & industry. Robb is celebrating four successful years in Arizona after spending over two decades in Colorado. His younger years were spent throwing newspapers and working at a movie theater under the bright lights of Houston, Texas.
He joined the US Army while still in high school and served honorably as an NCO in a combat engineering company. Following his subsequent graduation from Louisiana State University, Robb began dual careers in photojournalism and landscape architecture. He later added a Masters degree from the University of Colorado and continued work with Reuters Newspictures and UPI before focusing his business on commercial photography and advertising work.
His diverse body of work has appeared in numerous publications and on annual reports for many Fortune 500 companies including AECOM, Rio Tinto Minerals, General Growth Properties, the National Business Aviation Association (NBAA), the National Renewable Energy Laboratory (NREL), the City of Aspen, Dubai Aerospace Enterprises, and for hundreds of architects, engineers, and landscape architects.
He lives in Mesa, Arizona with his wife Fay and their three children.
Robb can be reached at hisEMAIL. Image portfolios can be viewed atRobb’s Website.

Some Of Robb’s Gear
Published September 11, 2014


Elevate Your Vision


Read this story and all the best stories on The Luminous Landscape
The author has made this story available to Luminous Landscape members only. Upgrade to get instant access to this story and other benefits available only to members.
Why choose us?
Luminous-Landscape is a membership site. Our website contains over 5300 articles on almost every topic, camera, lens and printer you can imagine. Our membership model is simple, just $2 a month ($24.00 USD a year). This $24 gains you access to a wealth of information including all our past and future video tutorials on such topics as Lightroom, Capture One, Printing, file management and dozens of interviews and travel videos.
- New Articles every few days
- All original content found nowhere else on the web
- No Pop Up Google Sense ads – Our advertisers are photo related
- Download/stream video to any device
- NEW videos monthly
- Top well-known photographer contributors
- Posts from industry leaders
- Speciality Photography Workshops
- Mobile device scalable
- Exclusive video interviews
- Special vendor offers for members
- Hands On Product reviews
- FREE – User Forum. One of the most read user forums on the internet
- Access to our community Buy and Sell pages; for members only.
You may also like


