


 Falcon & Branch — Costa Rica, 2001
Photographed with a Canon EOS D30 and 100~400mm f/5.6L lens @ 400mm
1/500 sec @ f/8 — ISO 400
This photograph was taken on a February 2001 trip to therainforestof Costa Rica. It was shot from a small boat on the Rio Aquinas. While I quite like it, after a couple of weeks of living with the print I decided that while it was a very good literal interpretation of what I saw, it didn’t capture the "feeling" of the hazy heat and humidity of this tropical locale.
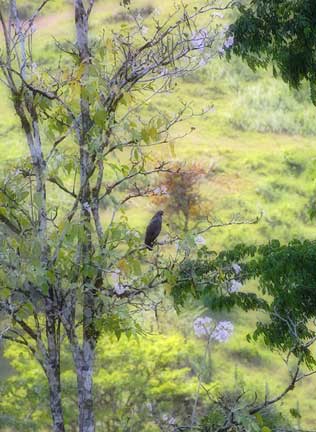
I believe that this interpretation does a much better job. Sharp yet soft at the same time. Shadow areas have darkened and become sharper while highlight areas have lightened and become softer. Remarkable, isn’t it? (You may view enlarged versions of each photograph by clicking on them).
Not all images lend themselves to this treatment, but for those that do you can create a print that is quite special and yet at the same time doesn’t have an overly "painterly" look — it’s still photographic.
Here then is the recipe for how to create this type of image. But, like all recipes — season to taste. This technique, like many in PhotoShop, requires a lot of experimenting. A hint — rather than experimenting with a 20-50 Mb file try reducing the resolution to around 72 dpi. This makes for much faster tests, and when you have an idea of what you want to do then work with your full resolution image. (72 dpi is the maximum resolution needed for a high-res computer screen. Redo the image again at its full resolution for printing purposes once you have the effect that you want.)
Load the picture that you will be working with and open the Layer Palette so that you can work with layers. Right click on the original layer and select Duplicate Layer . Lighten the layer quite a bit, preferable using a Levels Adjustment Layer . This will allow you to season the final result to your taste. Select the newly created Background Layer and then Filter/Blur/Gaussian Blur . The blur amount to apply is a matter of taste. Try 25 pixels as a place to start. Make sure that Opacity is set to 100% and then select Multiply from the slider box next to it. If you’ve used an Adjustment Layer you can now double click on it and adjust the balance between the layers.
That’s it.
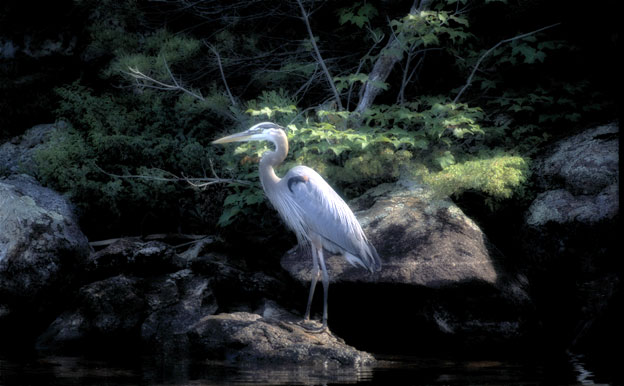 Muskoka Heron #1 — Ontario, 2000
Another example of this technique isMuskoka Heronseen above. The straight photograph was good, but it didn’t convey the feeling of early morning light in the northern woods which I remembered so strongly. The use of theGaussian Blur Overlaytechnique allowed me to create a print which better conveys my emotions.
What I like best about this technique is that its effect is subtle. The viewer may sense that the image has somehow been altered, but it isn’t obvious and it doesn’t alter thecontentof the image in any way.
If you are interested in reading other articles on digital imaging have a look atDigital Manipulations,A Digital Printing Class,Instant Photoshop,Blended Exposures,Contrast MaskingandAn Introduction to Digital Imaging. If you’d like to read about my current digital image processing gear, look atDigital Processing.


Elevate Your Vision


Read this story and all the best stories on The Luminous Landscape
The author has made this story available to Luminous Landscape members only. Upgrade to get instant access to this story and other benefits available only to members.
Why choose us?
Luminous-Landscape is a membership site. Our website contains over 5300 articles on almost every topic, camera, lens and printer you can imagine. Our membership model is simple, just $2 a month ($24.00 USD a year). This $24 gains you access to a wealth of information including all our past and future video tutorials on such topics as Lightroom, Capture One, Printing, file management and dozens of interviews and travel videos.
- New Articles every few days
- All original content found nowhere else on the web
- No Pop Up Google Sense ads – Our advertisers are photo related
- Download/stream video to any device
- NEW videos monthly
- Top well-known photographer contributors
- Posts from industry leaders
- Speciality Photography Workshops
- Mobile device scalable
- Exclusive video interviews
- Special vendor offers for members
- Hands On Product reviews
- FREE – User Forum. One of the most read user forums on the internet
- Access to our community Buy and Sell pages; for members only.
You may also like


