


By: Alain Briot
This article and the products described apply to both Mac and PC based systems, and CRT as well as LCD panels.
Alain Briot is one of the most successful landscape photographers working in the American Southwest today. His work is widely exhibited and collected. His monthly column for this web site, of which this is part, is calledBriot’s View. An extensive interview with Alain is included in Issue #1 ofThe Luminous Landscape Video Journal.
How can I calibrate the Apple Cinema Display and, can an LCD monitor be calibrated at all? I have been asked these two questions numerous times and this made me realize that a tutorial on calibrating LCD and CRT monitors would be a good idea. Although this article focuses on calibrating theApple Cinema Display(22″ LCD) the instructions below can be also used to calibrate almost any LCD or CRT monitor.
To start with, calibrating an LCD monitor is not very different than calibrating a CRT monitor provided you have the right calibration software. I useColorblind Prove-it!to calibrate my monitors, but there are other packages which work just as well. The nice thing aboutColorblind Prove It!is that it can be used to calibrate both CRTºs and LCDºs making it a very versatile solution.
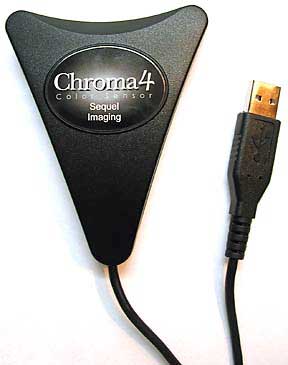
Prove-it!is a combination of software and hardware. The software consists of the Prove-it! application while the hardware part consists of theChroma 4Color Sensor also called the “spider” because it attaches to your screen via suction cups. The purpose of the Chroma 4 is to measure the color balance, gamma and luminosity of your monitor. (Hint:Place a piece of Saran Wrap between the screen and the suction cups. This prevents the cups from marring the screen’s protective covering — or seebelow).
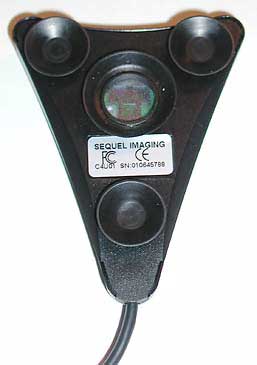
The rear view of the spider shows the actual color sensor:
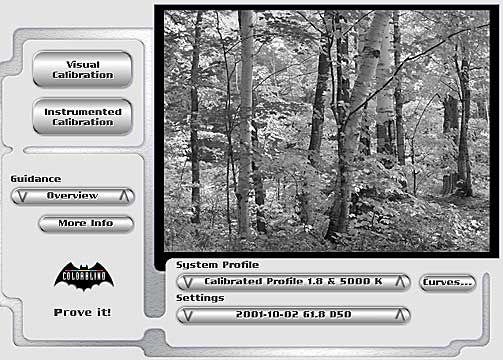
Calibrating your monitor starts by installing the Prove it! software and starting the program. Once on the main screen (seen below) you are asked to choose between “Visual calibration” or “Instrumented calibration”. I recommend selecting “Instrumented calibration” since I personally find it very difficult to calibrate a monitor by eye. Instrumented calibration uses theChroma 4spider to check color balance, gamma and luminosity.
After choosing “Instrumented calibration” you are asked to connect theChroma 4 Spiderto your computer. Connect the USB cable to any USB port on your computer or keyboard. With theApple Cinema DisplayI used the second USB port on the back of the display. I recommend to use this port and will explain why later on.
The next screen asks you to choose between 3 calibration options: “Auto calibration and profile” which is the easiest method and the one I recommend, “Auto Calibrate” and “Auto Profile.” “Auto Calibrate” gives you more options regarding the calibration setup for your monitor but if you use this approach you must then use “Auto Profile” afterwards to build a profile for your monitor. “Auto Calibration and Profile” does both calibration and profiling in one easy step.
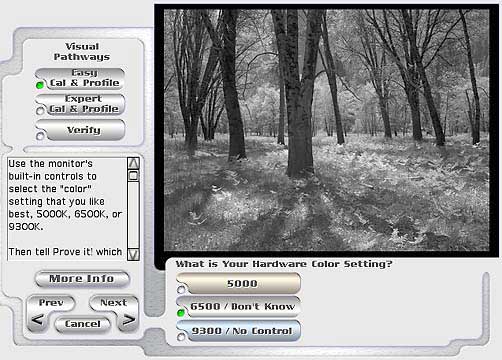
The software then asks you for the color temperature you want your monitor calibrated for. You can choose between a 1.8 gamma and a 5000k color temperature (G1.8/D50) or a 2.2 gamma and a color temperature of 6500k (G2.2/D65).
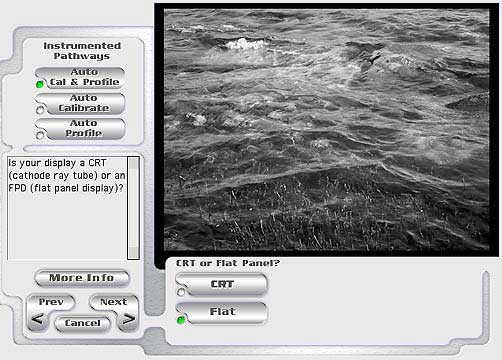
Next you are asked whether you want to calibrate a “CRT” display or a “Flat” display. Click the second option if you are calibrating theApple Cinemadisplay or another LCD monitor.
Youfinally get to the calibration screen where theChroma 4spider is actually used. The goal is to center the spider on the red dot. On CRT monitors this is achieved via the suction cups on the spider. On an LCD monitor these cups shouldnºt be used as they will either leave marks on the flat panel or pull off the thin plastic skin which covers the panel or both.
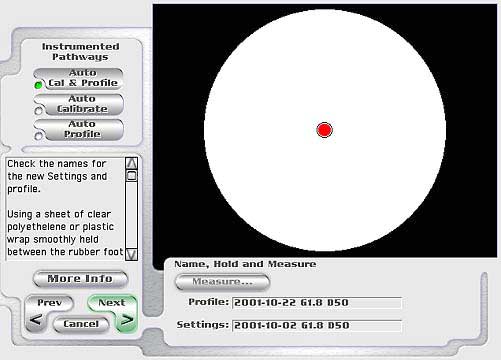
I recommend you dangle the spider from the top of the display with the USB cable (thatºs why I recommend using the second USB port on the back of theCinema Display). To do so place the spider gently over the red dot, holding it by its USB cable, and when you got it in the right spot tape the USB cable to the top or rear of the display (donºt tape it to the LCD screen!). The slight backward tilt of theCinema Displaywill cause the spider to lay flat on the display without any further ado. Be careful not to press down on the spider or the suction cups will immediately adhere to the flat panel.
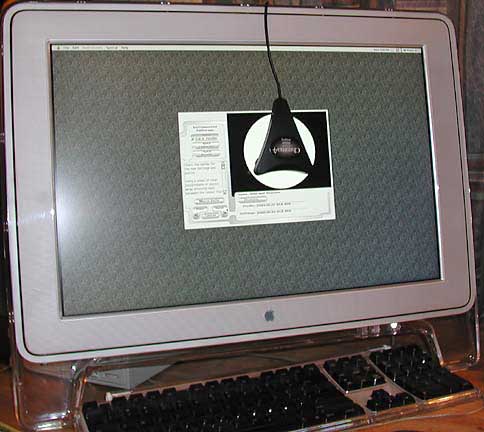
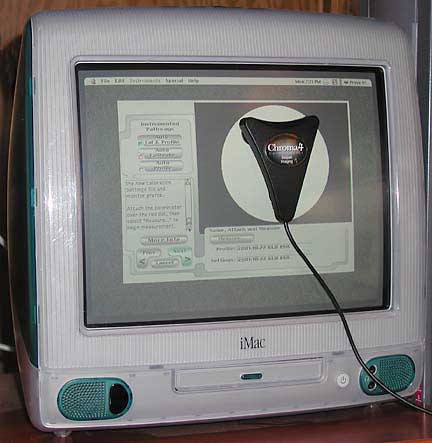
To contrast the setup for a flat versus a CRT display here is what the instrumented calibration for an iMac looks like:
Calibration will take a few minutes and when done you will be presented with a set of adjustment curves (similar to those in Photoshopºs “Curves” command) showing the modifications made to your monitor’s luminance and color balance. You can inspect these curves individually to see which adjustments were made.
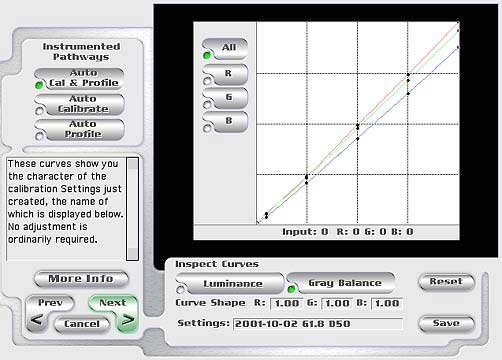
Clicking “Save” in the curves panel saves the calibration curves and the profile which were just created. ColorBlind Prove-it! takes care of saving the profile in your profile folder and of selecting this profile as default profile in theColorSynccontrol panel. All you need to do to see the results of your calibration is to restart your computer.
If you choose “Visual Calibration” you get an option called “Verify” which allows you to verify that you monitor is calibrated properly and which color balance and gamma modifications were applied. I find “Verify” interesting as a learning tool but not indispensable since I wouldn’t have the knowledge to second-guess the software. I recommend you use “Easy calibration and profile” and trust the results you get.
The next and final step is matching your transparency, screen and print. This is covered in my companion articleImage Matching.
This article and accompanying photographs are Copyright 2002 by Alain Briot
My earlier article onmonitor profilingwill also be of interest.
Michael
Editor’s Note:I have usedProveItsoftware and theSequelspyder since 1999 both on PC and Mac systems
and find it to be a superior solution to monitor and LCD calibration. Highly recommended.
Michael
This is one of a regular series of articles titledBriot’s View
written exclusively for TheLuminous Landscape
byAlain Briot
About Alain Briot
I create fine art photographs, teach workshops and offer DVD tutorials on composition, image conversion, optimization, printing and marketing. I am the author of Mastering Landscape Photography, Mastering Photographic Composition, Creativity and Personal Style and Marketing Fine Art Photography. All my books are available in eBook format on my website at this link: http://beautiful-landscape.com/Ebooks-Books-1-2-3.html
You can find more information about my work, writings and tutorials as well as subscribe to my Free Monthly Newsletter on my website at http://www.beautiful-landscape.com . You will receive 40 free eBooks immediately after subscribing.
I welcome your comments on this essay as well as on my other essays. You can reach me directly by emailing me at [email protected].
Alain Briot
Arizona


Elevate Your Vision


Read this story and all the best stories on The Luminous Landscape
The author has made this story available to Luminous Landscape members only. Upgrade to get instant access to this story and other benefits available only to members.
Why choose us?
Luminous-Landscape is a membership site. Our website contains over 5300 articles on almost every topic, camera, lens and printer you can imagine. Our membership model is simple, just $2 a month ($24.00 USD a year). This $24 gains you access to a wealth of information including all our past and future video tutorials on such topics as Lightroom, Capture One, Printing, file management and dozens of interviews and travel videos.
- New Articles every few days
- All original content found nowhere else on the web
- No Pop Up Google Sense ads – Our advertisers are photo related
- Download/stream video to any device
- NEW videos monthly
- Top well-known photographer contributors
- Posts from industry leaders
- Speciality Photography Workshops
- Mobile device scalable
- Exclusive video interviews
- Special vendor offers for members
- Hands On Product reviews
- FREE – User Forum. One of the most read user forums on the internet
- Access to our community Buy and Sell pages; for members only.
You may also like


