![]()
In the Fall of 2002 when Canon announced the remarkable EOS 1Ds,Phase Onesimultaneously announced that their highly regardedCaptureOne software would be available for the 1Ds as well as the 1D.Phase Oneis a Danish company that makes a line of high-end digital backs for medium and large format cameras. Their products have a sterling reputation. Unless you’re a commercial studio photographer you likely haven’t seen or used their products, but those that have seem to have little but praise for them. The proprietary image processing software thatPhase Onehas developed for these backs has been especially well reported on by critical users.
I reviewedCapture One DSLRat the time and was fulsome in my praise. I had never been happy with Canon’s RAW file conversion software (I’m being polite — frankly, it’s dreadful) and thoughBreezebrowser and YarcPluswere both superior and relatively inexpensive they still took too long to preview images, because they both work through and are limited by Canon’s SDK(Software Development Kit).
Capture Oneis a different breed, and now with the newCapture One – LEmakes itself available to a much broader audience, and at much lower price.Canon D30,D60and10Dcameras are supported, as is theNikon D100, and the price is just $99 rather than the $499 charged for the Pro version which supports these cameras as well as theCanon 1D,1DsandD1x.

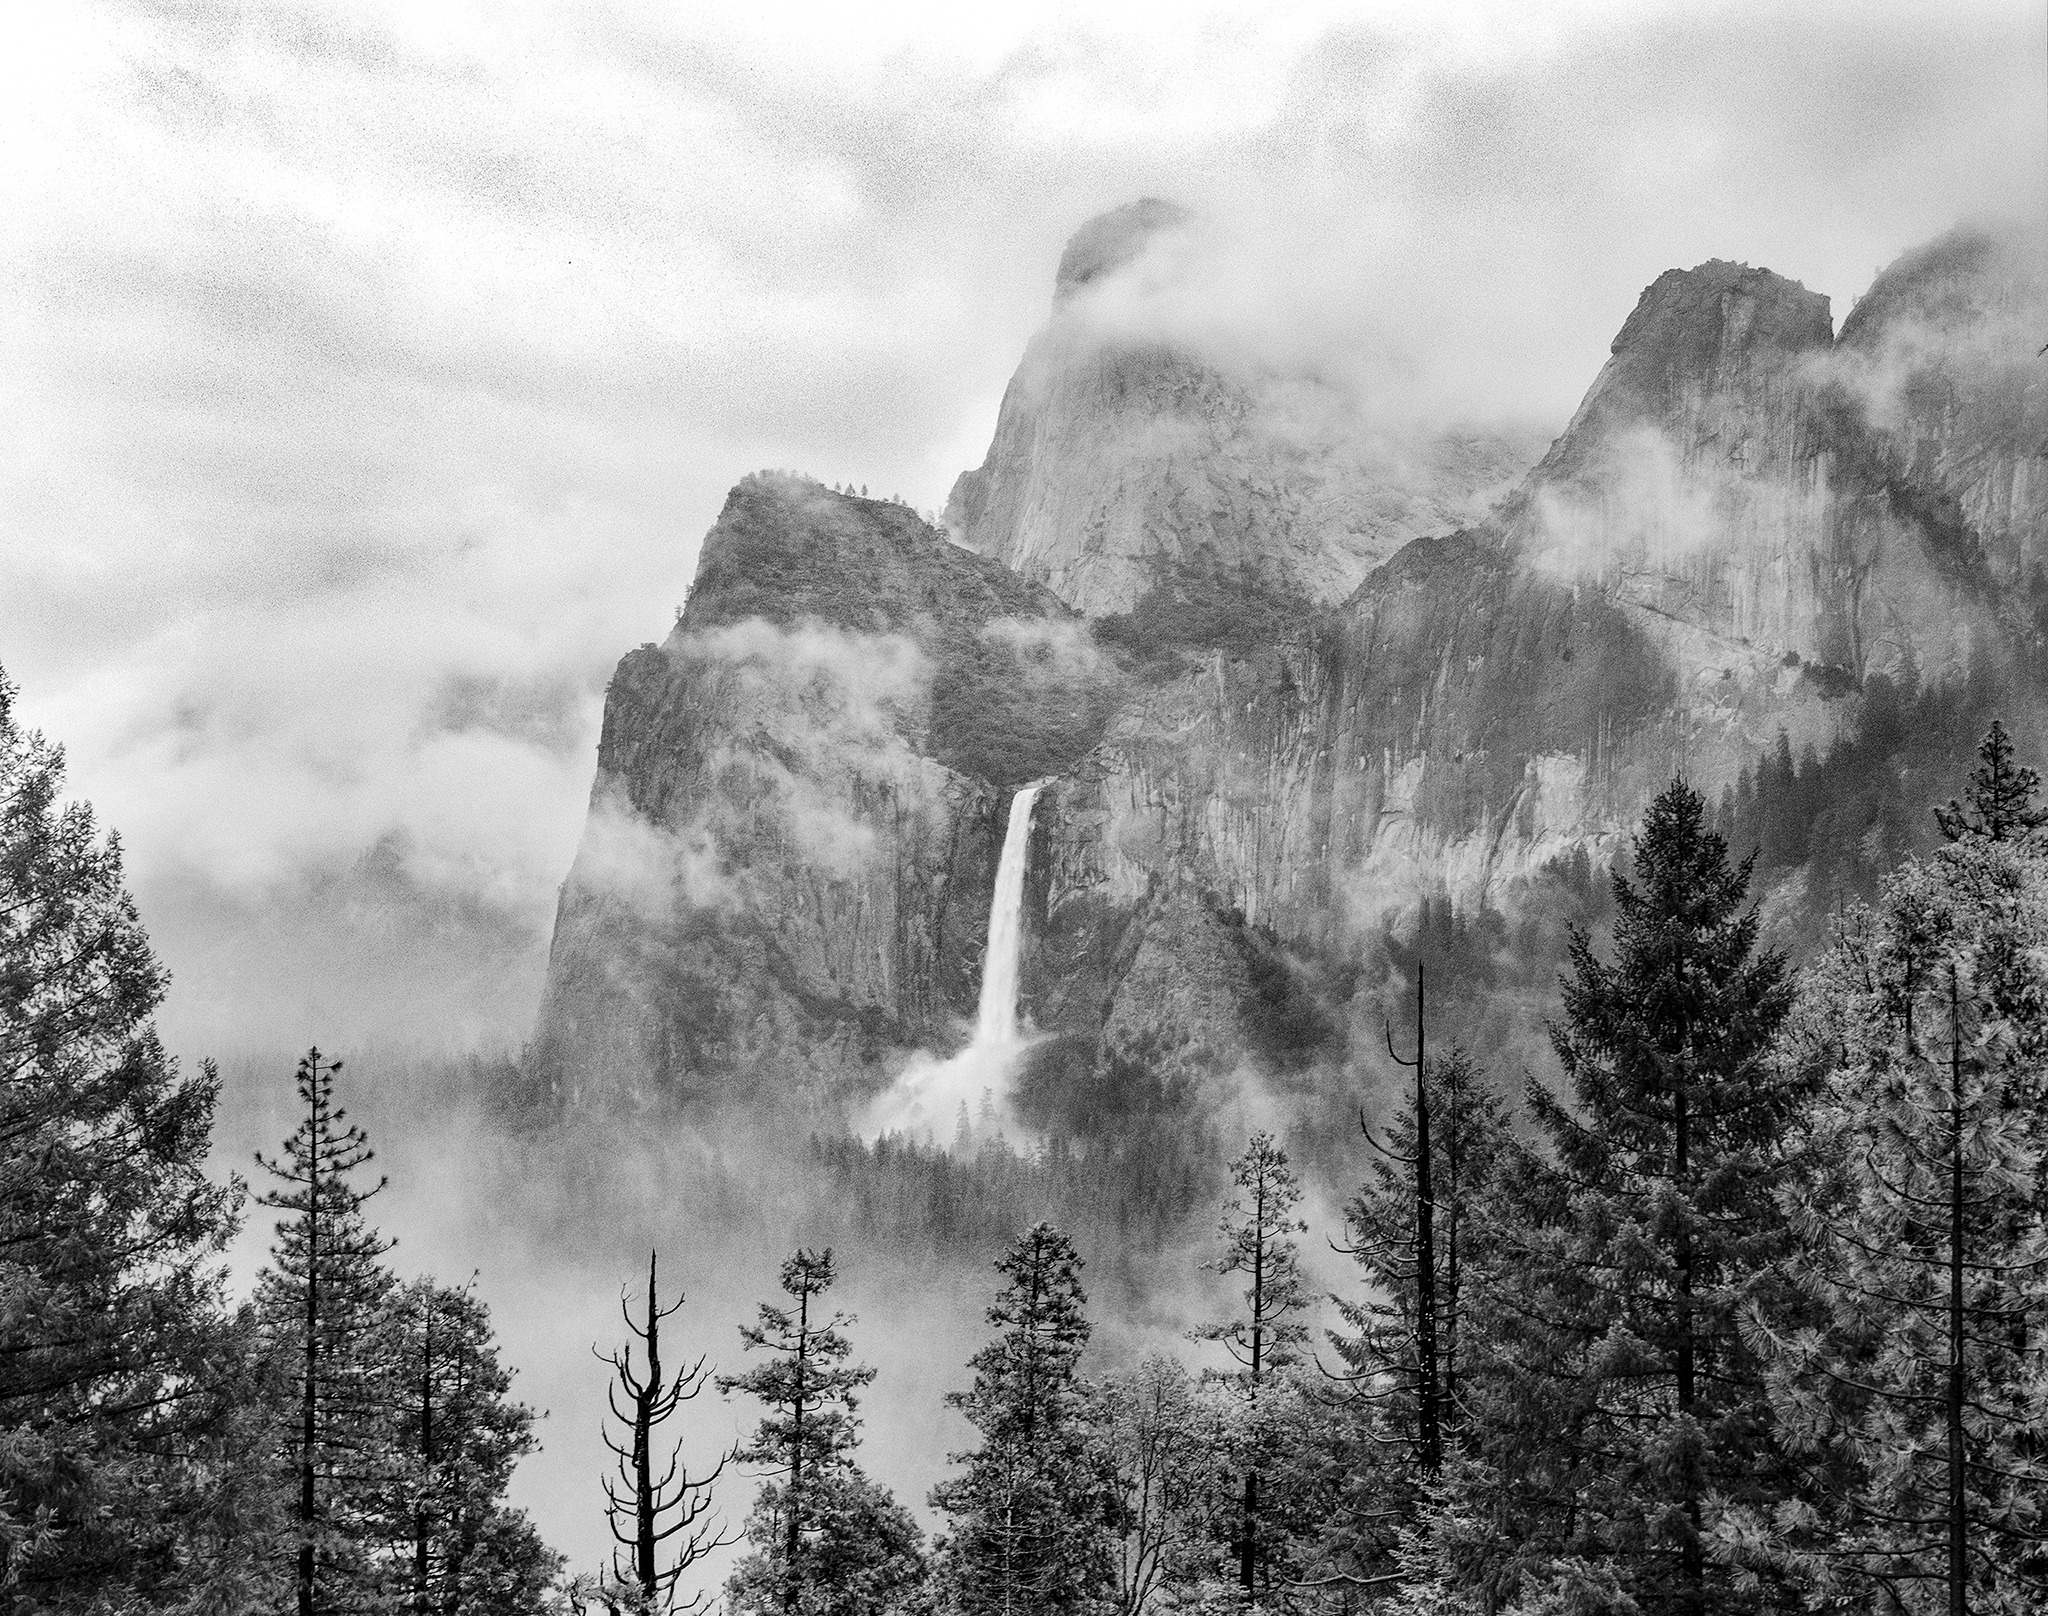
Vulture — Loxahatchee National Wildlife Reserve, Florida — April, 2003
Canon EOS 10D with Canon 400mm f/5.6L @ ISO 1600
What you Get
First off — you can downloadCapture One – LEand try it out free for 15 days. If and when you’re satisfied that this program works for you, for your $99 you get RAW support for theCanon D30,D60, 10DandNikon D100.RegrettablyPhase Onehas overlooked theFuji S2 Pro, a very popular DSRL that uses the Nikon lens mount. TheKodak 14nis also not supported by either Capture One’s Pro or LE version, something that I hope that they address, since one ofPhase One’sgreat strengths is in the area of noise reduction.
The things that have been left out of LE vs. the Pro version are not terribly serious, and most users will never miss them. These include the lack of both tethered and CMYK support, limited profiles, no anti-moire plug-in, and more limited upgrade and support policies. As I just said, none of these are show stoppers. What is lacking though is Macintosh support. This is only available through the Pro version, a decision that I hope Phase One will soon change.
The RAW Facts
If digital photography is still new territory for you you need to understand that a RAW file is like a digital negative. While a JPG produced in-camera has had white balance, sharpening and several other forms of processing applied (including lossy compression), a RAW file is just that — raw — a monochrome file without Bayer matrix encoding applied and also without a linear tone correction curve. (The human eye and electronics see differently).
The advantage of this is thatyoumake all the decisions about how the image is to be processed, not the camera. The first downside is that these files are quite a bit larger than JPGs, though they are somewhat compressed — usually about 3:1. This compression though is lossless, and so there is no image degradation. The second downside is that the file has to be processed on a PC using somebody’s RAW conversion software before anything can be done with it, and this takes time — both yours and computer processing.
In Use
OK. Let’s start with my conclusions first.Capture Oneis as close to magic as I’ve yet seen in imaging software. Since I started using DSLR in November of 2002 I regarded it as an almost indispensable tool for working with Canon 1D or 1Ds files, and nowC1-LEplays the same roll for use with my Canon 10D. I wish I could scientifically quantify what I’m seeing — but I can’t. I do know though that this software is able to produce tonalities from my cameras that are a significant step above those from Canon’s own software, and better than I can get from Photoshop alone.
I won’t go into too much detail on how the program functions because you’re able to download the file and try it yourself, but here are some highlights of what this program is about.

Fig. 1
The main screen is highly configurable, but usually consists of 4 major panels. Reading from left to right there’s a file browser, thumbnails with basic EXIF data, a large preview window and then five vertical tabs;Capture/Gray Balance/Exposure/Focus/Develop, as seen below in Fig. 2.

Fig. 2
This tabbed layout makes for very efficient screen usage. It’s also worth noting that by pressing F8 the orientation of the windows shifts so that the main preview window formats appropriately for either a vertical or horizontal frame.
In Fig. 2 above we see theGray Balancetab. here you have the ability to place an eye dropper on a white point in the image as well as comprehensive tools for fine tuning colour balance, either in composite RGB or for each individual colour channel.
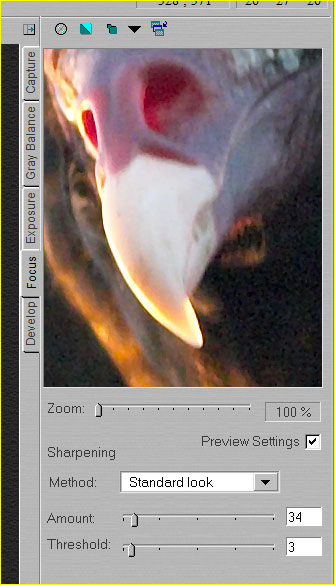
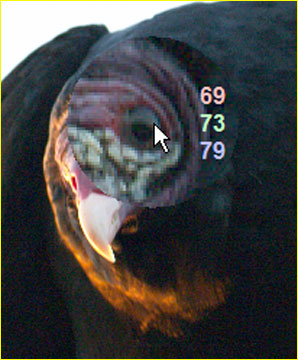
Fig. 3a & 3b
TheFocustab (Fig 3a) performs two functions; it serves as a magnifying area, and secondly provides USM tools. My preference is to leave these at "0" because I feel that sharpening should be done after everything else and just before printing, with the amount of sharpening based in the final print size. But, this software is designed so that you can produce images that are essentially "finished", even without going into Photoshop, and so USM is one of the tools provided.
Fig 3b shows a new tool, previously unavailable inCapture One. This is a magnifying glass invoked by pressing the right mouse button. It tracks the main image and shows the RGB values under the cursor.

Fig. 4
TheExposuretab provides both Levels and Curves adjustments as well as an Exposure slider (EC) and a Contrast slider (CC). Again, this can be done either in composite RGB or for each individual colour channel.
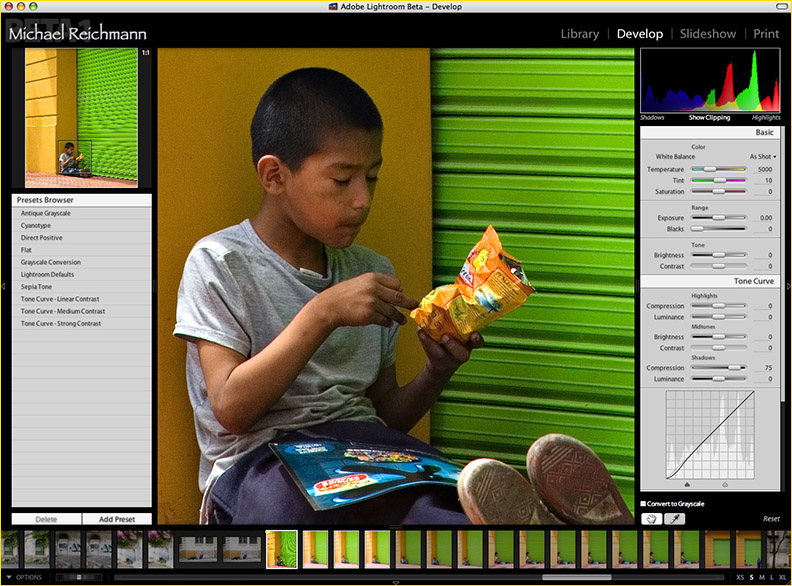
Fig. 5
In Fig. 5 we see the Develop tab which controls how files are converted. The items you see are pretty much self explanatory. At the very bottom you’ll see that you can set the program to automatically open your favourite image process software, such as Photoshop, once the file has been saved and to automatically load the file.
Real-Time Processing
If you’ve ever used Canon’s RAW processing software you can’t help but to have noticed that whenever you make any adjustment the program has to re-process the file, and this takes time. Change the colour balance, black point, white point and other basic adjustments and you’ll age considerably waiting for each step. TheCapture Onesoftware uses a relatively small (a couple of megabytes) file that it uses for display purposes, performing all adjustments on it in real time. When you finally tell the program to convert the RAW file to TIFF it applies these adjustments to the main file.
Because you have essentially instant feedback you are able to quickly and easily fine-tune your photographs. Doing the RAW processing takes some time though; about 70 seconds to take a 1Ds 11MB RAW file and convert it into a 63MB 16 bit TIFF. This is with a 1.8Ghz Pentium IV and 512MB or RAM.
What makes this much less onerous than it might otherwise appear to be is that one can do this is batch mode, applying corrections to a group of images (LEonly allows 20 images in a Batch). But also conversions can be stacked, and will be done in the background while you continue to work on new RAW files. ClearlyPhase Oneunderstands how photographers need to work.
Colour Management
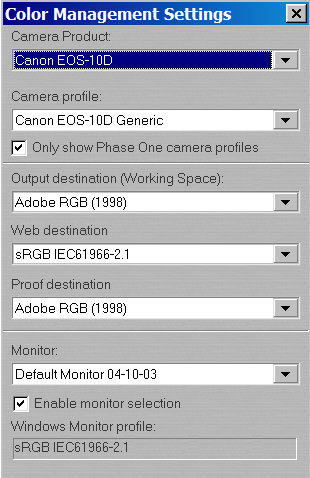
Fig. 6
Capture Oneis a colour management savvy program. The settings screen seen above in Fig. 6 shows how profiles can be assigned from camera through the monitor to your final output. You can use and create your own profiles with a program such asInCamera Pro, or use the generic camera-specific profile thatPhase Oneprovides for each camera.
I have found thatCapture Onehandles colour management workflow brilliantly. What I see on my screen inC1-LEis almost exactly what comes out of my printer later in Photoshop. But this of course assumes that you have properly caibrated and profiled your monitor.
The Alternatives
Canon provides theirFile Viewer Utilitywith each of their digital camera. It does the job, but frankly it’s not a very polished piece of software. It has a poor user interface (though the 10D’s version is somewhat improved), and it’s slow.Adobe’sCamera RAWis a superb Photoshop plug in that also handles all of the named cameras as well as the neglectedFuji S2 Pro.Breezebrowsernow supports the 10D as well as the earlier Canon DSLRs.
What to do? The choice as I see it is that if you’re a Photoshop userCamera RAWis a great choice at $99. The downside is that there is no free trial. You pay your money and you take your chances.Capture One LEis available for a 15 day free trial and if you subsequently buy it also costs $99. If you have a camera like theFuji S2 Prothat isn’t supported byCapture OnethenCamera RAWis your best choice. If you do have one of the supported cameras then the choice is tougher. I’d choose Adobe’sCamera RAWfor ease of use and superior integration with Photoshop. I’d selectedCapture One LEfor greater flexibility. And of course if you’re on a strict budgetBreezebrowseris always a solid choice for Canon owners, though preview mode is slower than either of the others. Having a choice of several great programs is wonderful though.
Disk Space — Update
One of the pleasures of usingCapture Oneis how quickly it provides large and detailed thumbnails, as well as preview images. It does this by creating small work files on the fly. But, these files (and they are not really that small at a couple of MB each) are retained even when you have long finished with reviewing a RAW file directory. If you have a huge hard disk, no worries, but you may want to check thePreviewssubdirectory under theCapture Onedirectory. You’ll likely find that it contains many Gigabytes of preview files. These can safely be deleted if you need the disk space.
Find Out More and Download Capture One – LE
Other reviews ofCapture OneLE is also available from
Digital OutbackandDPReview
Elevate Your Vision


Read this story and all the best stories on The Luminous Landscape
The author has made this story available to Luminous Landscape members only. Upgrade to get instant access to this story and other benefits available only to members.
Why choose us?
Luminous-Landscape is a membership site. Our website contains over 5300 articles on almost every topic, camera, lens and printer you can imagine. Our membership model is simple, just $2 a month ($24.00 USD a year). This $24 gains you access to a wealth of information including all our past and future video tutorials on such topics as Lightroom, Capture One, Printing, file management and dozens of interviews and travel videos.
- New Articles every few days
- All original content found nowhere else on the web
- No Pop Up Google Sense ads – Our advertisers are photo related
- Download/stream video to any device
- NEW videos monthly
- Top well-known photographer contributors
- Posts from industry leaders
- Speciality Photography Workshops
- Mobile device scalable
- Exclusive video interviews
- Special vendor offers for members
- Hands On Product reviews
- FREE – User Forum. One of the most read user forums on the internet
- Access to our community Buy and Sell pages; for members only.
You may also like