


Digital Photo Collage
A Photoshop Tutorial
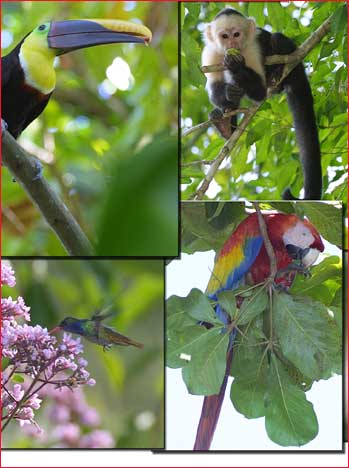
For The Birds
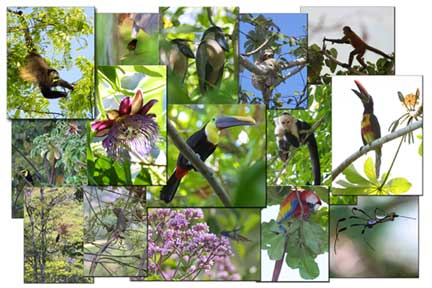
Click to see a larger version
In February, 2000 my wife and I and another couple spent a week in the Pacific rainforest in southernCost Rica. Using long lenses, projected flash and macro gear, I ended up producing quite a few striking images. After the trip our friends (non-photographers) asked for some prints so that they could frame them to hang on their walls as a memento of our holiday together. There were so many photographs that we all enjoyed that it was hard to choose. So, rather than just select one or two prints for them to frame I decided to create a large collage suitable for framing.
I’ve subsequently used this technique to make collages for other events which have been well received by family members and friends. This is not a technique that I use for my professional work, but for personal and vacation photographs it’s a winner. Here’s how they’re done.
Step By Step
I will assume that you’re going to make the print on at leastSuper-A3sized paper (13X19"). I will also assume that you have somewhere between 6 and 12 images that you’d like to work with. The size of each image in the collage will depend on how many you have, how important one is vs. another, and other esthetic factors. I’ll leave that all up to you once you’ve learned the basic techniques involved.
-
Prepare all of the photographs that you will be using. That means full processing, including sharpening ready for printing. If you have any Layers, including Adjustment Layers,Flattenthe file.
-
Change the file size to that which you think it will want to be on the collage. For a dozen or so images on a 13X19" print a size of between 3X4" and 4X5"will work well. Make the more important ones larger and the less important ones smaller than the others.
-
Change the resolution to 300 PPI (or whatever you normally use) and nowSaveit with a new name.
-
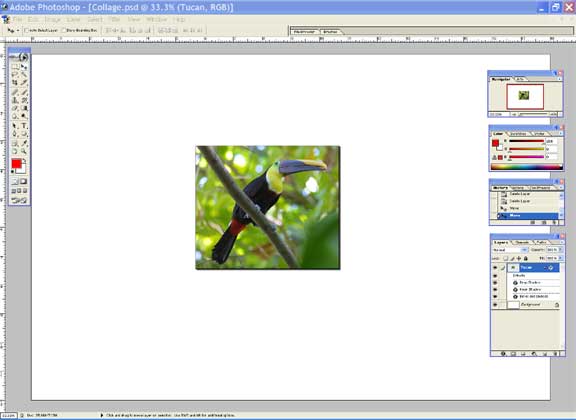
Create a new file with a canvas that is roughly 12 X 18" in size at 300 ppi with a white background.File / New.
(You can make the resolution anything that you normally use. 240 PPI is the lowest that should be used with an Epson Photo printer and 360 PPI is considered the highest that makes any appreciable difference. Remember that the higher the resolution, the bigger the file, and the harder it is to work with unless your computer has lots of RAM and a fast processor.)
-
Load the first image that you want to work with. Arrange it as well as your collage canvas so that they are both visible.
-
Select / Alland then drag this image onto the new canvas using the Move Tool (V). (You can also useEdit / Copy, change windows and thenEdit / Paste. But, dragging uses less memory and system resources and is therefore faster).
-
You can now move it around on the canvas and position it where you think it might work best. I try and start with an image that will be the most prominent one of the collage. I make it a bit bigger than the others and place it roughly in the center of the canvas.
-
Go back to your original first file and close it. It is no longer needed.
-
You now have your large canvas on screen with one image on it. Place this image roughly in the center
-
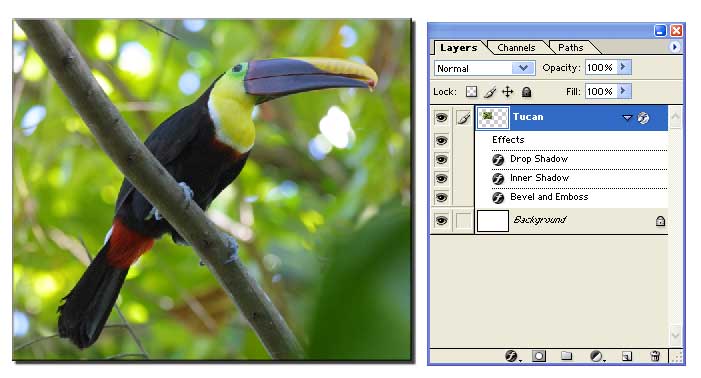
Make sure that the Layers palette is visible;Window / Layers. On the Layers palette you will now seeLayer 1. Right click on the name and selectLayer Properties. Rename the Layer to something that clearly describes the image. You’ll have lots of layers in a few minutes and if you neglect to do this not knowing clearly which is which will quickly drive you nuts.
-
Right click on the new name and selectBlending Options. In theStylesbox on the left selectDrop Shadow,Inner Shadow,BevelandEmbossandContour. Click OK.
-
The effects that I’ve selected are arbitrary. They are the ones that I used on this collage because after some experimentation they’re the ones that I found visually effective. There’s no reason not to do your own experiments and see what you like best. For the moment though use these while practicing.
-
Notice that beneath the Layer name on the Layer Palette there are now the names of each of the effects that you selected. Also note that there is a eye symbol to the left of each one. You can click on the eyes and turn these effects on and off to see what they do.
Digression‚Each of the effects that you’ve used has its own set of parameters that can be changed. For example, click Drop Shadow under the Styles sub-menu (or on the palettes menu). You’ll now see a large number of tools that can be used to change the density, angle, distance etc., of the drop shadow. An abundance of choices.
-
Notice the downward facing triangle next to the Layer name. Click on it. You’ll see that Layer Effects are now collapsed and that the triangle faces right. This is worth doing as the palette will be getting crowded soon and doing this saves a lot of space.
-
Load your next image and follow steps #6‚ #11. You now have two images on screen.
-
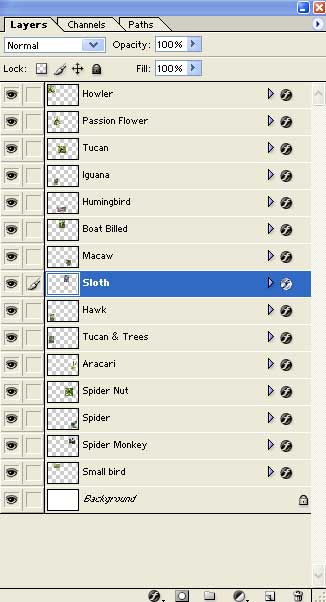
You next need to become familiar with how to select and work with the individual images which are now separate Layers. Think of them as prints on a table. To move one and place it on top of or behind another you need to pick it up. In Photoshop you do this by clicking on the Layer name on the Layers palette. Once it’s highlighted the cursor now will move that Layer on the canvas. (This is why giving each layer a descriptive name is so important).
-
At this point image #1 is sitting on top of image #2. To reverse this go to the Layers Palette and grab the palette bar for the first one and drag it under the name of the other. You’ll see that as you have more and more Layers on screen that the order of the layers on the palette is the order in which they overlap each other on-screen. Just drag the Layers up or down on the Layers Palette to put them in the order that you want them to appear.
That’s basically it. At this point simply keep loading files onto the canvas and arranging them in a way that’s pleasing to you. It takes a lot of experimentation to get satisfactory results, taking into account how much to overlap each individual image, how big to make them, and so forth.
Have fun!
If you enjoyed this article, as well as the hundreds of other tutorials, features,
reviews and essays on this site, you can support its continued growth
and discover an exciting new photographic resource by …


Elevate Your Vision


Read this story and all the best stories on The Luminous Landscape
The author has made this story available to Luminous Landscape members only. Upgrade to get instant access to this story and other benefits available only to members.
Why choose us?
Luminous-Landscape is a membership site. Our website contains over 5300 articles on almost every topic, camera, lens and printer you can imagine. Our membership model is simple, just $2 a month ($24.00 USD a year). This $24 gains you access to a wealth of information including all our past and future video tutorials on such topics as Lightroom, Capture One, Printing, file management and dozens of interviews and travel videos.
- New Articles every few days
- All original content found nowhere else on the web
- No Pop Up Google Sense ads – Our advertisers are photo related
- Download/stream video to any device
- NEW videos monthly
- Top well-known photographer contributors
- Posts from industry leaders
- Speciality Photography Workshops
- Mobile device scalable
- Exclusive video interviews
- Special vendor offers for members
- Hands On Product reviews
- FREE – User Forum. One of the most read user forums on the internet
- Access to our community Buy and Sell pages; for members only.
You may also like


