


by Mark D Segal & Todd R Shaner
Remember the film era? It’s demise began setting-in roughly two decades ago, and about all that’s left is a reduced stable of good scanning hardware and those millions of negatives in countless personal and institutional collections that many people really intend to “do something about” – “one of these days”. The problem is that the truly high quality film scanners of yesteryear are discontinued or cost a small fortune, those that hit the resale market are also expensive, and those that people own will become increasingly difficult to service as time marches onward, parts become scare and experienced technicians retire or pass on. The “digital revolution” from capture to print has taken-over in a remarkably short period of time.
The technology that won’t be disappearing any time soon is that useful for photographing the film media with a digital camera and processing the files with imaging software. While there’s nothing new about this idea, Mark and Todd decided that given the latest equipment and software now on the market, it could be worthwhile revisiting this approach. They invested considerable time and effort (and some money) exploring fresh approaches, and as a result have achieved their objective of developing two workflows that produce truly good results with little work. The focus of their research is on colour and black and white negatives; however the same techniques could be used for positives without the inversion step.

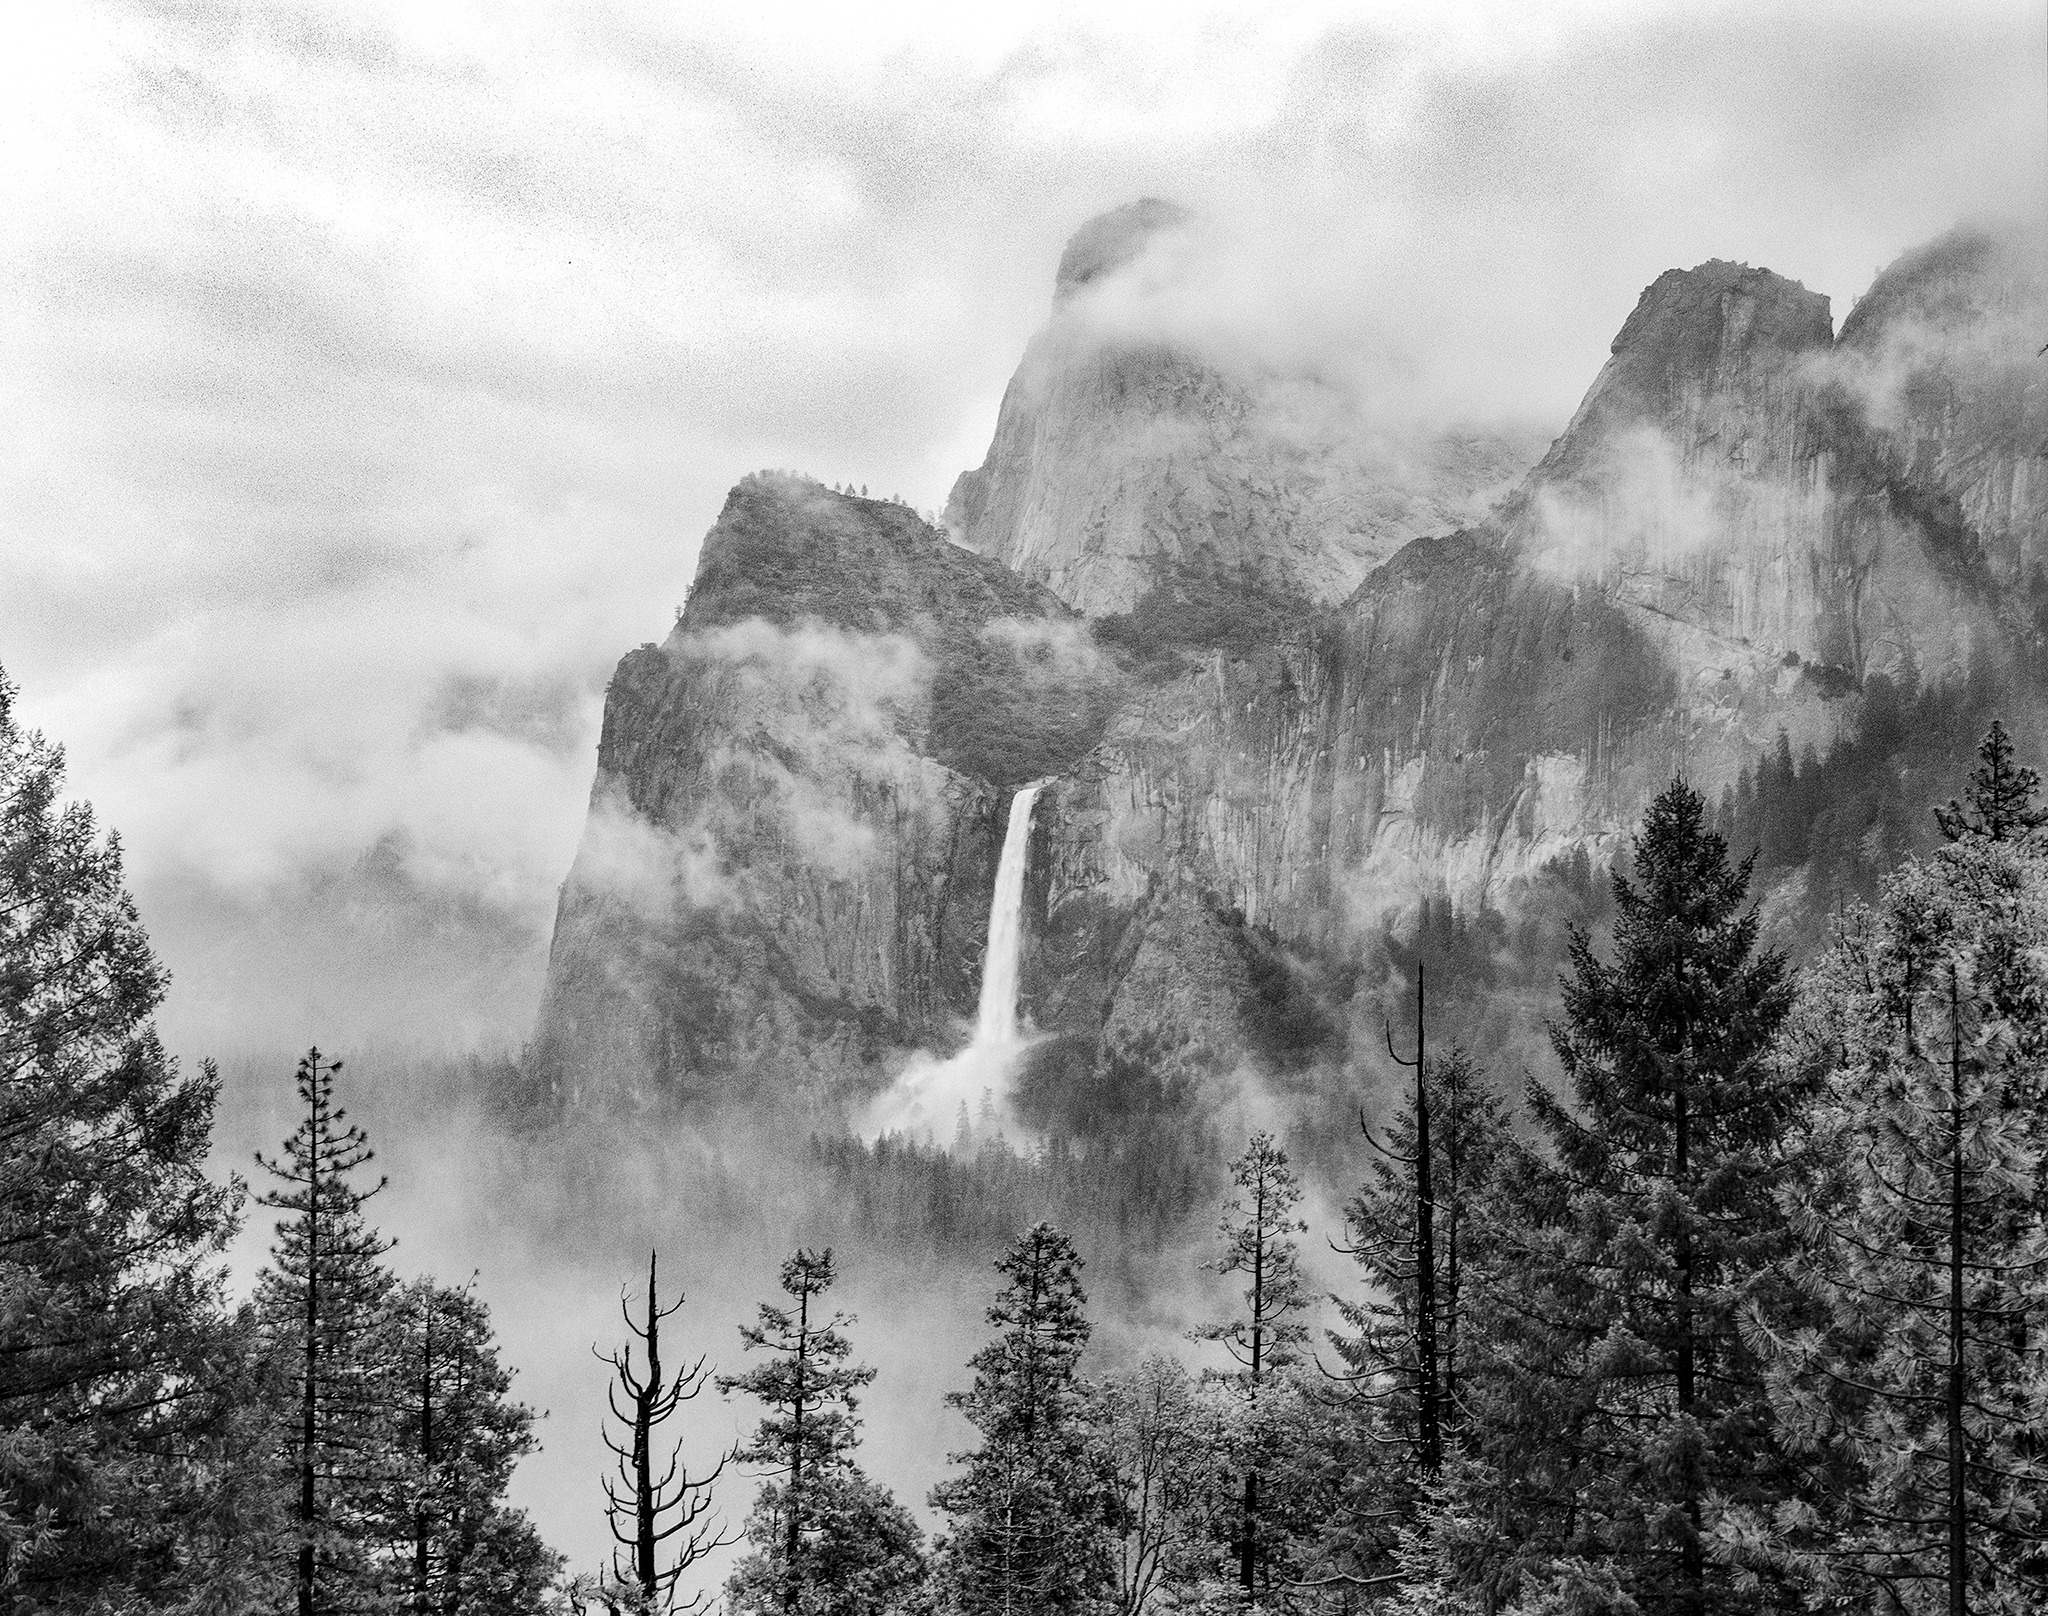
DSC5992. Zanzibar 1970 (c. Mark D Segal) Ilford FP4, 2 ¼ *3 ¼ roll film developed in Agfa Rodinal
[Mark’s conversion procedure (MakeTiff to SilverFast HDR8); then tone]
While the camera-based approach is easy enough in principle, in practice there are numerous factors to deal with, and those inform the content of the article. We are providing it HERE as a PDF download, because it has 36 pages and contains much information that will provide off-line guidance to those who try implementing these techniques.
The article opens with a discussion of camera equipment and set-ups for this kind of “macro-photography”. Key considerations include cameras, camera and media set-up, magnification, lens specifications and quality, media flatness, vibration, lighting and its impact on grain and defect reproduction, focusing, and exposure. Mark and Todd each have different set-ups, but they do the same things. A “novel” feature of Mark’s set-up is the use of the new 24 MP Sony a6000 mirrorless APS-C camera equipped with the new Zeiss Touit 50mm “Makro” lens and the Sony “Play Memories” remote control utility for iPhone. Todd is using a time-tested Canon DSLR 5D Mark II full-frame camera with Canon Macro lens. Todd’s light source is an electronic flash and diffusion glass, Mark’s is a light table providing near-neutral diffuse lighting.

Times Square New York (c. Todd R Shaner) Kodak Royal Gold 100
[Todd’s conversion procedure (Photoshop)]
Following the discussion of set-up and exposure, Mark and Todd each demonstrate and explain their post-capture processing approaches, which are different; but again, both delivering fine results. Mark approached the research by asking himself how to develop synergy by combining the strengths of several applications, each of which was designed to address one or more of the workflow requirements at hand, such as creating linear TIFF files from raw files and inverting negatives to positives. Todd approached it by asking himself how he could tame everybody’s favorite 800 lb. gorilla, “Photoshop”, to produce good results as painlessly as possible.
Mark describes a workflow using two applications: “MakeTiff” (ColorPerfect), followed by SilverFast HDR8 (LaserSoft Imaging AG). Todd describes a total workflow self-contained within Adobe Photoshop CC. Todd provided a Photoshop Action (download links below) to take users quickly through the first four steps of his procedure. Both of these discussions take the negative capture through raw conversion, negative to positive inversion, and tone and hue adjustments – all that’s needed to make the photo pretty close to print-ready.

Mark’s Conversion Procedure
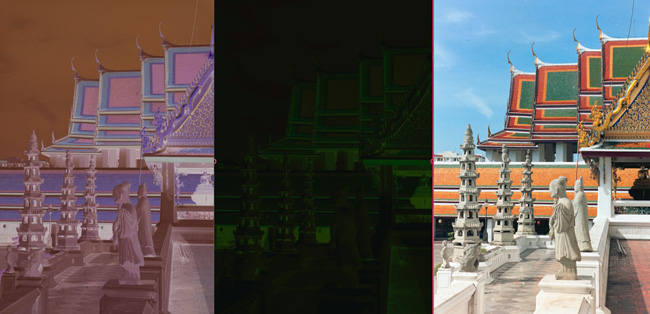
Photo at Wat Suthat, Bangkok (c. Mark D Segal), Fuji Reala, 2004
[And yes – that greenish/black blob in the middle is REALLY important!]
We do not provide any judgment about which approach we think is “better”, because they both work well; readers simply need to decide for themselves which to use – we think based largely on personal preference and the software they either already use or wish to acquire. Digital imaging is rich in options and ways of combining the strengths of various products to produce good outcomes. This article is surely not exhaustive, but we have tried various combinations of techniques and software and what we present here is what we decided worked best in terms of quality, speed and convenience.

Todd’s Conversion Procedure
Times Square Night (c. Todd R Shaner) Kodak Royal Gold 100
Regardless of the approach used, the resulting image files can of course be purposed to one’s preferred medium for print, web or device viewing.
© Mark D Segal and Todd R Shaner
November 2014
Post-Scriptum: (Mark speaking);
The downloadable article is a technical piece with no mention of costs, or costs relative to results for different options, say between cameras, between software, between scanners and cameras. That is intentional because there are very many options for implementing these approaches and their costs will vary by user because much depends on what one posseses to start with, added to which – comparing relative cost with relative quality of outcomes is doubly difficult for the same reasons. As well, the range of options is a moving target. Just while this research was underway, Epson launched a new higher-end prosumer photographic scanner – the V800 or V850 Pro for less than $1000, which the company says embodies significant improvement over their already not-so-slouchy V750 Pro. The macro-lens alone for my Sony a6000 that I used for the camera scans in this article costs about $1000. Which solution is a better expenditure of $1000? Stay tuned.
Readers may download Todd’s Photoshop Action here:
https://www.dropbox.com/s/ffwl30byvbad6kz/Color%20Negative%20Processing.atn?dl=0
And the instructions for installing it here:
Mark is a consultant in energy infrastructure development who has been avidly making and processing photographs for the past six decades. Mark started working in digital over fifteen years ago, first scanning film, then adopting a full digital workflow. Mark is author of “Scanning Workflows with SilverFast 8, SilverFast HDR, Adobe® Photoshop Lightroom and Adobe® Photoshop“, the only comprehensive book of its kind on the market.
Todd is retired from a 45-year career in the computing technology industry where he worked in research and development of real-time systems and most recently Intel® Embedded Architecture platforms. He has over 30 years of experience in film photography including color film processing and printing. Todd also has 15-years of experience in digital photography, Adobe® Photoshop, Illustrator, InDesign, and numerous other applications.

Elevate Your Vision


Read this story and all the best stories on The Luminous Landscape
The author has made this story available to Luminous Landscape members only. Upgrade to get instant access to this story and other benefits available only to members.
Why choose us?
Luminous-Landscape is a membership site. Our website contains over 5300 articles on almost every topic, camera, lens and printer you can imagine. Our membership model is simple, just $2 a month ($24.00 USD a year). This $24 gains you access to a wealth of information including all our past and future video tutorials on such topics as Lightroom, Capture One, Printing, file management and dozens of interviews and travel videos.
- New Articles every few days
- All original content found nowhere else on the web
- No Pop Up Google Sense ads – Our advertisers are photo related
- Download/stream video to any device
- NEW videos monthly
- Top well-known photographer contributors
- Posts from industry leaders
- Speciality Photography Workshops
- Mobile device scalable
- Exclusive video interviews
- Special vendor offers for members
- Hands On Product reviews
- FREE – User Forum. One of the most read user forums on the internet
- Access to our community Buy and Sell pages; for members only.
You may also like