


Reflections on Photography & Art
Subject Matter & Print Size
by Alain Briot
 |
Each problem that I solved became a rule which served afterwards to solve other problems.
Rene Descartes
In the previous essay in this series, Art & Science, I discussed the relationship between the artistic and the technical aspects of photography. I now want to move to a reflection on the practical applications of this relationship. The first practical application I want to address is the relationship between subject matter and print size.
_____________________________________________________________________________
1 – Let us start with a story
When I was at the Beaux Arts I had a life-changing experience in regards to the relationship between subject matter and print size. Since at that time I was a painter, I will use the term painting size in this story.
As a painter it is tempting to make small paintings. As a painting student it is even more tempting to make small paintings. This is because painting materials are expensive, because there is less of a feeling of failure if a small painting doesn’t succeed, and because if you don’t sell it (and you don’t sell it when you are a student) it takes less room to store small paintings than large paintings.
At the Beaux Arts one of our assignments was to paint big paintings. And I mean big: mural size. I did, with whatever outcome I was capable of. I won’t go into that. Let me just say I had a great time, used lots of paint, made quite a mess, and got through with the assignment.
I then returned to small paintings. But something happened then that was quite unexpected. First, I realized that I no longer found all subjects appropriate for small paintings. Some subjects “asked” to be painted large and I had no other choice but to make them large. Other subjects “asked” to be painted small and I had no other option but to make them small. In other words, and to sum things up, I was now working in two main painting sizes: large and small. The choice of size was now based on subject matter, not on convenience as was the case previously.
I now created small paintings to achieve what couldn’t be achieved with large paintings. I made small paintings when I wanted to create a painting that would be displayed in an intimate space, such as a study or a small room. I made small paintings when I wanted to represent subjects that, by nature, are better represented small, subjects that would be crushed by being painted large. I painted small when I wanted to express how delicate certain things were, when I wanted to show that a miniature has a unique beauty that lies in its preciousness, in the attention to detail, in the fact that one can admire it from a few inches away. I painted small when I wanted to create intimacy between the painting and the viewer, when I wanted to create a one on one relationship so to speak. I painted small when I wanted to point to the subtle and delicate nature of things, when I wanted to take the time to explore a single detail of a large scene or when I wanted to make a study. I painted small when I wanted to express the preciousness of an object I could hold in my hand.
On the other hand I painted large when I wanted to emphasize the superlative scale of a scene. I painted large when I wanted to show something to everyone in the room. I painted large when I wanted to create a centerpiece, a painting that would be displayed in a prominent place and be visible from a long ways away. I painted large when the subject was either very small, and called for enlargement in order to make details visible, or when the subject called for strength, for gestural quality in the facture, for movement and speed in the brushstrokes, an approach that cannot be successfully used with small pieces. I painted large when I wanted to use large brushes, one inch or two inches in width. I painted large when I wanted to show the boldness of each brushstroke and when I wanted to fill the space with movement. I painted large when I wanted to express intensity of emotion and strength of character. I painted large when I wanted a piece one could look at from 20 feet away.
The choice of size was made on the basis of subject matter, feelings and intent.
Prior to being asked to make large paintings, I was painting small because of the practical aspect of small paintings, not because of what can be achieved in a small painting. In fact, prior to making large paintings, I had no idea what could be done with small paintings that couldn’t be done with large paintings. I was locked in a world that I had chosen for practical reasons, not for artistic reasons. I was locked in a world that controlled me much more than I controlled it.
|
|
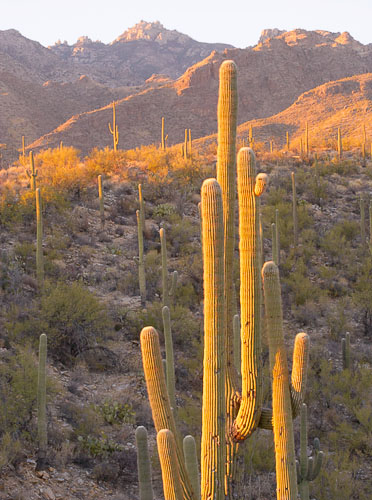
Sabino Saguaros
Although this photograph is of a grand landscape, I visualized it printed in 16×20 maximum size and captured it with the Canon 1DsMk2.
After processing and optimizing this image, I realized the possibility of making a much larger piece. I then visualized it as a vertical panorama, using the Saguaro as the central element, cropping the image around it, and keeping the jagged skyline as a second visual element and the smaller saguaros in the distance as a third element. I then started planning to return to this location to secure the image on 4×5 film.
_____________________________________________________________________________
2 – The relationship between print size and subject matter
Each painting has its own way of evolving…
When the painting is finished, the subject reveals itself.
William Baziotes
Unlike painters, who must choose the size of their canvas before they start to paint, photographers have the freedom to decide on the size of their prints after they are done shooting. For this reason, many photographers do not consider print size when they photograph.
The problem with this approach is that it opens the door to this situation:
If you don’t need to make a decision on print size today,
how do you know you will not put off making this decision until a month from now,
or a year, or even forever?
Indeed, why not? Fact is, many do. Unsure ad infinitum of what is the ideal size for any given image in their collection might be, many photographers decide that since the medium allows them to postpone making a decision they might as well do just that. Of course, this is a personal choice, and if this is your choice it is not in my intention to force you to change it.
However, think about it. Certainly, the painter’s approach is limiting. And agreed, they can only create a single size for any given painting not being able to fall back onto a transparency or raw file as the original (we are considering only original paintings here, not reproductions which obviously can be done in any size). But their approach also forces them to make tough decisions right away. And, as we saw with my story about making large paintings and small paintings, such decisions are directly related to the subject they are working with. Certain subjects call for big paintings and other subjects call for small paintings.
It is the same with photography. Certain subjects call for big prints and other subjects call for small prints. After all, and in regards to the landscape, both painters and photographers are working with the same subject and approaching it in the context of a two dimensional medium.
Certainly, most photographers print some of their work. However, many decide on print size for practical reasons rather than artistic reasons. Some print at the maximum print size of their printer. Others print only letter size. Many print most, if not all, of their work in the same size. This situation is very common, and if you feel that I described your approach, do not take it as a critique. Take it as an opportunity to learn a different approach, an opportunity to try something new that has a significant potential to improve the artistic content of your work. You may also have very good reasons to print your work in a single size and no desire to change. This is a situation that is not only understandable, but which has been taken by some of the finest photographers. Again, my goal here is to present alternate possibilities as well as reflect upon a specific aspect of landscape photography.
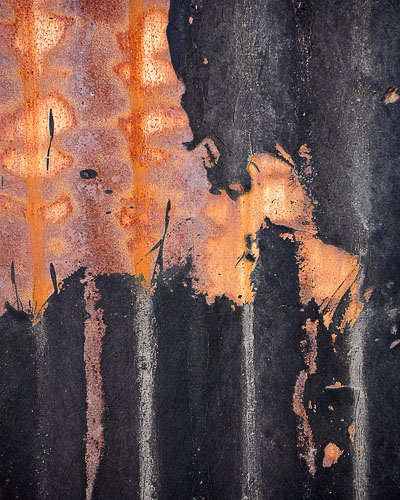 |
Barrio Abstract One
This photograph is a detail of a corrugated metal fence in the Tucson Barrio, a relatively small visual space when compared to my usual subject which is the grand landscape.
However, when I created this image I visualized the image printed quite large, beyond what I consider to be the maximum size for the 1DsMk2, which is about 16×20. I thought that the lower resolution of a large print, such as 20×30 or larger, would be minimized by the abstract nature of the subject and the lack of sharply defined details.
_____________________________________________________________________________
3 – Why print size, or painting size, matters
I simply like the monumentality of the subjects
– the opportunity for metaphor and the varied light that comes with high altitudes.
Robert Glenn
Print size, or painting size, matters enormously. This point is best exemplified through an example. The fascination that the Mona Lisa exerts upon us is in part, though not solely, due to its size. This portrait is very close to life size. In viewing the original we are not only taken by the expression of the Mona Lisa, we also find ourselves in front of someone who is our own size, or very close to it. It is like looking at a living person sitting in front of us.
The effect that the Mona Lisa has upon us would be lost if the portrait was twice life size, or half life size. Make the Mona Lisa much larger, or much smaller, and the troubling effect that this painting has on us is tremendously reduced. Small reproductions do not have the same effect as standing in front of the original or looking at a reproduction that is the same size as the original.
The same effect holds true with photographs. The choice of print size will influence the effect that your photographs have on your audience. The success that your work will encounter is in part due to the size you chose to print each specific image. Finding the right size for a specific print is an important element in terms of conveying your vision to your audience.
You can, for example, use artistic license by deciding to make very small prints of subjects that, in nature, are very large. Similarly, you can decide to print large subjects that are naturally very small.
Subjects printed much larger than nature take on a presence that they do not normally have because we are not used to seeing them at that size. The large size magnifies each detail, making us look at length at a subject to which we may previously have given only a passing glance. The large print size allows us to discover the aesthetic qualities of details too small to be seen with the naked eye.
Subjects printed much smaller than nature take on a precious appearance, because we can now hold in our hand, so to speak, something that is normally too large for us to hold. A miniature of a very large landscape allows us to visually grasp this entire landscape at once, while in nature we would have to turn our head right and left to see it all. Also, because small details are no longer visible, the miniature forces us to see the overall structure of the landscape, instead of getting lost in the study of individual details.
_____________________________________________________________________________
4 – A matter of lenses
The point can be made that photographers enlarge and reduce their subject through the selection of either a wide-angle lens, which can be said to reduce size, or a telephoto lens, which magnifies the subject being photographed. It can also be said, to follow this argument, that this approach reduces the need for variation in print sizes because photographers can change the subject size through the use of different lenses rather than through the use of different print sizes.
Good point. Yet, enlargement and reduction of the subject is also widely used by painters. Maybe not in the same way, but with the goal of creating a similar effect, which is to draw out attention to specific aspects of the scene being depicted. For example, Georgia O’Keeffe painted greatly enlarged flowers, or details of flowers, and in relatively large sizes. To me her paintings are a journey into the inner landscape of flowers, a discovery of the hidden beauty that looms in the heart of a flowering plant. This same approach can be used with macro photography, but unless the photograph is printed large –larger than the original, larger than the flower- the effect is greatly reduced, the journey, in this instance, becomes far less captivating.
_____________________________________________________________________________
5 – A matter of process
Everything is a subject; the subject is yourself.
It is within yourself that you must look and not around you…
The greatest happiness is to reveal it to others, to study oneself,
to paint oneself continually in one\’s work.
Eugene Delacroix
Don’t get me wrong. I am not saying here that when I started photography my approach to photographic print sizes was any different. In fact, when I started, I printed my photographs all in the same size. The first thing I did after buying an enlarger, enlarging easel and trays – each of a size that I could afford and that would fit in the limited space I had available for a darkroom – was buy a box of 11×14 paper (or so, as it was a metric size), and proceed to print all the photographs I wanted to print in that one size.
In a chemical darkroom there are good reasons to do so. First, the enlarger needs to be set and focused each time the photograph is enlarged or reduced in size. This means moving the enlarger head up or down, re-framing the photograph on the printing easel, and re-focusing the image with the grain focuser.
Second, the developer, fixer and washing trays are of a given size, and that size is chosen either because it is convenient to work with in the space available to you (such was the case for me) or because you plan to make prints of a specific size on a given day. There is no point mixing more chemicals than necessary, for example preparing 20×30 trays when all you want to print are 8×10’s. A tray one size above print size, for convenience and comfort of operation, is all you need. So, if in the middle of an 8×10 printing session, you decide you really want to do 20×30 prints (for example) you will have to prepare larger trays of chemicals. You may also have to project the enlarged image on the floor, or on the wall of your darkroom, since your enlarger may not be able to move up far enough to enlarge the image to this size.
Then there is the issue of washing a large print, which in some ways duplicates the problem of tray size, but with the added inconvenience that prints must stay in a washing bath much longer, and that water must be constantly moving over the print for an effective wash. And finally there is the issue of having a drying rack big enough to dry your prints. Storage space is also a concern, since large prints are fragile and can be easily damaged if handled improperly, but in this respect the issue is similar with digital prints and chemical prints.
All this to say that, in the chemical darkroom, in which I started printing my work, changing print sizes in the middle of a session can be difficult. For this reason, it is not commonly done as it is much easier to standardize a printing session on one paper size, or on a couple of paper sizes that are close to each other.
With digital it is an entirely different matter. Digital does not require you to use larger trays, mix new chemicals, raise the enlarger head, project a large image on the floor or on the wall, or have larger washing baths and drying racks when you decide to go from 8×10 to 20×30. All you need is a file with the appropriate resolution and a wide format printer. You can even print an 8×10 and a 20×30 side by side on roll paper on the Epson 7800 or 9800, something I do regularly. If you take the time, you can even tile your prints carefully so that no paper is lost. There are even programs, such as ImagePrint, that are designed to do just that automatically, by selecting the “Optimize paper use” option. If you have a smaller format printer, such as say the Epson 4800 or 2400, changing print sizes is as simple as changing paper size in the paper tray, or printing a small image in the middle of the maximum paper size your printer can accommodate, or again tiling a large and a small image on the same sheet of paper.
In other words, the move from chemical to digital photography has made it much easier to vary print sizes. The problem, in my estimate, is that many photographers continue to approach print size in the same manner it was approached with chemical photography. Doing so prevents us from using one of the most important opportunities offered by digital photography when it comes to printing, namely the ability to vary print sizes virtually at will.
_____________________________________________________________________________
6 – Displaying prints
Unless you sell your work, you can only display a few large prints in your home before you run out of wall space. The fact that photography was embraced by many amateurs, who either do not sell their work or do so only occasionally, means that small print sizes were perceived as more practical, less expensive, and easier to store and display.
However this does not negate my point about selecting print size on the basis of subject matter. If making 20×30 or larger prints is not convenient for practical reasons, such as cost, storage and display space as previously mentioned, consider varying print sizes in the sizes you are comfortable with. Granted, you will not get the impact of a 7-foot wide panorama in a 20-inch wide panorama (for example), but you will gain experience adjusting the print size to the subject of your photographs, which is the central point of this essay.
_____________________________________________________________________________
7 – It will influence how you photograph
Critic asks: “And what, sir, is the subject matter of that painting?”
“The subject matter, my dear good fellow, is the light.”
Claude Monet
The approach I just described definitely influences the way I photograph and print my work. If you try my approach, it will similarly influence your work. If you embrace this approach, it will change how you photograph and print your work. It will also change how your audience responds to your work.
It also influences which camera I use to create each image. If I plan to make a small print from a given subject, say 11×14, I really don’t need to photograph it with my Linhof 4×5. Instead, my Canon 1DsMk2 is perfectly appropriate since able to deliver an image that will be virtually indistinguishable from a 4×5 photograph at that print size.
Similarly, if I intend to make a big enlargement, say 40×50, it does not make sense to photograph the subject with the 1DsMk2 and later attempt to upres the image to the best of the software’s ability. I will have far better quality by photographing the subject directly with 4×5. For me it therefore makes sense to carry both camera formats and to choose which one I am going to work with based on the print size I intend to make for each given subject.
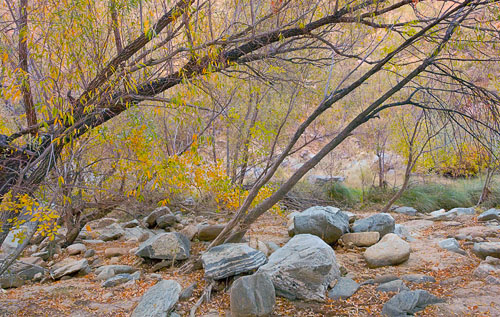 |
Sabino Trees
I saw this scene printed as a 16×20 or so, not huge but not miniature either.
What attracted me to this scene was the subtle quality
of the light and colors. The light was subtle and soft, yet imbued of a presence
that would be over exagerated in a large print and difficult to notice in a miniature.
_____________________________________________________________________________
8 – How you can use this approach in your own work
Having the proper resolution to make a print at a given size is a technical issue. Choosing the ideal size for a specific subject matter is an artistic decision.
Too often the choice of print size is made for technical reasons. A photograph that would be best printed large may get printed small because the resolution is not high enough to make a larger print, or because a large format printer is not available.
Similarly a photograph that should be printed small may get printed large because the resolution allows it, or because a large format printer is available.
The fact is that, if you follow my approach, the size of your final prints should not be decided on the basis of technical considerations, be it image resolution, printer availability, or other.
Instead, the size of your final print needs to be decided on the basis of subject matter and artistic intent. This decision should preferably be made in the field, before taking the photograph.
Asking yourself the following questions can be very useful when considering print size. To be most efficient, these questions need to be asked in the field, prior to taking the photograph:
– What do you want to express through this image?
– What are your artistic goals?
– Do you want to print this image the same size as the original subject, larger than the original or smaller than the original?
– Which camera format would be best suited to create this image?
– How do you want the audience to feel when they look at your print of this image? Certain subjects – a panoramic view of Monument Valley for example – cannot be printed at original size because no print will ever be big enough. However, we can create a print large enough that when standing in front of it we will feel as if we were standing in front of the original. So what matters here isn’t the relationship between the reproduction and the original subject. What matters is how the print will make the viewer feel.
_____________________________________________________________________________
9 – Conclusion
Print or painting size is one of the elements that define the personal style of a photographer. However, in my estimate the possibility for photographers to easily vary print size is under-utilized today, even though digital photography is making this easier than it ever was.
The tendency in photography, when it comes to prints, has been to minimize variations in print size. We have all been to shows where just about every photograph is the same size. This approach certainly works in terms of providing a consistent visual presence. And, if the photographer works with a subject that demands this size and none other, or if a consistent print size is part of this photographer’s personal style, this approach is definitely warranted.
But what I have often seen are photographers who embrace this approach out of convenience rather than out of personal choice. They find this approach convenient because it is widely accepted and because it simplifies organization and planning. It is, after all, much easier to mat and frame 30 photographs of the same size than 30 photographs of different sizes. In this respect, these photographers approach photography the way I approached small paintings: they embrace an approach for practical, rather than artistic, reasons.
There is also something to be said in favor of varying image sizes in an exhibition. It focuses attention on individual pieces rather than on the whole show. Visitors notice larger pieces from a distance, and by contrast smaller pieces, rather than rows of frames each the same size as all the others (if you use multiple print sizes and want to maintain visual consistency, using the same molding for all the frames is an excellent way to do so).
At this point you may or may not want to change your approach. But do consider this: is there any good reason why a detail from the landscape, say a leaf, should be printed the same size as a photograph of the whole landscape? Maybe there is, and maybe there isn’t. In my opinion it is worth spending some time reflecting upon this matter.
Alain Briot
_____________________________________________________________________________
Alain Briot offers fine art photographic prints, photography tutorials on CDs and photography workshops. You can read Alain’s detailed biography and discover his work, tutorials and workshops at http://www.beautiful-landscape.com
Alain welcomes your feedback on this essay: [email protected]
You can read many more of Alain\’s essays written for this site at Briot\’s View.


Elevate Your Vision


Read this story and all the best stories on The Luminous Landscape
The author has made this story available to Luminous Landscape members only. Upgrade to get instant access to this story and other benefits available only to members.
Why choose us?
Luminous-Landscape is a membership site. Our website contains over 5300 articles on almost every topic, camera, lens and printer you can imagine. Our membership model is simple, just $2 a month ($24.00 USD a year). This $24 gains you access to a wealth of information including all our past and future video tutorials on such topics as Lightroom, Capture One, Printing, file management and dozens of interviews and travel videos.
- New Articles every few days
- All original content found nowhere else on the web
- No Pop Up Google Sense ads – Our advertisers are photo related
- Download/stream video to any device
- NEW videos monthly
- Top well-known photographer contributors
- Posts from industry leaders
- Speciality Photography Workshops
- Mobile device scalable
- Exclusive video interviews
- Special vendor offers for members
- Hands On Product reviews
- FREE – User Forum. One of the most read user forums on the internet
- Access to our community Buy and Sell pages; for members only.
You may also like


