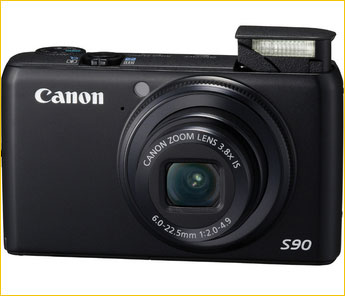

Pressing The Right Buttons
The just released Canon S90 presses all of the right buttons, (so to speak). It is currently the world’s smallest and lightest shirt-pocket-sized (SPS) camera that shoots raw. It has an almost 4X zoom (28–105mm equivalent) and has a remarkable f/2 as its widest aperture at the wide end of its range. There is, of course, optical image stabilization, a full 3″ LCD screen, as well as a built-in pop-up flash. As I first wrote, all the right buttons have been pressed, and this is more than a pun, as we’ll soon see.
The camera’s 10MP sensor is one of the largest found in an SPS sized camera, with a pixel density of 23 MP/cm². This half that of competing cameras, and it goes a long way toward improving image quality, especially anything above base ISO. To top it all off the camera’s normal top sensitivity setting goes up to ISO 3200. There’s also a special “Low Light” mode with sensitivity up to 12,500, if you can believe it. (But only in JPG, and with reduced resolution due to the use of pixel binning).
Where It Fits In
Regular readers know that I work with the best equipment that I can. I currently have three main camera systems; a Phase One 645 with P65 back, a Sony A900, and a Leica M9 system. Oh yes, I also have a Panasonic 4/3 system with a GH1 and GF1, mainly for use as second bodies for the Leica, but also for certain other types of shooting.
Each of these has a specific role for the different types of work that I do, including landscape, nature and wildlife, and documentary and street shooting. Most working pros that I know have even more gear than this, but I’m trying to keep things under control. (Joke).
I also always like to have a small pocket camera for those times that even something like a GF1 is too bulky. I’ve tried many of the cameras available, recently enjoying and using the Panasonic LX3 and Canon G10 in particular, though the latter and its newer version the G11, stretch the “pocket camera” moniker more than one would like.
There are of course literally dozens of cameras in the SPS (Shirt-Pocket-Size) category, with new ones seemingly appearing weekly. But, very few are able to shoot raw, which I regard as a must for anything beyond family snapshots. Whenever I try an SPS that only shoots JPG, such as the nice little Panasonic ZS3, I am at first pleased with the portability and ease of use, but when I capture something worthwhile and then want to work with the file, I get frustrated, and the search for a better solution continues.
Thus far the best SPS on the market, in my book, has been the Panasonic LX3, reviewed here exactly a year ago. Indeed I’m pretty sure that this is the camera that Canon’s engineers and marketing folks had in mind as their primary competition when they designed the S90.
Here’s how these compare.
Canon S90Panasonic LX3 Resolution 10MP CCD 1 0.1MP CCDA perture Range f/2–f/4.9 f/2–f/2.8 Focal Range 28–105mm equiv 24–60mm equiv Weight 195g 265g Pixel Density 23 MP/cm²24 MP/cm² Variable Aspect Ratios NO 4:3 – 3:2 – 16:9 Video Yes – SD Yes – HD
That’s enough for the vital stats, though the LX3 does have a leg up in some areas, such as a faster continuous shooting rate, variable aspect ratios, and having HD video vs. the Canon’s SD video capability.
The point here though is not to beg the differences, but to highlight the similarities. Both cameras are targeted at the serious amateur or pro who needs an always-along SPS camera with raw capability, decent image quality (at least at low ISOs), and a fast lens. (Yes, I know that the Ricoh GRIII has a lot of the same specs, but its lack of a zoom lens removes it from direct comparison here).
In Hand
I was interested in the S90 for all of the reasons above, but also because it uses the same sensor as the G11, reviewed here just a couple of weeks prior to this report first appearing. But being busy with various shoots, trips, review projects, and simply life in general, when Canon offered to loan me an S90 for review a month earlier, I declined, citing too many prior obligations.
But then I was in New York for PhotoPlus Expo in late October and ran into Eric Chan, one of the software developers at Adobe who works on Lightroom and Camera Raw. He had an S90 in his pocket that day, and seemed quite taken with it. After just a few minutes of checking it out, I realized that the S90 was definitely worth having a look at. The next day I walked past a camera shop near my hotel, they had one in stock, and out came my Visa card.
The image quality of the S90 was something of a known quantity prior to purchase, because with the same sensor as the G11, and the Digic 4 image processing engine onboard, I was fairly certain that IQ would be quite similar between the two. The lens was different, but then Canon’s lenses on their pocket cameras have always been pretty decent.
What I was very curious about was how the camera handled, because what I was struck with when quickly looking at Eric’s S90, was that the manual control interface seemed quite elegant for such a small device. Better than just about anything I’d seen before.

The Control Ring
A day or so of use convinced me that Canon is really on to something with the design of the S90’s control interface. This starts with a Control Ring that surrounds the lens. It falls to hand where a manual focusing ring might be found, and it can be programmed to provide a number of different functions, including Exposure Compensation, ISO setting, Focusing, White Balance, and Zooming. Changing these is accomplished by simply pressing the dedicated Ring Func button on top of the camera.
I found that its most interesting and rewarding use was as a focal length setting ring. Its click stops translate into settings of 28mm, 35mm, 50mm, 85mm and 105mm in full-frame 135mm terms. These focal lengths are then displayed on the rear LCD, and importantly, the camera returns to the last focal length set after being turned off.
This may not seem like a big deal to some folks, but if you’re an experienced 35mm film or full-frame DSLR shooter your brain is likely hard-wired with these focal lengths and what their field of coverage is like. Being able to dial them in directly goes a long way in terms of usability when using such a diminutive camera. Kudos to Canon for hitting this one out of the park.
I’ll add that one of my pet peeves with cameras having electric zoom controls is that they are almost always discontinuous, making exact framing difficult to achieve. This new Canon approach is more akin to have separate lenses than having a zoom, and for this reason pleases me. Hard to explain, but it’s very real once you’ve experienced it.
Of course the zoom lever continues to function even when the Control Ring is set to change focal lengths, and to the extent that its discrete steps allow you to, framing can be fine tuned.
Other Controls
There’s another customizable control on the camera’s rear panel and that’s the Shortcut (S) button. It can be programmed with a number of different settings including ISO, White Balance, Focus Lock, AE Lock and several others.
Finally, there’s the rest of Canon’s usual dial interface with the new pretty-much standard layout of a moving ring, four rocker positions and a central FUNC / Set button. This provides rapid and fairly straightforward access to almost any control that you might wish. The ring surrounding the controls is far too loose, and I find myself constantly adjusting exposure compensation when I don’t actually mean to.
In Program mode the ring becomes an Exposure Compensation control while in Aperture Priority and Shutter Priority modes it adjust each of these settings respectively.
I won’t drone on about the controls beyond this other than to say that after a couple of days of experimentation I ended up setting the Control Ring to Focal Length mode and the Shortcut button to ISO, and I find this works very well for me. Amazing how some thoughtful design can allow such a range of control with a minimum need to access menus – something that several other camera makers could learn from.
Image Quality
Image Quality from any digital camera is a mix of attributes; noise, resolution, dynamic range, colour rendering, and in the case of a fixed lens camera, optical aberrations.
Noise
To my mind noise is often the least important characteristic of a digital camera, except at high ISO, where of course less is more. Maybe it’s because I grew up and made my living as a photojournalist in the film days when grain was simply a fact of life at anything over ASA 100. Luminance noise simply doesn’t bother me, but chromance noise does (colour splotches).
In terms of noise the S90 is essentially the same as the G11, reviewed here recently. The camera shows some luminance noise even at ISO 80, just as all tiny sensor cameras do. This doesn’t become any sort of issue until one gets to ISO 400, where it’s still acceptable to my eye, but it starting to become noticeable at this speed in larger prints. By 800 luminance noise is simply too coarse for my taste.
Chroma noise isn’t visible at the lower speeds but starts to rear its ugly head at ISO 800 and by 1600 is a mess. 3200 isn’t even worth wasting ones time on.
I should point out that my testing, just as with the G11 was done with Lightroom 3 Beta. I was working with this since before it was publicly released, and the new raw processing engine and chroma noise reduction panel does an excellent job with G11 and S90 raws. One can argue that Canon’s DPP is better, but I won’t, because I simply have no patience for working with DPP in terms of usability.
The bottom line on noise is that ISO 80 and 100 are as clean as any tiny sensor camera yet, but should not be compared in this regard to a DSLR. Noise is still visible, even at ISO 80 and 100, though only on-screen at 100%, not in prints. ISO 200 is usable for even the critical user, though luminance noise is visible even in medium sized prints. ISO 400 is the cut-off point. Some people will find it acceptable. Some won’t.
Purple Fringing
Unfortunately like most small sensor cameras the S90 suffers from purple fringing. I can live with it, and it’s not that difficult to ameliorate in post processing, but it’s there.
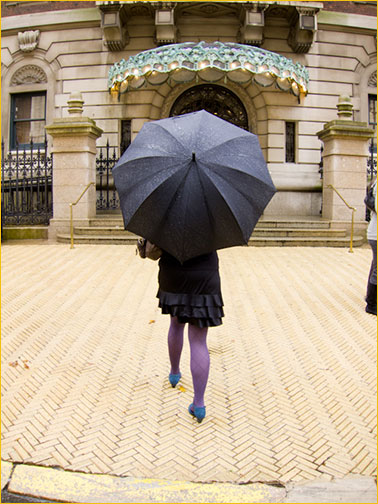
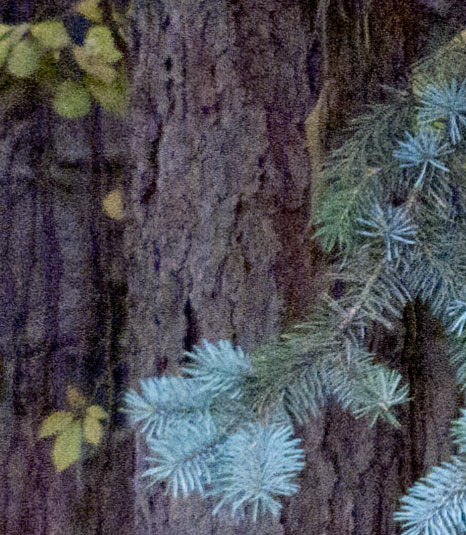
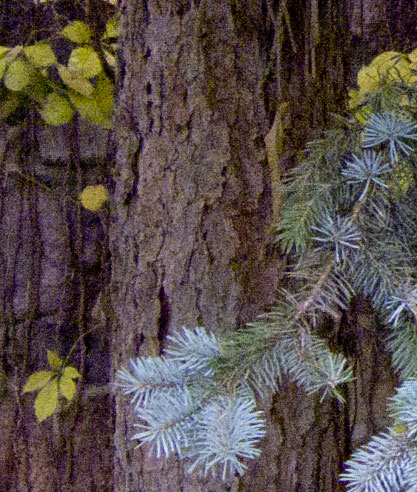
Above is a full frame view of a shot taken with the lens slightly stopped down and at its widest. Ignore the barrel distortion for the moment – we’ll be looking at that shortly.
Below is a 100% crop showing the fringing.
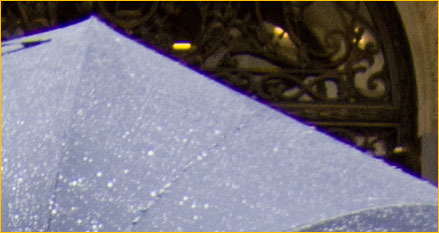
Incidentally, I liked the shot, notwithstanding its technical problems, and so all was not lost. After correcting the barrel distortion and most of the fringing in Photoshop I produced an interpretation that I enjoy. Looks just fine in a 13X19″ print, about the maximum that a 10MP file from this camera can comfortably produce, and more than adequate for most people and applications.
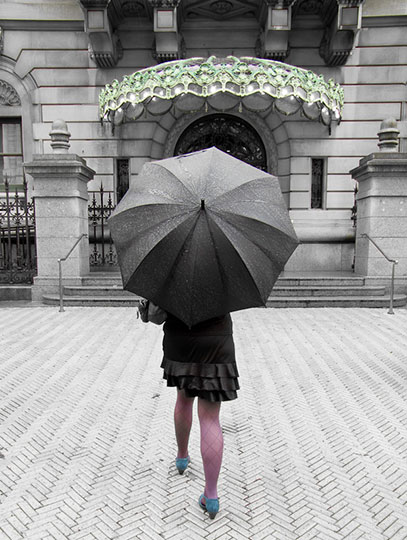
Barrel Distortion
Barrel distortion with the S90, as with almost all small sensor / small lens cameras, is really bad. Interestingly, one doesn’t see it on the rear LCD, either when framing the shot in live-view, or when reviewing it on the rear LCD after exposure. The reason for this is that Canon corrects the distortion dynamically while previewing, and applies this correction to the JPG file when it’s written to the card. It also records this correction information into the “Maker Notes” in the raw file, so when you process the raw file in DPP it is taken care of automatically.
But, if you process your raws in another converter than DPP there is no barrel distortion correction applied, and you’re over a barrel, so to speak.
Below is an example showing the in-camera JPG and also the raw file as processed in Lightroom 3 Beta without any correction. Interestingly, even the in-camera JPG isn’t fully corrected. Be aware though that most manufacturers play this game with their small fixed-lens cameras, it’s just that at this point LR3 Beta, nor any software other than the latest DPP, can not similarly apply auto-correction.

Note that the above shot was taken at a focal length of 7.5mm; not the widest setting on this 6mm lens. Below is one taken at 6mm, raw processed in LR3 Beta, and also an example corrected in Photoshop afterward.
At this time if you want to shoot raw, only Canon’s DPP can automatically remove barrel distortion on the S90. If you want to use another raw processor one can adjust the image afterward manually in Photoshop (Image / Filter / Distort / Lens Correction). It won’t be too long though until other raw processing programs are updated to be able to handle this, because more and more camera makers are saving money, materials, and space by doing their optical corrections in software rather than in the original optical design. Whether this is a “good thing” or not is a matter for some debate, but we’ll hold that off till another time.
Compared to the Panasonic LX3
The Panasonic LX3 has been a huge success for that company. Available has lagged behind demand for most of the past year. No wonder Canon decided to try and challenge it with the S90.
Earlier in this report we provided a small table showing some of the difference between the two cameras. One can also go on certain camera review sites and do spec and feature comparisons. From a handling point of view though, I would recommend an old-fashioned visit to a dealer that has both in stock. There’s nothing like even a brief hands-on to tell you what’s going to work for you and what isn’t. Specs only tell part of the story.
I was curious though how these two cameras, with very similarly specified sensors would compare.
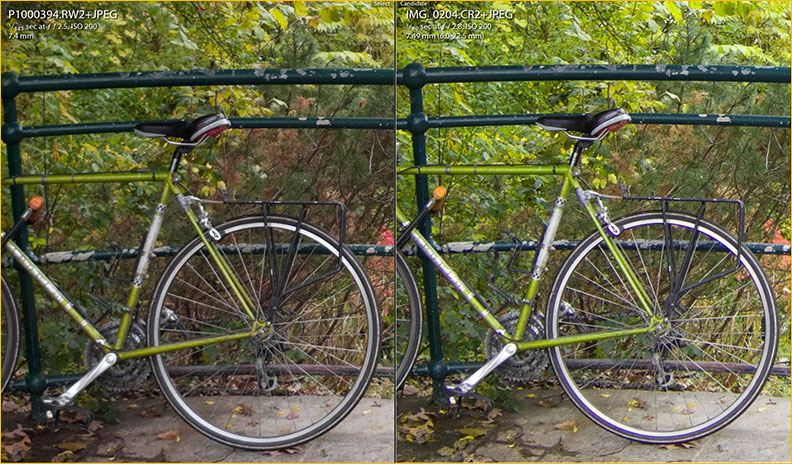
I won’t bore you or myself with endless 100% pixel-peeping comparisons. Above, for example, is the LX3 (left) and the S90 (right) at 100% onscreen. There is some noise visible at ISO 200, but it’s comparable between the two. Ditto at lower ISOs, just a bit less so.
As is usually the case, it’s at the extremes that one can tell the differences between closely matched products. Above is a 100% crop from shots made with both cameras at ISO 1600. The Canon definitely seems to have a bit less luminance noise (no sharpening has been applied to either). Interestingly, the Canon also definitely appears to offer better resolution and acuity, at least at this speed, and likely due to the camera’s relative in-camera noise reduction.
The Bottom Line
With the S90 and its stable mate the G11 Canon has shown that it is paying attention to the needs of photographers who require pocketable cameras with raw capability. Indeed the S90, because of its diminutive size and decent controls, may just be the current market leader in this category. But, with the emergence of a new generation of large sensor / small sized cameras such as the Leica X1, Panasonic GF1, and Olympus EP-1 / EP-2 the industry is now turning in a new direction, and Canon hasn’t yet shown an inclination to play in this new arena.
For now though, if you want the world’s smallest and lightest shirt-pocket-sized (SPS) camera that shoots raw and comes in at under $500, the Canon Powershot S90 is the one to get.
UPDATE
Within hours of this review first appearing a number of the Canon faithful decided that I was out of line doing my raw processing in Lightroom Beta 3. They wrote that Canon’s DPP was far superior, especially in terms of noise and sharpness.

100% crop with all default noise reduction and sharpening turned off in both Canon’s DPP (top overlay) and Adobe’s Lightroom 3 Beta (bottom image and settings panel). Image shot at ISO 400 with the Canon S90.
Sorry – such is not the case. What is the case is that DPP’s default setting is to apply a fair amount of Luminance noise reduction, while LR3B has none at this time. In fact, Luminance noise reduction doesn’t even work yet in this release of LR3B, only Chromanance, because that’s what Adobe is interested in having tested by users.
Turning off all noise reduction and sharpening in DPP, and also the default Chroma noise reduction and sharpening in LR3B, produced what you see above. (No attempt was made to equalize levels or white balance for this comparison.)
The reality is that while there were things to be concerned about in processing some camera’s raw files in LR 2x, LR3B is a whole new animal, and whereas I wouldn’t have been at all surprised if Canon’s DPP, their own software, didn’t do a really good job, once the playing field is leveled both do quite comparably. Any differences seen in this instance are simply a matter of default settings and user preference in processing.
My recommendation to some readers therefore is that before jumping to conclusions, or basing a judgment on web chatter, one do some work and experiments oneself to see what really is going on.
November, 2009


Elevate Your Vision


Read this story and all the best stories on The Luminous Landscape
The author has made this story available to Luminous Landscape members only. Upgrade to get instant access to this story and other benefits available only to members.
Why choose us?
Luminous-Landscape is a membership site. Our website contains over 5300 articles on almost every topic, camera, lens and printer you can imagine. Our membership model is simple, just $2 a month ($24.00 USD a year). This $24 gains you access to a wealth of information including all our past and future video tutorials on such topics as Lightroom, Capture One, Printing, file management and dozens of interviews and travel videos.
- New Articles every few days
- All original content found nowhere else on the web
- No Pop Up Google Sense ads – Our advertisers are photo related
- Download/stream video to any device
- NEW videos monthly
- Top well-known photographer contributors
- Posts from industry leaders
- Speciality Photography Workshops
- Mobile device scalable
- Exclusive video interviews
- Special vendor offers for members
- Hands On Product reviews
- FREE – User Forum. One of the most read user forums on the internet
- Access to our community Buy and Sell pages; for members only.
You may also like