


One of the most frequent requests I get from readers is —can you please explain from start to finish the steps taken in creating a print. What they mean by this is not just what to do first in Photoshop, but the entire creative journey, including the tools used.
With this article I will attempt to do so, but please be aware of two things. Firstly, it’s just one man’s approach. There are a multitude of ways of accomplishing the same or similar tasks, and every photographer will do things somewhat differently. Secondly, what is described below applies tothis specific image. Every photograph is, of course, different. Another image may require different approaches and tools, though what’s shown below is typical of how I work with a non-problem image.
The Finished Image
Immediately below is the finished image that will be discussed, and the steps that were necessary to achieve it. You can see a larger version by clicking on it.
This was not in any way a challenging image to process, and is simply a pleasant rural scene, but it will serve to illustrate the steps that I use, from shooting to printing.
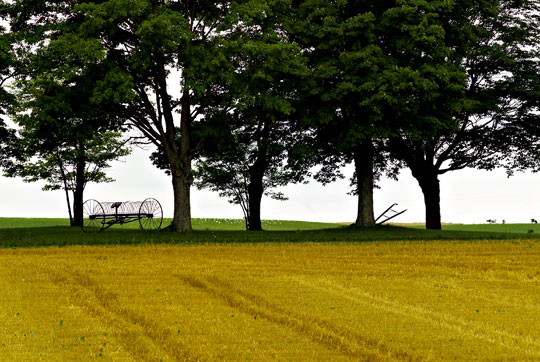
Hay Rake. Holland Marsh, Ontario — August, 2003
Contax 645 with 210mm f/4 Sonnar + Zeiss 1.4X Mutar
with 16 Megapixel Kodak DCS Pro 645 digital back. ISO 100
The Shot
I was out testing the use of the210mm f/4 Sonnartogether with the1.4X Mutarextender on myContax 645. I was driving in a farm area north of Toronto near what’s calledThe Holland Marsh. It was the kind of day thatKodakused to describe as "cloudy bright". What appealed to me here was the contrast between the foreground field with furrows, and row of trees, and antique farm implements. I was limited by a fence as to how close I could get so the use of an effective focal length of nearly 300mm was a necessity to try and get close enough to the core subject matter.
Exposure was "as metered" at 1/60 sec @ f/11, ISO 100, tripod mounted with mirror lock up. This produced aneasyexposure, well within the dynamic range, and requiring little effort to print well.
As described inExpose Rightit is best to expose digitally as much toward the right side of the histogram as possible without blowing out the highlights. In other words, overexposure is preferable to underexposure in terms of maximizing dynamic range and minimizing digital noise, butonlyif you don’t blow the highlights.
RAW Conversion
The first step in processing any digital image is RAW conversion. I shoot in RAW mode 99% of the time. The advantage is that you end up with the equivalent of a digital negative. In other words, it’s what the chip saw, with no processing applied within the camera. It also means that I don’t have to think aboutWhite Balance. I always shoot withAuto White Balanceset, and simply adjust to taste in the RAW converter.
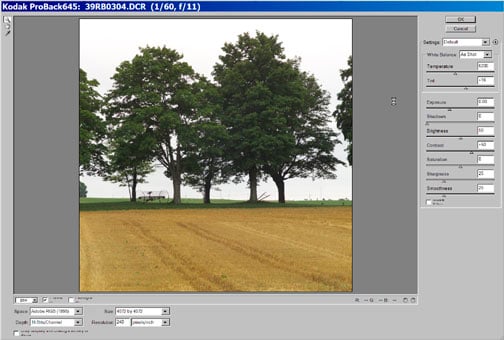
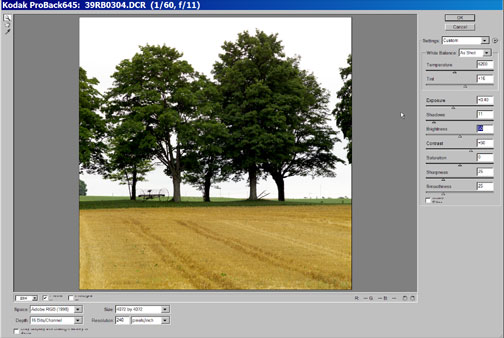
Fig. 1
For this image, shot with theKodak DCS Pro BackI usedCamera RAW, theAdobeplug-in converter forPhotoshop 7. Most camera’s RAW files can be processed by either manufacturer provided software, or one from third parties.
InFigure 1above, on the left you see the image as it first came intoCamera RAW, and to the right after a few basic adjustments. I leftWhite Balanceas it was, about 6200 K, and used theExposure,ShadowandBrightnesssliders to visually adjust the image to one that’s more pleasing. (By holding down the ALT key inCamera RAWyou can easily find the best black point and white point, but even then I simplyseason to taste).
This is a good time to point out that for visual adjustments to work, or to make any sense with regard to how a final print will look, your monitormustbeprofiled and calibrated.

Fig. 2
Other important settings are colour space, resolution and bit depth. I leave the file at its native resolution and work inAdobe RGB. I export to Photoshop in 16 bit mode since this allows for superior flexibility and ultimate image quality, particularly if its necessary to make coarse adjustments to the image in Photoshop.
In Photoshop
The first thing to consider when the image comes into Photoshop is whether or not it has noise problems. If it does then I will applyNeatimageat this point, and since this program is now available as a Photoshop plug-in it fits very nicely into the workflow.
If settings have been done properly in the RAW converter little in the way of basicLevelsandCurveswork will be necessary inPhotoshop, except for problem images. I try and do these now while the image is still in 16 bit mode.
The next thing that I want to do is a basic cropping. Some people may find this odd, but there are two reasons for this. The first is both esthetic and practical. I want to see if there reallyisan image there worth working on. If I can’t find a cropping that "works" this is a better time to abandon the file than hours later after much wasted time. Secondly, by cropping at this stage areas of the image that might alter my technical judgment of the file (such as the bland sky in this frame) are reduced to their appropriate level of importance.
Fig. 3
Obviously the cropping decision is an aesthetic judgment, and will vary from individual to individual and from image to image. The one thing that I keep in mind when I’m deciding on cropping is —does this part of the image contribute, or would the final photograph be better without it? As for aspect ratio, I crop my photographs to anything from square to wide-aspect ratio. It simply depends on what the subject matter wants.
At this point what I see on the screen is starting to look like the final image. But, chances are brightness and contrast can be fine tuned using eitherLevelsorCurves. This is the point that I usually switch to 8 bit mode so that I can do these onAdjustment Layers. This allows for more subtle changes, as well as changes of mind down the road. Upcoming versions ofPhotoshopwill likely allow forAdjustment Layersin 16 bit mode, and so when this capability becomes available I’ll probably stay in 16 bit mode right through till print time.
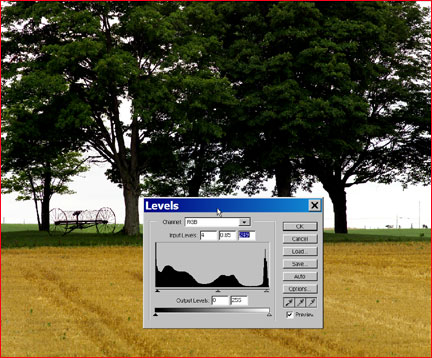
Fig. 4
The next thing to consider is the image’s colour. If there are any aspects that need attention there are a variety of tools available (seeAn Image Processing Workflow). I might have usedSelective ColororSelect / Color Rangeto enhance or subdue a particular part of the palette.
In this particular case I felt that the foreground field stubble had interesting texture but was a bit drab. If the sun had been out the field likely would have shown a richer hue, especially using a polarizer, so I decided to assist nature a bit. I used theColor Mechanicplug-in to add a bit of extra tonal richness to the foreground.
Fig. 5
This is not dissimilar to what one could do with a warming filter on-camera, but in this case only the field is affected rather than the trees as well, which obviously shouldn’t be changed.
Fig. 6
Figure 8shows the small shift in hue that was made withinColor Mechanic.
If needed, and in this case it does help, I next applyLocal Contrast Enhancement. This brings out some of the mid-tone contrast that adds "life" to so many otherwise flat images.
The final step will be sharpening, but before this I go to 100% magnification and look for dust spots. If there I’ll use theClone Tooland theHealing Brushto remove them. In the case of this particular image I saw that there was some extraneous "junk" in the upper right hand corner, and a bit of judicious cloning removed it. While too small to be seen in an on-screen image, in a 13X19" print these bits of fence post and wires are messy and so I removed them. Since I would have done so if I could have walked over to the spot, or by changing viewpoint, I feel no compunction about this bit of image alteration.
Sharpening is the final step. I like to do this on a separate layer so that I can change the amount of sharpening at a future date, depending on how the image will be tasked. What I do is reduce to 8 bit mode (if not already there) and then create a duplicate layer. I name this layerSharpening Layer. I use a variety of sharpening tools and techniques. A quick search of this site will turn up a number of worthwhile techniques and products to help you with this important step of image preparation.
That’s about it. I save the file, make a print, and move on to the next one. How long does this routine take? Anywhere from 10 minutes to 10 hours, depending on the image. In this particular case it was more like 10 minutes.
Hay Rake. Holland Marsh, Ontario — August, 2003
Contax 645 with 210mm f/4 Sonnar + Zeiss 1.4X Mutar
with 16 Megapixel Kodak DCS Pro 645 digital back. ISO 100
Other Resources
Three other articles on this site that you may find of interest areInstant Photoshop,Understanding DSLR WorkflowandAn Image Processing Workflow.
August, 2003


Elevate Your Vision


Read this story and all the best stories on The Luminous Landscape
The author has made this story available to Luminous Landscape members only. Upgrade to get instant access to this story and other benefits available only to members.
Why choose us?
Luminous-Landscape is a membership site. Our website contains over 5300 articles on almost every topic, camera, lens and printer you can imagine. Our membership model is simple, just $2 a month ($24.00 USD a year). This $24 gains you access to a wealth of information including all our past and future video tutorials on such topics as Lightroom, Capture One, Printing, file management and dozens of interviews and travel videos.
- New Articles every few days
- All original content found nowhere else on the web
- No Pop Up Google Sense ads – Our advertisers are photo related
- Download/stream video to any device
- NEW videos monthly
- Top well-known photographer contributors
- Posts from industry leaders
- Speciality Photography Workshops
- Mobile device scalable
- Exclusive video interviews
- Special vendor offers for members
- Hands On Product reviews
- FREE – User Forum. One of the most read user forums on the internet
- Access to our community Buy and Sell pages; for members only.
You may also like


